bon appétit
https://www.youtube.com/watch?v=9-8zcBogaKY
Printable View
bon appétit
https://www.youtube.com/watch?v=9-8zcBogaKY
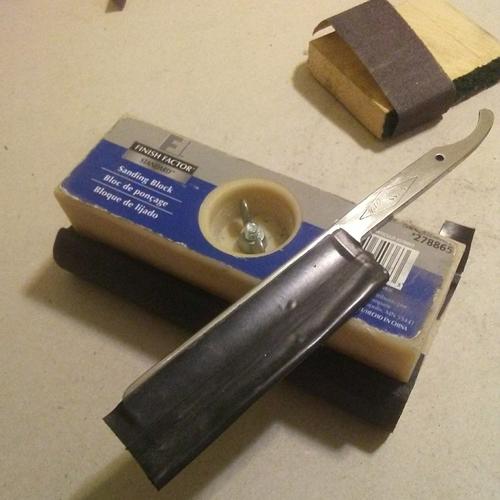
Got a chance to work on that blade last night. Taped up the blade, and did some sanding. Hit the spine and tang, paying attention to keeping crisp lines on the edges of tang, and crisp stamp letters. So I didn't use a soft surface to back the sandpaper. Soft backer = softer lines. Harder backer = crisper lines. There's a trade off though, as with a backer it makes a better connection.
Gonna work my way up the grit tonight, and finish the blade face too. My tools and space are limited, so this is an opportunity to undertake a totally awesome rebuild with the simplest tools.. No power tools. Should be fun!
Attachment 300454
While I'm on a Duck Adventure, here's one my buddy gave me for removing a branch from and patching his roof.
A SatinWedge. It's in bad shape because of the scales breaking down, but it has no hone wear on the spine and it's a wedge.. Also it has the inlays. So many I see online don't have the inlays.
I'll clean it up and see how the blade looks. Since I still have that jar of acetone and my inlay removal tools and skills fresh, I'll take those off no problem.
And will need to think about scale material.
Follow the same theme as the Reaper with bog oak? Something else?
Attachment 300457
10pups and chevhead did some pretty cool stuff with translucent acrylic. So with those already having been done, I would tend to look through the juma or kirinite to see if there was anything there that would work, also there is some cool acrylester stuff too. It is cool to get something unique in the finished product.
Thanks for the suggestion Rez. I'll look online at some of those. Don't want a design that's too busy, as I like to keep the focus on the inlays.
Definitely torn on the material choice, because these come with clear.. makes me lean toward clear.. but I'm not into plastics. So...?
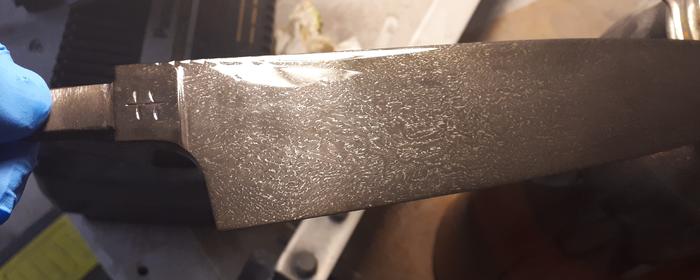
Cleaned the blade to see what I'm looking at before going too far.
The dark on the blade are superficial spots. But what my camera well not pick up are the tiny specks of devil spit across the blade face.
The tang and stamps are great though! A little hone wear on spine but no rust, and the inlays are perfect.
So I think it's good. I can deal with tiny pits in the end, can't be too crazy picky right?
Attachment 300458
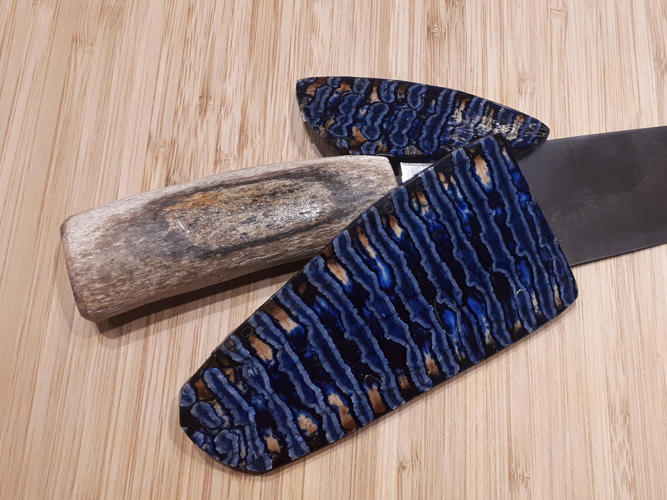
A wootz chef, fresh out of the etch, with mammoth rib handle and stabilized mammoth molar bolster.
Attachment 300460
Attachment 300461
Try to hone it first to see if you can get to good steel reasonably.Quote:
Originally Posted by MikeT
I don't have a 1k stone. I've got sand paper though, does that work for such a test?Quote:
Originally Posted by 32t
Quote:
Originally Posted by MikeT
I’d rather use a 4/8 norton slowly than sandpaper on a duck personally mike.
But it “could” work if wet paper, of known good quality and a truly flat backer is all you have currently.
Certainly not a finished hone job but a rough one to see what you got.Quote:
Originally Posted by MikeT
This is a project that I am playing with to practice removing inlays. Look at the edge of this cell rot nightmare. The blade would be half width even before thinking about getting to good steel.
Just be sure that you have good steel to work with before wasting a whole bunch of time.
Attachment 300467
I don't have a project for these inlays so if you mess one of yours up by chance let me know.
Tim
Thanks for the offer Tim! Much appreciated.
I'll be very careful, because I'll keep an eye open for a blade for that Satinedge.. You may want to build one...?
Since my buddy gave me this new one, I'm thinking about seeking out Ducks with broken scales and make a set. It will take a long time BUT I've got a good start!
Thanks MikeB52, I'll see if I have the wet sandpaper.
Any suggestion on the grit progression?
A little update on the Reaper.
Had some pitting on the tang. Just been sneaking in time on this one. Sorry just little tidbits of progress.
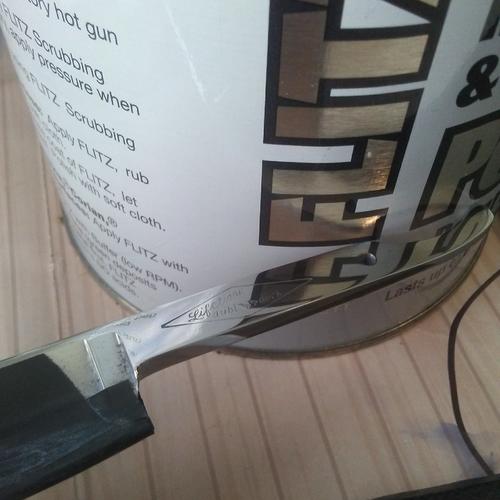
Limited on grits. 400 dry, 400 w/Flitz, 800dry, 800 w/Flitz, 1000dry, 1000 w/F, 1200dry, 1200 w/F, 1500dry, 1500 w/F, 2000 dry, 2000 w/F. Then an old shirt with Flitz.
That's the highest grit I have. Camera sucks, it looks better in person.
Next for the blade face.
Attachment 300504
Edit: To get a higher grit out of the 2k, I used the same piece until it was totally worn out. At that point it is like a higher grit from the wear, and loaded with Flitz and metal build up, and gets the surface nice and smooth!
Yup. Slurry sanding polishes more than cuts. Looking good.Quote:
Originally Posted by MikeT
It was beautiful out, so did some scale work for the Berg razor
The material I am working with is a faux tortoise shell acrylic sheet. Unfortunately, I found out pretty late it the process that the dark colors do not penetrate very far. Kinda disappointed with the look of it now, as it is basically tan unless held up to the light.
Attachment 300515
Attachment 300516
Attachment 300517
Attachment 300518
Attachment 300519
I also started some black acrylic scales, but they broke at the pivot when I was at 80 grit removing dremel gouges. Pretty strange as the material is pretty dang tough and wasn't using that much pressure
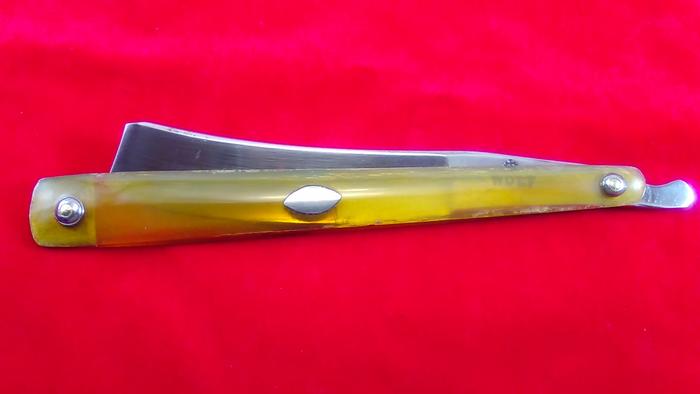
Awhile back, I started on a "Wolf" razor, that I got from MikeT.
Attachment 300520
I repaired as much posible, of the delamination and bug chewing, with Epoxy and CA. Sanded to 800 grt. and gave them a good week in neatsfoot oil. Then polished out by hand, once removed.
The blade had a lot of hone wear, with scratches nearly covering both blade face's, making it all but a true wedge.
Attachment 300521
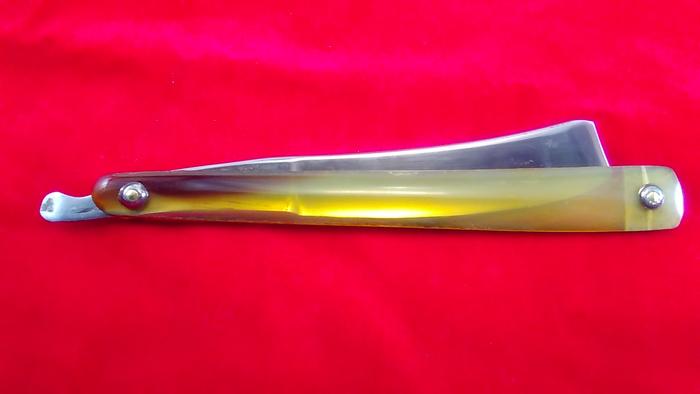
So I started sanding with 400 grt. W&D with oil, progressing to 800. Then spent Bookoo hours sanding/ rubbing with a single piece of 800 crocus paper with oil, till that sumbitch was wore out. Then hand rubbed it with Iron Oxide/ Red Rouge, on a rag. Not one time, did this get touched by a polishing wheel, tis all done by hand.
Pinned with brass pins, original steel washers, and wedge.
Attachment 300522
Attachment 300523
Attachment 300524
Attachment 300525
And after honing
Attachment 300526
How many layers of tape to hone that old girl MGM
Love it Mike!! Your hand finishes are amazing.
You can just imagine picking up that brand new razor for cents after taking your horse and buggy for errands.
I know it doesn't affect the shave, but a cool name like WOLF never hurt anything. :D
Did I mention I love it?
Mike, that's probably the best restoration done totally by hand that I've ever seen.
You set the bar high with this one.
Pete <:-}
Three layers..!! :rofl2:Quote:
Originally Posted by RezDog
My hands are paying for it...but its worth it, after they calm down. I've been at it all day to get it finished for tomorrow's SOTD.Quote:
Originally Posted by petercp4e
Honing and stopping it, was real fun after finishing up with the crocus and rouge, earlier today.
But its ready..!!! :rock:
That is a great finish on a beautiful razor, and that bevel is super fine.Quote:
Originally Posted by outback
I really enjoy the shave I get from razors of this era.Quote:
Originally Posted by RezDog
Always silky smooth, close shaves. Something about the steel, IMO.
Super job on that wolf Mike! Great swept curve to it, and you really did keep a tight bevel.
Sweet job..
Mike that Wolf looks crazy! Awesome work.
Maybe my favorite old blade shape, what a great curve.
I agree with Joshua, what a name right?!
Tomorrow that Woof will be hunting down wild hare in Ohio.
:overkill:
I agree. I don’t know if it is the crucible steel, the thin perfect balance or if it’s all in my mind but they shave like none other.Quote:
Originally Posted by outback
I wonder if it had anything to do with the fuels used in the forge, and heat treating methods. It seems softer, in comparison to modern steels, but still retains its edge just the same. Love um.:bowQuote:
Originally Posted by Steel
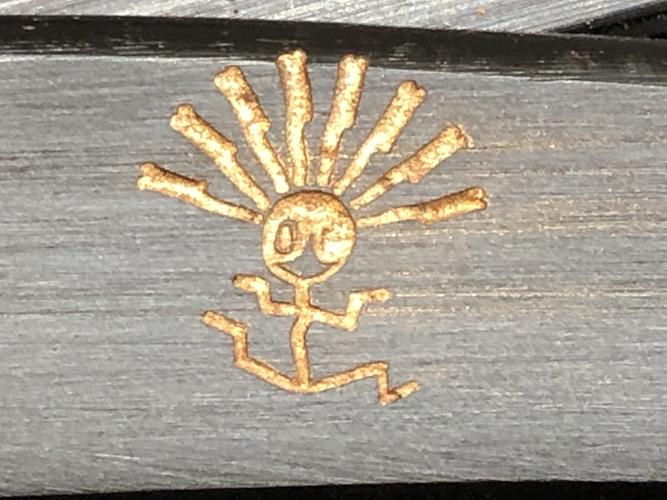
Weekend yeah! so I was able to get back to this logo project.
Still wasnt happy with the definition since, as when an image gets smaller it gets harder to keep sharply defined so I had to experiment with pixel size of image, as well as angle of V bit and depth of plunge required for various bits.
Within my design software I can run simulations, which do help a bit, but nothing beats real-time trials.
Attachment 300539
So Im using up some busted part scales also made of horn to try to eliminate as many variables as I can before committing to the actual razor.
Attachment 300540
Ya know, I find it scarier working on other peoples stuff than my own. More care free with my leap in and try philosophy when its one of my own herd.
But for someone else, make an extra jig, shim up the back stops, support the wedge, and the space between the scales, try to eliminate every conceivable failure point before you start. etc.
Attachment 300541
Must admit though, its an awesome opportunity to really get back into some of the gadgets I havent really touched in some time.
Shop time= peaceful time.
:tu
Ya know, I find it scarier working on other people’s stuff than my own. More care free with my leap in and try philosophy when it’s one of my own herd.
My problem is then it becomes work.:shrug:
Nice work, Mike! :tu
That's the goofiest logo I have ever seen! :roflmao
Is the problem with you or the logo?
Maybe the logo should loose the eyes.
That seems to be the big issue.:shrug:
The ying yang thing seems difficult.
Still....looks great to my eye! :beer1:
The ying yang is certainly the challenge by the looks of it. I have no idea how the imaging translates and can offer zero support. I am however absolutely certain you will figure it out.
Looking good, Mike. I know what ya mean about others equipment. Always looking ahead, like a soldier with the 1000 yard stare.
I would love to get Charlie's logo made into a small pendant / keychain thingamajig since each of the symbolic elements he used mesh well with my unconventional nature. Love the yin-yang, the spazola-factor, and his use of 8 blades. A lucky number if you ask me. And really appreciate the simplistic nature of his logo overall.Quote:
Originally Posted by sharptonn
Crazy 8s!
:rock:
The Wolf looks like a brand new razor Mike. Nice job on that on. And the logo is coming along. Its beyond my understanding on how its done. At one time i looked into on of these lazor cutting machines. Until i seen the price. Id habe to sell a lot of work for years before it would pay for itself. So that dea got squizhed quickly.
Still a very nice detailed job.
Truly is the hardest part. Losing side wall of eye trying to get depth.Quote:
Originally Posted by sharptonn
This whole image is really tiny now, maybe 7 mm total, so its fussy. The eye is maybe 1/16th in total.
:aargh:
Making some pendants or fobs,, thats a neat idea.. might cut some of these up and send them along so Charlie can use or toss..his call, hehe.
At 1 or greater finished image, the challenges I am having now, I would not have.
Cheers men.
:beer1:
If you have honed them with 3 layers of tape, do you strop any differently? Or use only hanging strops since they have more give to them?Quote:
Originally Posted by outback
Charlie's logo is killer.
I've even thought about it as a tattoo.
It will be very interesting to see what you do with this.
I'll get in the line for anything that is produced.
Pete <:-}
In my case, Hanging strops accomodate a triple taped razor no problem in the shave den.(without tape)Quote:
Originally Posted by JP5
Board strops, on the other hand, I personally only use during the honing sessions so the spine is still taped up.
:beer1:
Could you use the laser engraver to cut bolsters? That could be cool, maybe some real thin nickel silver sheet or brass then CA it to the scales and finish over the top?Quote:
Originally Posted by MikeB52