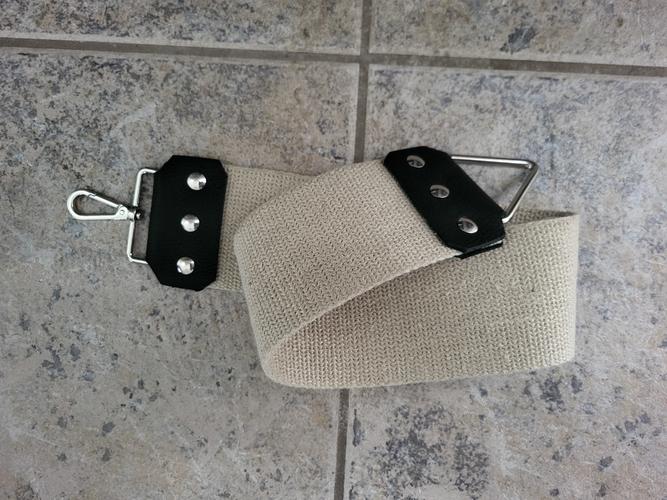
Strops, this one is hemp fiber.
Attachment 352613
Attachment 352614
Attachment 352615
Printable View
Strops, this one is hemp fiber.
Attachment 352613
Attachment 352614
Attachment 352615
It makes for a nice stropping surface, I really like mine.
Where did you get that hemp fiber?Quote:
Originally Posted by PaulFLUS
First 2 finished pieces.
Attachment 352755
Attachment 352756
Attachment 352757
Attachment 352758
Those look very nice. You must be pleased with how they turned out.
Add a little texture to the bottom and you’ve got a nice lathering bowl.
https://sharprazorpalace.com/shave-d...ml#post1982381Quote:
Originally Posted by DZEC
Outstanding Paul!
Color me impressed. And while you're at it, color me a bowl, I would buy !
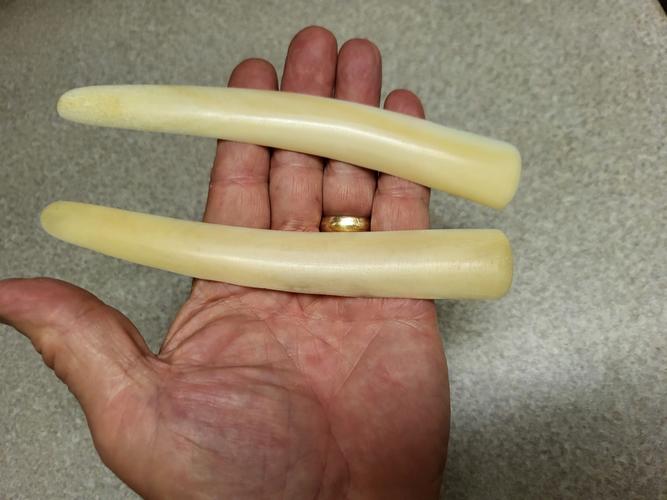
Got the other scale made from the cow femur dog bone.
Attachment 352798
I still have some polishing to do but they are both shaped and thinned.
Next is hammering out and shaping a tire weight for the wedge.
They look great Paul!
Thanks. I kinda had to make them for this blade because it is a size bigger and none of the blanks I could find were long enough and wide enough.
It’s Hard to find longer blanks.
Those scales are jumbola! I can't wait to see finished razor!Quote:
Originally Posted by PaulFLUS
Started to pin up the razor I made the bone scales for and then....[Sad trombones]
Attachment 352828
Oh well, the one I made to replace it with is better anyway.
I really hate when that happens! Well, all is not lost. That can be replaced. It's just a setback for time purposes.Quote:
Originally Posted by PaulFLUS
Yeah, and since this one is oversized I can probably cut that one down and use it for something else.
Did ya soak um in mineral oil before pinning.
What a drag, sorry man. That sucks!Quote:
Originally Posted by PaulFLUS
If you get a piece of flat rubber like bicycle inner tube & punch a small hole in it you can place it over the pin you're peining. Saves on errant hits but won't fix ham fists ;)
Well this one was even dumber. The pin bent and I was trying to realign the scales slightly shifting one side of the pin. I have done it many times with horn, wood and synthetic scales but I should have known better with bone. Should have just unpinned and replaced the pin to begin with. I wound up sleeving it the second time.
That's what it all about Paul! We know what we should do, but we think "nah I can fix that and all of a sudden......And that's the rest of the story!
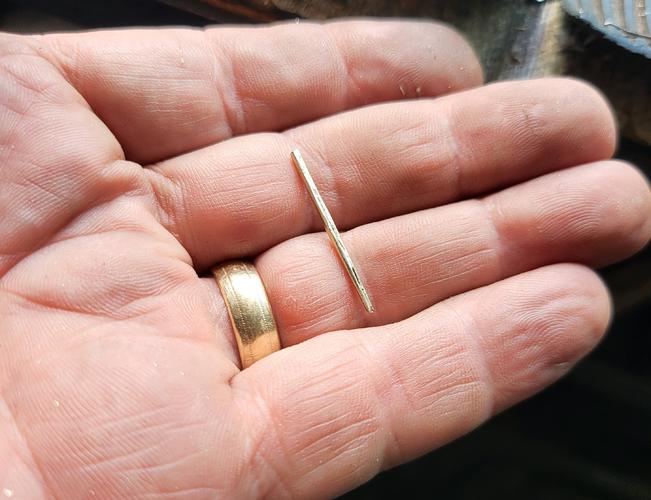
Pinning up a razor today that I've been working on off and on for a while. I got collars picked out, decided to go with nickel silver pins, got the wedge end pinned up only to realize that the one remaining peice of n/s pin I had was just barely too short. CRAP! Now I'm bummed because I stoked to get it back together and am stalled half way through pinning. I did have plenty of brass pin but that would look stupid to have one pinned with brass and the other n/s. I guess I have to order more pin stock but that really stinks that I have to wait. Then the wheels start turning and I said to myself, "Self, you have time on your hands and you have buckets of n/s scrap keys. Hmmmm."
You can see where this is going right?
First attemp:
Attachment 353051
Attachment 353052
Attachment 353053
Cut the bottom rib off an old key, hammered it to square, put it in the drill chuck and spun it while hammering it to roundish. It actually worked but the folding created a fault which snapped while pinning.
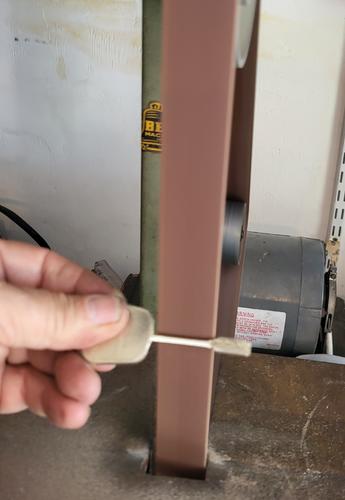
Back to the drawing board.
Attachment 353054
Attachment 353055
Took a different key and ground it round, put it in the drill and ran it while holding the pin against the belt until it was the right diameter. That took a little doing but it worked. I wound up getting the razor pinned up and finished as I had hoped.
I will say that this was not an efficient use of time or resources and the better route would have been to just buy some pin rod BUT, in a pinch it worked, got me finished and none would ever be the wiser.
I have seen many finished with nails etc.
You use what you have
Maybe not efficient but industrious.Quote:
Originally Posted by PaulFLUS
I've been working on a razor a bit at a time for my boy since he was born lol he's 7. Got a few years before he needs it.
Got all the bits just need to fettle and assemble now ��
Geek
Maybe it needs to be annealed first. Keys are pretty had compared to pins.
Well, that was also a Sargent key and theirs are exceptionally hard comparatively.
Edit: the one that broke that is.
1/16" nickel/silver brazing rods work okay. A single 36" piece will pin quite a few razors. I bought a tube of 5 pieces a long time ago but I wasted them on brazing stuff instead of pinning razors.
Why would you ever use brazing rod for brazing?:roflmao
When I don't need it for hanging fresh tobacco for curing due to being out of coathangers or aluminum electrical fence wire, or don't know when I will get around to rescaling the razors in my junk or fix-someday pile, and something metal needs to be stuck together by the use of something intermediate between welding and duct tape.Quote:
Originally Posted by PaulFLUS
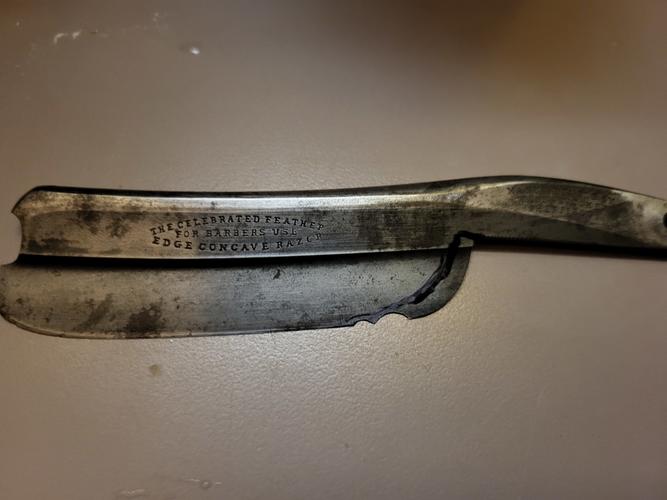
I got this blade in a lot from an auction. It is pretty badass except for the obvious big chips.
Attachment 353636
It's 8/8+, 17/16 to be exact. Here's a close up of the spine stamp.
Attachment 353637
I've never seen another one stamped the same.
I have toyed around with differnt methods of taking those chips out. I have considered giving the whole blade a taper, bringing the heel forward or giving it more curve or a combination of both...or all three. I was thinking maybe something like this.
Attachment 353638
I'm stoked about this one because...as stated, it's badass, but, that being the case I don't want to start grinding and say, "Why did I do that?" The one thing I've learned though is when in doubt, wait it out.
I’m not sure I’d jump straight to moving the heel forward but you will need to move it some for the shape to flow. High angle honing and just go slow until the forward chip starts to make sense and see how little you can take from the back to get that back chip straightened out.
I always feel that on these old blades less is more, and the more peculiar they are, the less you should touch them.
I absolutely love this one
Finally got this one done. It's been in the restoration in progress drawer for a coon's age.
Henry Sears & Son #640, "Queen 3/4" NOT 6/8 :shrug:
Attachment 353780
I've been shaving with it's big brother exclusively for the last month and a half with an old edge which needs no help. The 7/8 is probably my best shaver of all. This one was a bit of a problem child. It was a microchipper. I wanted to do a full Ark progression but quickly realized that would not work so I down-shifted to the softer stones and at finish gave it a microbevel to stabilize the apex. It shaves well, just not the WOW shave of the bigger one, who now...
Attachment 353781
...has a mini me!!!
That is truly outstanding Paul!
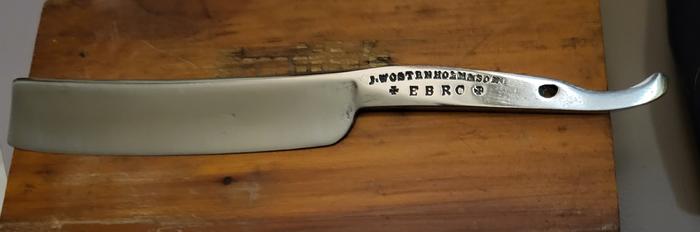
Here's another one that has been in the drawer for far too long. Joseph Wostenholm & Sons *EBRO*
Before:
Attachment 353840
I swore I had some individual and more in progress pics but this was what I could find.
Got some more sanding done on the blade.
Attachment 353841
Attachment 353842
That top pic doesn't capture the extent of how pitted and cruddy it was. The scales need a lot of work too. More on that later.
What are you going to do with that big ass hole in the tang?
You could always drill it out and then sleeve it to get the right sized hole.Quote:
Originally Posted by Johntoad57
Bob
I’ve had good luck just pinning them the way they are. The holes usually look worse than they are. They tend to taper in to the middles. I royally messed up the one I tried to drill and sleeve. That hole needs to be dead straight. I wound up filling it with JB Weld and trying two more times.
Same here. I tried all that. Seems to do nothing or cause issues at times. I don't use spacers on them either. The big, funky hole seems to allow the tang to slide as necessary when opening and closing, seems to keep the blade centered in the scales better.
IF the scales are straight!