Results 1 to 8 of 8
Like Tree8Likes
  • 1 Post By Slimhunk
  • 1 Post By 10Pups
  • 5 Post By Geezer
  • 1 Post By Slimhunk

Thread: Advice in the process of restoration

  1. #1
    Junior Member
    Join Date
    Mar 2014
    Location
    Sweden, the south
    Posts
    2
    Thanked: 0

    Default Advice in the process of restoration

    Hello!

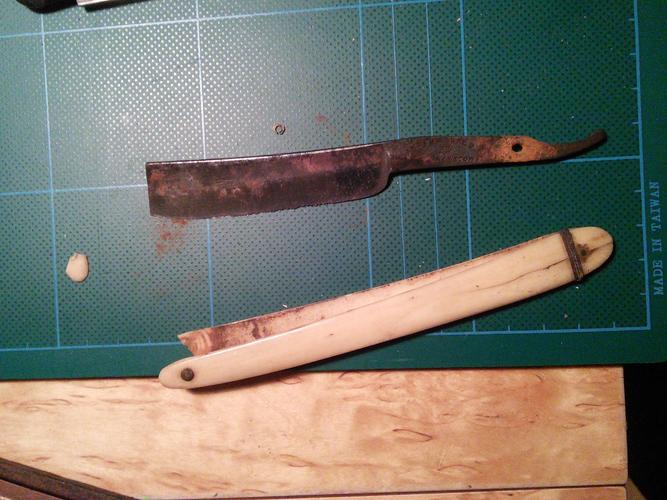
    I just started restoring my first straight razor and i would love some advice in the process. Will i be able to get rid of the holes and black spots from the rust or do i have to stick with it and just polish up the rest of the razor? If you have any opinions on my methods so far I would love to have some advice.

    1 picture, the knife itself

    Name:  IMG_20140311_2110161.jpg
Views: 162
Size:  55.8 KB

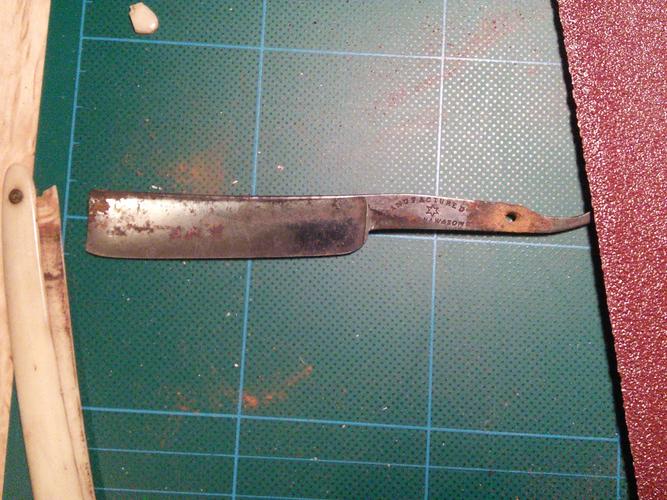
    After "bread knifing" it with 60 grit sandpaper
    Name:  IMG_20140311_211502.jpg
Views: 156
Size:  68.2 KB

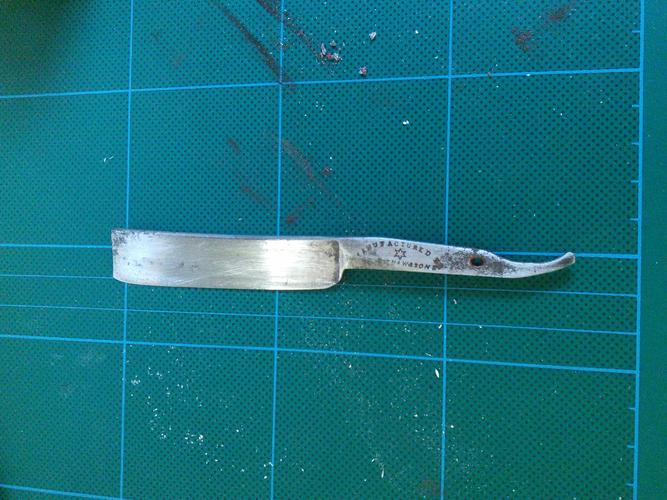
    Polished it up with autosol and 80 grit sandpaper

    Name:  IMG_20140312_164637.jpg
Views: 149
Size:  58.2 KB
    Current status, rough love with 120/180 grit sandpaper
    Name:  IMG_20140313_231601.jpg
Views: 169
Size:  59.2 KB

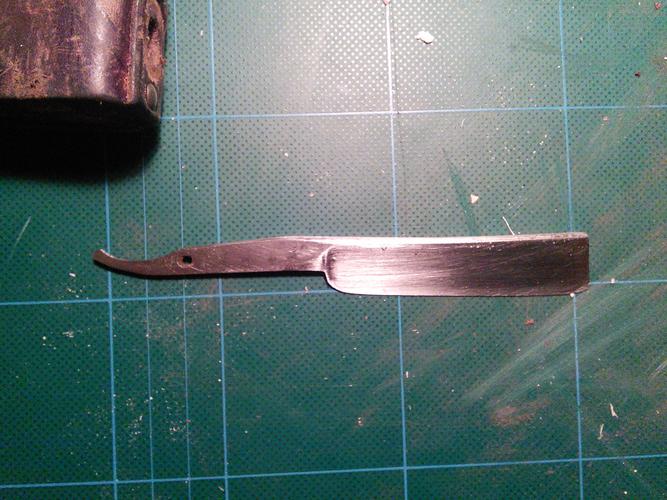
    Next step is to continue to polish it with finer and finer wet sandpaper. I find it difficult to reach the small hole where the blade starts and Im afraid i wont be able to get rid of the rust in the text on the knife or the holes/black spots on the blade.

    I would really apreciate some help

    Thanks!
    Last edited by Slimhunk; 03-13-2014 at 11:18 PM.
    Geezer likes this.

  2. #2
    Senior Member blabbermouth 10Pups's Avatar
    Join Date
    Nov 2012
    Location
    Across the street from Mickey Mouse in Calif.
    Posts
    5,320
    Thanked: 1184

    Default

    Some pits are just too deep to get out and it's up to you how far you go. It's hard to tell from pictures how deep pits are but from what I can see I would say you could go some more. I rarely go down to the grits you are using myself, 400 being my usual starting point for something that needy. The reason is because the scratches for 60 are as hard to get out as the pits,(almost). If you use just paper you still have a long row to hoe. When you start using finer grits you are satisfied with the pits you can see or wasting time. Going back makes at that time wasted. What I am saying is if you want more pits out , get them before you move finer. Change direction with each grit so you can see what your leaving behind.
    Steel likes this.
    Good judgment comes from experience, and experience....well that comes from poor judgment.

  3. #3
    Senior Member
    Join Date
    Dec 2013
    Location
    Phoenix
    Posts
    312
    Thanked: 40

    Default

    I think you have a shot at getting the blackness out of the pitting. The black pitting near the pivot appears what is referred to as "Devil's spit." It can be hard to get out.

    I find that using a combo of sandpaper and metal cleaner (I use Brasso, which can be picked up for pretty cheap at home depo), helps clean away the grime and blackness of the pitting, and that it seems to leave less severe or noticeable scratches than when sanding dry.

    So maybe try something like this: return to the 60 grit, but sand wet with Brasso (or equivalent). Sand 80 and 120 dry, and then sand at 180 wet with Brasso. The 180 sand with the Brasso should help reduce the scratch marks.

    After that, move up slowly (220/240 to 320, 400, 600, 800, 1000, and higher). I personally go all the way up to 12000 and I have a set of micromesh clothes that cover 1500 to 12000. They can be picked up for a total of about $20.

    One last tip -- when hand sanding WEAR GLOVES. You can pick up a cheap pair of Harbor Freight gloves for $2.00 that have kevlar along the fingers. I have cut myself really badly while hand sanding -- leaving scars on the hand -- that could have been completely avoided if I would have worn gloves. Now, I always wear gloves.

  4. #4
    Senior Member
    Join Date
    Dec 2013
    Location
    Phoenix
    Posts
    312
    Thanked: 40

    Default

    Woops, I just noticed you are in Sweden. So my advice for Home Depo, Harbor Freight, or Brasso might not apply. I'm sure you should be able to find similar things where you live.

  5. #5
    Ecl
    Ecl is offline
    Does this title make me look fat? Ecl's Avatar
    Join Date
    Apr 2011
    Location
    Medieval Kansas
    Posts
    148
    Thanked: 27

    Default

    Don't go crazy on the sanding. A lot of "restorations" result in shiny but structurally compromised razors. Sanding out a pit might turn a blade into a flimsy piece of foil. A minute on the buffer can be the equivalent of decades worth of hone wear. There's an eBay guy in Canada who specializes in buffing years worth of steel off of old razors, turning them into shapeless lumps he proudly advertises as "mirror finished."

    I used to try to get my vintage blades looking factory fresh, but I've evolved to the point where I can accept that a blade from 1860 just might, possibly, have been used before. My current policy is "no heroic measures." I remove the rust, sand out as many scratches as I can, and make them as shiny as I can. I make the best new scales my miniscule skills allow, hone the razors and put them in my rotation. They may still have some pitting, but I've saved as much steel as I could.

  6. #6
    Member
    Join Date
    Mar 2014
    Location
    South Kentucky
    Posts
    67
    Thanked: 8

    Default

    To get the rust out of the lettering try a soak with a thin rust penetrating oil then scrub with a stiff tooth brush. I use Kroil but you may find a good substitute at an auto parts store. This can also remove some of the black from the pits. Good luck with your restore.

  7. #7
    Senior Member blabbermouth Geezer's Avatar
    Join Date
    Jul 2010
    Location
    EauClaire,WI
    Posts
    7,685
    Thanked: 3825
    Blog Entries
    1

    Default

    Soak the blade in warm Vinegar for twenty minutes. That can loosen rust a lot. Was the blade afterward with a strong citrus or other floor cleaner detergent or soap. That neutralizes the acetic acid of the vinegar.
    Sanding should go faster after that also with a bit of light oil on the wet dry abrasive paper. Better to spend longer on the sanding with finer grit than to get too deep scratches from too coarse a grit that takes forever to remove and can compromise the blade. Do not use a stroke along the edge with an\y grit stronger than 220. It can leave scratches which will break away the edge from the blade later.
    Good going so far!!
    ~Richard
    Be yourself; everyone else is already taken.
    - Oscar Wilde

  8. #8
    Junior Member
    Join Date
    Mar 2014
    Location
    Sweden, the south
    Posts
    2
    Thanked: 0

    Default

    Wow, thank for all the awesome sugestions! I will try them all in some sort of reasonable order and repost the results. And special thanks for the glove security advice, since I bread knifed the edge it doesnt cut at all but there were sometimes it could have gotten nasty if it wasn´t.

    When it comes to the edge, I bought some really fine grit M3 wet sandpaper, do you think it will be possible to try to get an edge with that before my norton honing kit arrives? I saw someone who used sandpaper to get a really sharp edge.

    Thank you all!
    Geezer likes this.

Posting Permissions

  • You may not post new threads
  • You may not post replies
  • You may not post attachments
  • You may not edit your posts
  •