Page 2 of 3 FirstFirst 123 LastLast
Results 11 to 20 of 26
Like Tree22Likes

Thread: Wade and Butcher - ouch - crack in blade
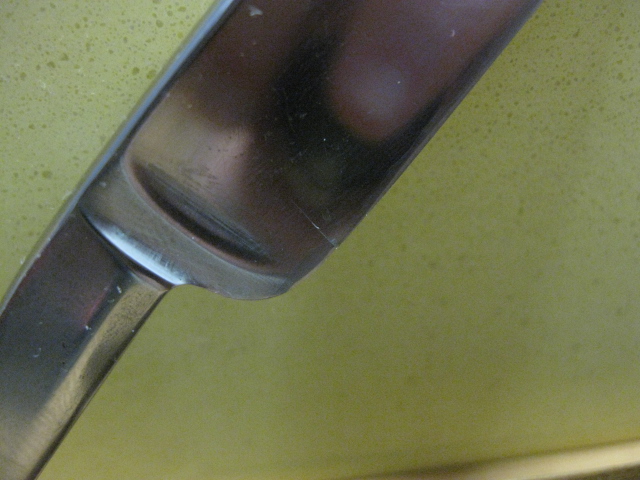
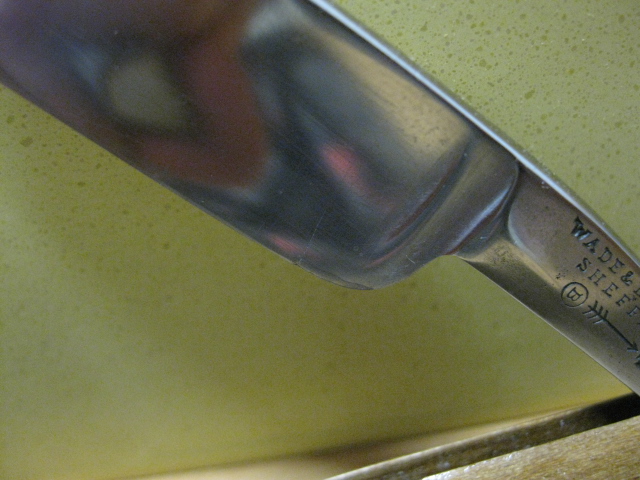
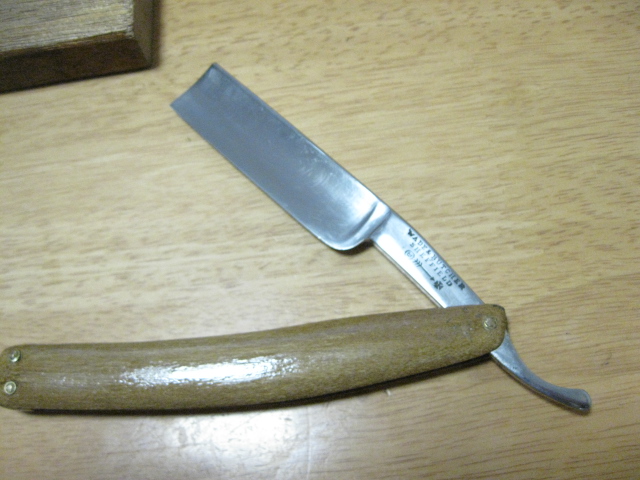
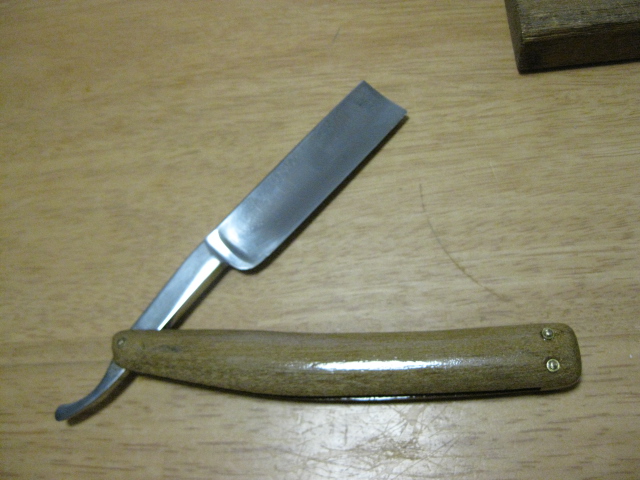
  1. #11
    Senior Member RickyBeeroun222's Avatar
    Join Date
    May 2011
    Location
    Ipswich, Australia
    Posts
    481
    Thanked: 64

    Default

    Checked the crack gain on both sides of the razor,and used a straight edge for guidance. Found it stopped (at least what I could see with the naked eye) about 1/8" below the level of the tang. Marked out a shape to grind out to and decided to give it a go grinding the blade carefully.
    As they say nothing ventured nothing gained, so with heart in mouth clamped the blade into my vice grips touched it to the grinder at about 45 degrees angle a few seconds at a time, and very carefully cut away the damaged area.
    Heeding the caution of so many here stopped and checked heat buildup each time I stopped, thankfully it did not go past being a little warm to the touch. After about 10 minutes the rough shaping bit was done. I saw no sign of the crack so decided to do more shaping work.
    Clamped the blade in the bench vice and spent about 30 minutes shaping out the blade some more - used the dremel with a small drum sanding wheel and a light touch on the metal - it seemed to work out OK with the rougher parts now smoothed out.
    Next will be the hand filing work to take the burrs of and finalize the new blade shape. That's a job for another day as the wife informs me it's time to stop playing with razor shaped objects and give her some help getting dinner sorted out.
    Will post some pics later time permitting.
    Chevhead and Corin like this.
    RickyB

  2. The Following User Says Thank You to RickyBeeroun222 For This Useful Post:

    onimaru55 (06-14-2014)

  3. #12
    Senior Member RickyBeeroun222's Avatar
    Join Date
    May 2011
    Location
    Ipswich, Australia
    Posts
    481
    Thanked: 64

    Default progress pics

    So far so good, may end up a nice razor - or a shiny box opener. Take my chances.

    After grinder front side - marked line shows where to stop, went a bit deep at one point.
    Name:  IMG_3101.JPG
Views: 106
Size:  48.0 KB

    Back view after grinder
    Name:  IMG_3103.JPG
Views: 107
Size:  46.3 KB

    Front view after sanding drum work
    Name:  IMG_3104.JPG
Views: 107
Size:  62.5 KB

    Back view after sanding drum
    Name:  IMG_3106.JPG
Views: 110
Size:  50.4 KB
    Maladroit and Chevhead like this.
    RickyB

  4. #13
    DVW
    DVW is offline
    Senior Member
    Join Date
    Jun 2014
    Location
    Eastern Washington State USA
    Posts
    406
    Thanked: 59

    Default

    Not bad. You a brave man.

  5. #14
    The Great & Powerful Oz onimaru55's Avatar
    Join Date
    May 2008
    Location
    Bodalla, NSW
    Posts
    15,597
    Thanked: 3748

    Default

    Without the stabiliser will be more flexible now but a good learning tool for a light touch on the hone & a flat angle on the face.
    Chevhead likes this.
    “The white gleam of swords, not the black ink of books, clears doubts and uncertainties and bleak outlooks.”

  6. The Following User Says Thank You to onimaru55 For This Useful Post:

    RickyBeeroun222 (06-15-2014)

  7. #15
    Senior Member RickyBeeroun222's Avatar
    Join Date
    May 2011
    Location
    Ipswich, Australia
    Posts
    481
    Thanked: 64

    Default

    Quote Originally Posted by DVW View Post
    Not bad. You a brave man.
    Not sure about the brave thing mate.
    I'm treating this as a new learning experience and expect that I can use knowledge gained for future repairs/restores.
    Maybe I just got a bit lucky with this one, long way to go yet.
    RickyB

  8. #16
    Senior Member RickyBeeroun222's Avatar
    Join Date
    May 2011
    Location
    Ipswich, Australia
    Posts
    481
    Thanked: 64

    Default

    Quote Originally Posted by onimaru55 View Post
    Without the stabiliser will be more flexible now but a good learning tool for a light touch on the hone & a flat angle on the face.
    Thanks for the tip Oz, must make sure to mute those points at heel and toe of the razor.
    RickyB

  9. #17
    Senior Member guitstik's Avatar
    Join Date
    Jun 2014
    Location
    Eads, TN
    Posts
    1,042
    Thanked: 161

    Default

    I had to do that recently to one of my razors that I found at a flea market and got for the princely sum of $3.00, it's a Buerger Bro's of Denver CO made by J. A. Henckels. It had a chunk missing out of the heal and so I just said " to heck with it" and started grinding away at it until I had a nice transition that pretty much matched the French point. I honed it up and stropped it with no problems and have shaved with it several times since. I hadn't noticed a lot of flex but then again I don't hammer on a blade when honing. Not meaning to say anyone here does either.

  10. The Following User Says Thank You to guitstik For This Useful Post:

    RickyBeeroun222 (07-04-2014)

  11. #18
    Heat it and beat it Bruno's Avatar
    Join Date
    Nov 2006
    Location
    Belgium
    Posts
    15,131
    Thanked: 5229
    Blog Entries
    10

    Default

    Quote Originally Posted by DVW View Post
    Not bad. You a brave man.
    Well, not really. That blade was a goner to begin with. At worst it could have broken and it would still be as unusable as it was to begin with. That's why restoring a blade that is essentially worthless is a good idea for beginning restorers. You get to learn new things and if it should go wrong, no need for tears.
    Til shade is gone, til water is gone, Into the shadow with teeth bared, screaming defiance with the last breath.
    To spit in Sightblinder’s eye on the Last Day

  12. #19
    Senior Member RickyBeeroun222's Avatar
    Join Date
    May 2011
    Location
    Ipswich, Australia
    Posts
    481
    Thanked: 64

    Default

    Thanks Bruno.

    This blade owes me very little which is a good thing. This is my first time trying this kind of fix - I am always willing to learn something new and this is no exception. The support and tips from the forum members always helps keep me focused on what needs to be done. It's always a pleasure to check in here, thanks everyone.

    Quote Originally Posted by Bruno View Post
    Well, not really. That blade was a goner to begin with. At worst it could have broken and it would still be as unusable as it was to begin with. That's why restoring a blade that is essentially worthless is a good idea for beginning restorers. You get to learn new things and if it should go wrong, no need for tears.
    Chevhead likes this.
    RickyB

  13. #20
    The Great & Powerful Oz onimaru55's Avatar
    Join Date
    May 2008
    Location
    Bodalla, NSW
    Posts
    15,597
    Thanked: 3748

    Default

    Quote Originally Posted by RickyBeeroun222 View Post
    Thanks for the tip Oz, must make sure to mute those points at heel and toe of the razor.
    Did that with my E.A. Berg, Rick.
    Took too much steel off in the restore & ended up with a very floppy heel so ground it off.
    Attached Images Attached Images  
    “The white gleam of swords, not the black ink of books, clears doubts and uncertainties and bleak outlooks.”

  14. The Following User Says Thank You to onimaru55 For This Useful Post:

    RickyBeeroun222 (07-04-2014)

Page 2 of 3 FirstFirst 123 LastLast

Posting Permissions

  • You may not post new threads
  • You may not post replies
  • You may not post attachments
  • You may not edit your posts
  •