Results 1 to 10 of 10
Like Tree39Likes
  • 12 Post By Voidmonster
  • 8 Post By Voidmonster
  • 9 Post By Voidmonster
  • 4 Post By Ranzor
  • 2 Post By Razorfeld
  • 1 Post By Geezer
  • 1 Post By Razorfeld
  • 1 Post By 10Pups
  • 1 Post By Wolfpack34

Thread: Almost everything you ever wanted to know about working with horn scales.

  1. #1
    Captain ARAD. Voidmonster's Avatar
    Join Date
    May 2011
    Location
    Pacifica, CA
    Posts
    2,474
    Thanked: 2226

    Default Almost everything you ever wanted to know about working with horn scales.

    First and foremost, I never would have done any of of the things I describe in this post if it weren't for discussions and encouragement from my friends here.

    In particular, Neil Miller's excellent posts about historical horn dyeing lead directly to my recent dye experiments.


    The scale vise technique I'll discuss is a slightly modified version of what Wolfpack34 uses.

    And finally, my method for centering a problematic razor came as a result of discussions with Wolfpack34 and 10Pups while sitting around and talking razor stuff. It was generally considered to be crazy.

    Now, without further ado:

    Fun tricks with horn: flattening warped scales!

    One of the most common problems you'll run into with old horn scales is bad warping.

    Using this method, it's possible to flatten even badly warped scales.

    Here's a picture of what I use:

    Name:  017993bfd9aac561edbfc95ee647ee1cc4ba4590b3.jpg
Views: 516
Size:  59.8 KB

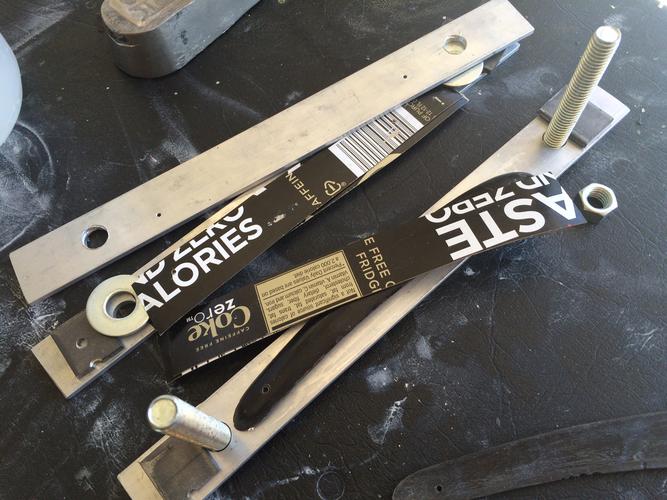
    In the picture are three long strips of relatively thick aluminum bar, two bolts, some pieces of steel bar used as spacers, large washers, nuts, and some strips of cardboard from a box of soda.

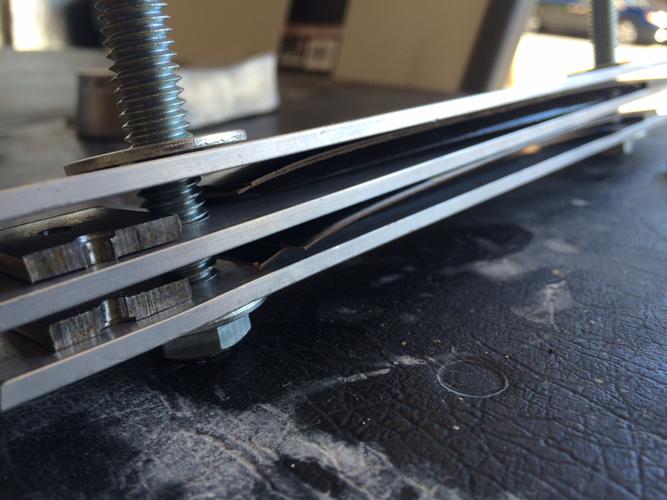
    It all gets sandwiched together like this:

    Name:  013cc87599eaaa5a64c60e0f41d726d3d49773eb1e.jpg
Views: 503
Size:  46.9 KB

    The horn scales are placed with the inward facing surface flat on the aluminum. I put two strips of cardboard on top of that, then the next layer of aluminum bar, the other scale, more cardboard, etc.

    Here's where the ideas at work are useful to understand.

    We're going to be baking this.

    The goal is not to exert a great deal of pressure on the scales -- doing that would put dents in them. Instead, it's to use just enough pressure to get them to lay flat. The steel spacers are doing most of the work here, and the cardboard provides a little bit of 'soft pressure'. It won't press into the scales, but it will provide just a little bit of extra-gentle pressure.

    Once it's sandwiched, I bolt the whole thing together, like this:

    Name:  019996be66444a810891f223c001ac95527a12cbe3.jpg
Views: 504
Size:  35.7 KB

    After that, I take the whole vise and put it in my toaster oven. I set the temperature to 240 degrees, turn on convection and run it on a 10 minute timer. I suspect this works best if you put the vise and scales in while the oven is heating so that it's brought to-temp a little more gradually.

    240 degrees (that's Fahrenheit) isn't significantly warmer than boiling water. My automatic hot water pot for coffee and tea dispenses water at 220. It's not hot enough to scorch the paper.

    But it is hot enough to make the horn a little more plastic.

    Once I take it out of the toaster oven, I put it immediately into the freezer for a some variable amount of time. Working on the 'for a while' principle, basically I take it out of the freezer when I remember to -- typically about 2 hours later.

    Then I let it sit for 12-24 hours at room temperature before taking the vise apart.

    This technique has been effective every time I've used it (probably 10 times now). Occasionally, a set of scales will require a second run through, but none have needed a third (and I've done this to some very badly warped scales).

    This technique even works on ornately pressed scales without damaging the design.
    -Zak Jarvis. Writer. Artist. Bon vivant.

  2. The Following 22 Users Say Thank You to Voidmonster For This Useful Post:

    32t (03-10-2015), Baxxer (12-13-2014), criswilson10 (12-12-2014), DoughBoy68 (12-12-2014), engine46 (02-16-2015), Geezer (12-13-2014), Hirlau (12-13-2014), jfk742 (07-02-2021), JimmyHAD (12-13-2014), Lynn (12-13-2014), manah (01-27-2017), MattCB (12-12-2014), Ranzor (12-13-2014), rolodave (12-12-2014), ScienceGuy (12-19-2014), sharptonn (12-13-2014), Splashone (12-12-2014), sqzbxr (02-07-2016), Substance (06-21-2015), Thaeris (12-15-2014), tintin (08-20-2017), Wolfpack34 (12-13-2014)

  3. #2
    Captain ARAD. Voidmonster's Avatar
    Join Date
    May 2011
    Location
    Pacifica, CA
    Posts
    2,474
    Thanked: 2226

    Default Centering problems? You can't fix it that way, that's crazy!

    Fun tricks with horn: correcting centering problems!

    Building on the method using the makeshift scale vise, I recently was working on a pair of razors for a friend.

    Name:  0122fd2a2fa5b6fa86a42469e4fee431d4834373b4.jpg
Views: 499
Size:  81.1 KB

    I completely disassembled them and flattened both pair of scales, since there was some relatively significant warping.

    Unfortunately, that warping wasn't limited to the scales. One of the razors had a little jump to the left in the tang, so it actually centered worse with straight scales1.

    This seemed like the perfect opportunity to set sail for uncharted waters. I asked Eisenfaust (whose razors these are), if it was okay to perform a daring experiment and he trusted me to go through with it.

    Here's what I did.

    Name:  01bb0438381ec2a333b04c7197d757f6867fe19c88.jpg
Views: 496
Size:  24.3 KB

    Using the same microfasteners I'd used for temporary assembly, I mounted the whole, assembled razor onto one of the aluminum bars of my scale vise by drilling two holes for the microfasteners. I tightened it down good and guided the razor closed.

    Name:  012fc8ea4fb7af57ed38932e5ae5f42f4a5916d46c.jpg
Views: 492
Size:  25.2 KB

    Then I baked the entire razor at 220 for 10 minutes, then put it directly in the freezer, just like I'd have done with a pair of scales.

    Taking it out of the freezer presented a new problem. It obviously frosted over quite significantly. I solved that by gently heating it with a hair-dryer and padding it down with paper towels.

    At the end of all this, I had a razor that centered very nicely. From there it was just an issue of re-pinning and everything worked great. (Also, the razor was in no way hurt by the temperature)

    1. Kids, always test assemble using microfasteners before committing the pins with a hammer, that's how you learn these things!
    Last edited by Voidmonster; 12-12-2014 at 06:03 PM.
    -Zak Jarvis. Writer. Artist. Bon vivant.

  4. The Following 12 Users Say Thank You to Voidmonster For This Useful Post:

    criswilson10 (12-12-2014), DoughBoy68 (12-12-2014), Geezer (12-13-2014), Hirlau (12-13-2014), JimmyHAD (12-13-2014), Lynn (12-13-2014), MattCB (12-12-2014), Phrank (12-13-2014), Ranzor (12-13-2014), sharptonn (12-13-2014), Substance (02-15-2015), Wolfpack34 (12-13-2014)

  5. #3
    Captain ARAD. Voidmonster's Avatar
    Join Date
    May 2011
    Location
    Pacifica, CA
    Posts
    2,474
    Thanked: 2226

    Default Fun tricks with horn: DYES!

    Fun tricks with horn: re-dyeing old mockshell!

    After all the work I'd done on that pair photographed above, the original dye-job had lost some of its punch. I'm sure you've seen lots of old mockshell horn with faint, ancient spots. Sometimes they're white (see Neil's links above for what's going on there).

    Here's how Eisenfaust's razors looked:

    Name:  0131e5e1e190a4953a9712ae658c85515b5441043e.jpg
Views: 485
Size:  26.6 KB

    After sanding and polishing, the original dyed spots were pretty badly faded. He asked me if there was anything I could do about that, which reminded me of Neil's posts. I determined to try some commercial hair dye.

    I experimented on some scrap, honey horn and I liked the results. Here's what I did.

    Name:  017b788d60c74efee30e20ee9bff780c6eec82af08.jpg
Views: 485
Size:  28.4 KB

    My assumption is that pretty much any permanent hair dye will work. My first tests were done with different stuff, but it worked just as well (but was too light a color). For these razors, I wanted the spots to be very dark but not quite black (hence the brown-black dye).

    Note also the absolutely amazing weasel-marketing on that box: "With Ingredients of a Natural Origin".

    As opposed to all those other hair dyes that're using chemical compounds delivered from an alternate universe by eldritch magics.

    Ahem.

    These hair kits have two components, kind of like epoxy. They all tell you to mix the two components in an included container then completely coat your hair in it. That's obviously not going to work so well for our purposes.

    Both kits also mix the two components in equal volumes, which makes things nice and easy. For both sets of scales I didn't need much dye at all.

    First though, I polished the scales and wiped them down good.

    Then I mixed up the dye in equal parts (basically a gloopy drop about the size of an American quarter). I used one of the applicator bottles that came with a kit, but you can really use anything that's not precious and will hold a little goopy dye. To mix it up, I used an old paint brush, which I then also used to apply it.

    Name:  01c6d0ecdcf7e5d877bc37c6ac7de194149e5ccb38.jpg
Views: 484
Size:  22.3 KB

    Art comes into it here, and it's best to do some tests to get a feel for how it works.

    Old Sheffield mockshell is hugely variable in quality. Some is an extraordinary simulation of tortoiseshell, others are... Shall we say, less convincing?

    These razors were kind of in the middle, and I mostly wanted to restore them to how they'd looked before. But that still included both spots with sharp edges and wispy bits that trailed and looped around.

    So I first blobbed on the dye, then used the hard end of my paintbrush to thin it out in places or make fine lines of dye.

    The end result was this:
    Name:  01f3dba24b37e1c7beaf5f8c8c6e8e329c51b9a3c0.jpg
Views: 496
Size:  55.8 KB

    Name:  01ca5ebd20bf7a56fcc46f4997891e8c3489e46bdc.jpg
Views: 476
Size:  52.2 KB

    The dye instructions tell you to leave it in your hair for half an hour. For the horn, I left it on for a full hour working on the theory that the material had a little farther to go to be in any danger of split ends. I washed off the dye with warm water and dried them with a paper towel.

    The color is very durable. At least as durable as the original dye job, since both sets of scales went under the buffer before I took those pictures.

    Out of curiosity, I also tested the dye on some ornately pressed scales (which originally had mockshell dye).

    Name:  012201c73c0ea7f6ab82bb9410ed83e1361545c41b.jpg
Views: 484
Size:  38.5 KB
    Last edited by Voidmonster; 12-12-2014 at 06:36 PM.
    -Zak Jarvis. Writer. Artist. Bon vivant.

  6. The Following 17 Users Say Thank You to Voidmonster For This Useful Post:

    32t (03-10-2015), Baxxer (12-13-2014), BobH (12-12-2014), Geezer (12-13-2014), Hirlau (12-13-2014), JimmyHAD (12-13-2014), Lynn (12-13-2014), MattCB (12-12-2014), Neil Miller (12-12-2014), OldTraf (12-15-2014), Ranzor (12-13-2014), RezDog (12-12-2014), sharptonn (12-13-2014), Substance (02-15-2015), Thisisclog (12-12-2014), Wirm (12-15-2014), Wolfpack34 (12-13-2014)

  7. #4
    Junior Member
    Join Date
    Nov 2014
    Location
    New Mexico
    Posts
    25
    Thanked: 2

    Default

    Great thread! I wish I had all of this info in one spot when I started my horn scales.

    Name:  20141213_091031.jpg
Views: 441
Size:  34.4 KB

  8. The Following User Says Thank You to Ranzor For This Useful Post:

    Voidmonster (12-13-2014)

  9. #5
    Moderator Razorfeld's Avatar
    Join Date
    Jul 2013
    Location
    Forest Grove, Oregon
    Posts
    5,152
    Thanked: 1226

    Default

    Based on your techniques used can we now call you Chef Void?
    Geezer and Voidmonster like this.
    "The sharpening stones from time to time provide officers with gasoline."

  10. The Following User Says Thank You to Razorfeld For This Useful Post:

    Voidmonster (12-13-2014)

  11. #6
    Senior Member blabbermouth Geezer's Avatar
    Join Date
    Jul 2010
    Location
    EauClaire,WI
    Posts
    7,685
    Thanked: 3825
    Blog Entries
    1

    Default

    Mods, Please add this to the Restoration section of the library! Perhaps with light editing by the author!
    ~Richard
    skipnord likes this.
    Be yourself; everyone else is already taken.
    - Oscar Wilde

  12. The Following User Says Thank You to Geezer For This Useful Post:

    Voidmonster (12-13-2014)

  13. #7
    Moderator Razorfeld's Avatar
    Join Date
    Jul 2013
    Location
    Forest Grove, Oregon
    Posts
    5,152
    Thanked: 1226

    Default

    This Richard seconds that Richard on adding it to the library.
    Voidmonster likes this.
    "The sharpening stones from time to time provide officers with gasoline."

  14. The Following User Says Thank You to Razorfeld For This Useful Post:

    Voidmonster (12-13-2014)

  15. #8
    Senior Member blabbermouth 10Pups's Avatar
    Join Date
    Nov 2012
    Location
    Across the street from Mickey Mouse in Calif.
    Posts
    5,320
    Thanked: 1184

    Default

    CRazy ? Watch it ! I resemble that remark :<0) Glad you put this all in pics with highly technical writings. Sometimes your average bull can grow some good stuff.
    Voidmonster likes this.
    Good judgment comes from experience, and experience....well that comes from poor judgment.

  16. The Following User Says Thank You to 10Pups For This Useful Post:

    Voidmonster (12-13-2014)

  17. #9
    Senior Member Wolfpack34's Avatar
    Join Date
    Apr 2011
    Location
    California
    Posts
    1,596
    Thanked: 865

    Default

    Very, very nice Zak! You did a great job of presenting these techniques in a clear and concise way. Easy to grasp...easy to do. I love it, almost as much as our hours of discussions on these topics.

    ... Three Thumbs Up!
    Voidmonster likes this.
    Lupus Cohors - Appellant Mors !

  18. The Following User Says Thank You to Wolfpack34 For This Useful Post:

    Voidmonster (12-13-2014)

  19. #10
    Captain ARAD. Voidmonster's Avatar
    Join Date
    May 2011
    Location
    Pacifica, CA
    Posts
    2,474
    Thanked: 2226

    Default

    Quote Originally Posted by Wolfpack34 View Post
    Very, very nice Zak! You did a great job of presenting these techniques in a clear and concise way. Easy to grasp...easy to do. I love it, almost as much as our hours of discussions on these topics.

    ... Three Thumbs Up!

    Hey! Where'd that third thumb come from?!

    (checks his thumbs)
    -Zak Jarvis. Writer. Artist. Bon vivant.

Posting Permissions

  • You may not post new threads
  • You may not post replies
  • You may not post attachments
  • You may not edit your posts
  •