
Results 1 to 10 of 13
 12Likes
Thread: Scale Inlays
 LinkBack URL
 About LinkBacks
-
03-17-2015, 09:59 AM #1Member


- Join Date
- Mar 2015
- Location
- Anchorage, AK
- Posts
- 59
Thanked: 4 Scale Inlays
Just wondering about doing inlays on scales. I haven't come across really any videos on adding them to scales. I've found a few on removing them, but I was wondering about people's experience with doing inlays. Feel free to share pictures of your work as well as any knowledge or links to good how to info. Was wondering about things to look out for with different materials both in terms of the scale and the inlay. Is it more difficult to do an inlay in a horn scale for instance...
"We are all erring creatures, and mainly idiots, but God made us so and it is dangerous to criticise."
Mark Twain- Letter to the President of Western Union, New York, 1902
-
03-17-2015, 10:09 AM #2Senior Member

- Join Date
- Feb 2012
- Location
- West Midlands, UK
- Posts
- 1,263
Thanked: 360
I think horn is probably one of the easier materials to add inlays - here is an example - it was my first attempt using three different forms of Mother of Pearl.
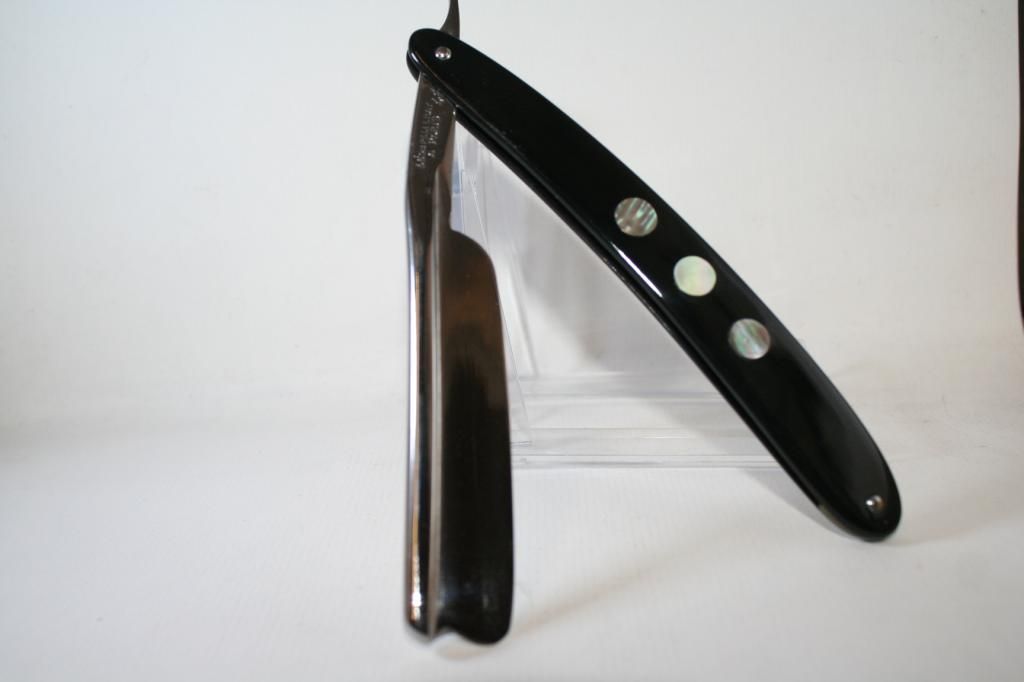
I used router bits for the holes then used glue to attach a piece of MOP to the other end of the drill - then turned the discs on a rotary sanding disc. They were inserted using CA and finally sanded/polished flat.
By the way, it's much easier to buy pre formed discs - they are available in lots of different sizes so I used them on combs that I made for my grand-children at Christmas.
I've yet to try any other forms of insert apart from round pieces but, like you, it's something I'm thinking of when I have more time.My service is good, fast and cheap. Select any two and discount the third.
-
03-17-2015, 12:50 PM #3Tumbling down the rabbit hole...

- Join Date
- May 2011
- Location
- Calgary, AB
- Posts
- 445
Thanked: 27
Nice job! I saw Mastro Livi do that on one of his videos and thought I should try one day.
dickpicnic likes this.
-
03-17-2015, 01:20 PM #4Senior Member


- Join Date
- Jun 2013
- Location
- Gladstone QLD AUSTRALIA
- Posts
- 3,245
Thanked: 804
http://straightrazorpalace.com/works...aving-jig.html
This was my effort with a bit of tutorial if it helpsSaved,
to shave another day.
-
03-17-2015, 01:27 PM #5Senior Member
- Join Date
- Feb 2012
- Location
- West Midlands, UK
- Posts
- 1,263
Thanked: 360
That's where I got the idea from - or should I say that's the process I copied? I then found that Robsbits on Ebay - who I've used for horn and scale material before, sells MoP and other materilas such as Paua in perfect discs in a range from about 2mm upwards. Originally Posted by Atchbo

Still, the Livi method is good if you wanted to use any other material you have on hand.My service is good, fast and cheap. Select any two and discount the third.
-
03-17-2015, 02:07 PM #6Senior Member

- Join Date
- Feb 2007
- Posts
- 392
Thanked: 105
Just a few to see what you can do.
I use a laser so it makes it easy.
http://straightrazorpalace.com/works...s-project.html
V/R
Tim
-
03-17-2015, 04:09 PM #7Senior Member


- Join Date
- Sep 2008
- Location
- Crossville, TN
- Posts
- 1,711
Thanked: 304
Here are two I did, I simply removed inlays by soaking in acetone. After deciding where I wanted them positioned I spread a thin coat of CA on the scales, laid the inlay on the scales, positioned and pressed down to seat against the scales using tweezers to keep CA off my fingers, used a tooth pick to spread excess CA fairly evenly over inlay being careful not to move inlay. When CA was dry I simply sanded smooth being careful not to sand into the inlay.
"If You Knew Half of What I Forgot You Would Be An Idiot" - by DoughBoy68
-
03-17-2015, 08:23 PM #8Member
- Join Date
- Mar 2015
- Location
- Anchorage, AK
- Posts
- 59
Thanked: 4
I saw that too. Which got me thinking.
"We are all erring creatures, and mainly idiots, but God made us so and it is dangerous to criticise."
Mark Twain- Letter to the President of Western Union, New York, 1902
-
03-17-2015, 08:30 PM #9Member
- Join Date
- Mar 2015
- Location
- Anchorage, AK
- Posts
- 59
Thanked: 4
What I'm thinking of doing at first anyway is something like an inlaid script on the scales. Thinking of a proper inlay material has got me perplexed a bit due to lack of general knowledge. A smooth flowing cursive word is the effect I'm after. Thinking once I get the script cut in maybe braising silver into the cavities, then sanding it down till the script looks clean and flush with the rest of the scale. Basically inlaying a scaled down version of this script into a scale is my goal Originally Posted by Substance
 "We are all erring creatures, and mainly idiots, but God made us so and it is dangerous to criticise."
Mark Twain- Letter to the President of Western Union, New York, 1902
-
03-17-2015, 08:36 PM #10Member
- Join Date
- Mar 2015
- Location
- Anchorage, AK
- Posts
- 59
Thanked: 4
I saw that too. Which got me thinking. Originally Posted by Atchbo
"We are all erring creatures, and mainly idiots, but God made us so and it is dangerous to criticise."
Mark Twain- Letter to the President of Western Union, New York, 1902


 Reply With Quote
