
Results 11 to 19 of 19
 45Likes
Thread: Wire Inlay Again
 LinkBack URL
 About LinkBacks
-
05-16-2015, 10:55 PM #11Senior Member


- Join Date
- Feb 2012
- Location
- Menominee,MI
- Posts
- 1,624
Thanked: 325
Well got them shaped and a quick coat of oil to see what they will look like and I think I will give it another try since I have enough walnut left for a couple more sets of blanks and some different wire on the way. I modified one of my chisel handles and hopefully that will give me better control. I need to work on transferring the design better. If I could print it out and iron it on it would work alot easier, but since I can't I have to do it by hand with carbon paper.
-
05-17-2015, 01:49 AM #12Senior Member


- Join Date
- May 2014
- Location
- Easley, SC, USA
- Posts
- 1,861
Thanked: 480
For transferring the designs, I use a needle and poke through the pattern into the wood about every 1/16 of an inch. Then I join the dots on the wood with pencil (white pencil if on dark wood).
Some people never go crazy. What truly horrible lives they must lead - Charles Bukowski
-
The Following 3 Users Say Thank You to criswilson10 For This Useful Post:
Geezer (05-17-2015), JSmith1983 (05-17-2015), Steel (05-19-2015)
-
05-17-2015, 11:18 PM #13Senior Member

- Join Date
- Aug 2013
- Location
- New Zealand
- Posts
- 268
Thanked: 75
JSmith, this looks amazing. Think you've done an excellent job and you've inspired me to try something new. Thank you for sharing!
-
The Following User Says Thank You to Suavio For This Useful Post:
JSmith1983 (05-18-2015)
-
05-23-2015, 06:53 PM #14
Same here. I have not attempted this task yet but would like to. It looks very well done!
 Originally Posted by Suavio

-
The Following User Says Thank You to engine46 For This Useful Post:
JSmith1983 (05-23-2015)
-
05-25-2015, 03:48 AM #15Senior Member
- Join Date
- Feb 2012
- Location
- Menominee,MI
- Posts
- 1,624
Thanked: 325
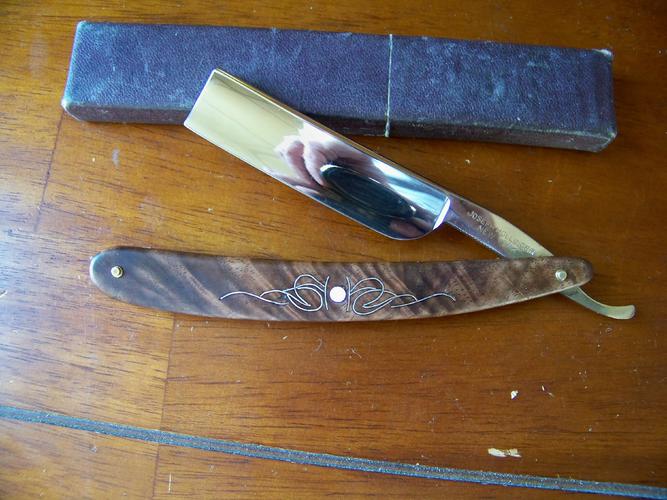
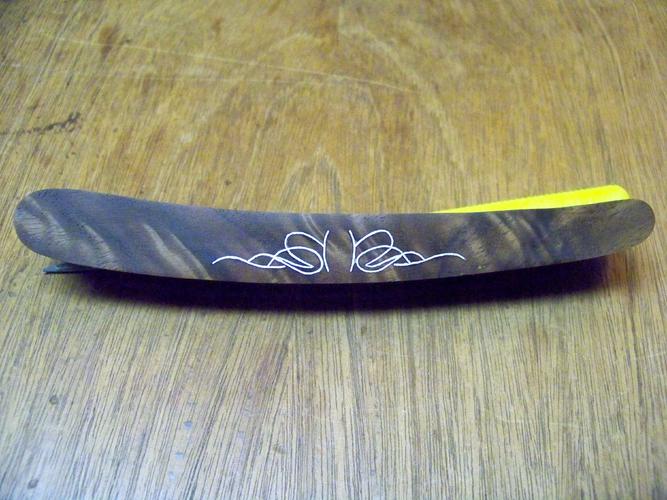
Ok gave it another go and thanks to the idea of connecting the dots I was able to transfer the design alot easier and more even and cutting the groove was easier. I also made a push rod so I can push the wires from side to side to help keep the design flowing nicely. This time I also made sure to cut all the lines first and then set the wire. This helped with creating tighter junctions where the lines connected. I am happy with this attempt, but I ended up sanding the scales with more of a curve than the last one and that made me have to use a smaller pattern which made doing the inlay even harder. I also did some more reading and learned a tip that I thought I would share in case someone wants to attempt wire inlays. Unfortunately I didn't find it till after I already sanded everything smooth. Tip is to smear a glue (wood glue, etc.) over the inlay before filing/sanding completely flush and let it dry. After that then finish getting it flush. This is supposed to help keep the edges of the wire from creating a burr and becoming fuzzy looking and keeping the lines smooth and sharp looking. Will have to try this next time since now I got better tools, different wire and I am sure I will have to do this again.
Last edited by JSmith1983; 05-25-2015 at 05:09 AM.
-
05-25-2015, 04:16 AM #16
Thank you for the extra tip! I will attempt this one of these days! Originally Posted by JSmith1983
-
The Following User Says Thank You to engine46 For This Useful Post:
JSmith1983 (05-25-2015)
-
05-25-2015, 08:33 AM #17Senior Member

- Join Date
- May 2012
- Location
- Oxford, Al
- Posts
- 1,605
Thanked: 407
Looks great. Remember one who cares about the quality of their work is the biggest nitpicker.
Mastering implies there is nothing more for you to learn of something... I prefer proficient enough to not totally screw it up.
-
The Following User Says Thank You to tiddle For This Useful Post:
JSmith1983 (05-25-2015)
-
05-25-2015, 12:51 PM #18
Wow, that is very well done.
CongratsIf you don't care where you are, you are not lost.
-
The Following User Says Thank You to rolodave For This Useful Post:
JSmith1983 (05-25-2015)
-
05-25-2015, 03:36 PM #19Senior Member
- Join Date
- May 2014
- Location
- Easley, SC, USA
- Posts
- 1,861
Thanked: 480
Looks great!
Adding wood glue before sanding doesn't really reduce the burr, but it does fill in any gaps around the wire and hopefully help keep the wire in place if you get too heavy handed while sanding.Some people never go crazy. What truly horrible lives they must lead - Charles Bukowski
-
The Following User Says Thank You to criswilson10 For This Useful Post:
JSmith1983 (05-25-2015)


 Reply With Quote


