Page 1 of 2 12 LastLast
Results 1 to 10 of 17
Like Tree20Likes

Thread: Razor scales - Let's get creative!

  1. #1
    Junior Tinkerer Srdjan's Avatar
    Join Date
    Apr 2014
    Location
    Canberra
    Posts
    799
    Thanked: 242

    Default Razor scales - Let's get creative!

    As Movember is long underway and I have not been shaving much, figured I'd post this bit of work I've done for fun a while ago. Several people found these scales interesting and have wondered what they are and how they were made. Some people have seen them temp-mounted on blades and asked: "Why aren't these permanent???".

    I will give as much explanation of the process, as I can. Sadly I don't have many pictures anymore, but the ones below should do just fine.

    Well anyway, for now they remain my test scales, I have no desire to peen any razor in them. Who knows, maybe when I run out of wood, horn, bone, G10...
    I hope you find this at least a little inspiring and of course, feel free to share your own ideas and creations. Rock on!
    Name:  Image-1447287067135.jpg
Views: 258
Size:  23.6 KB
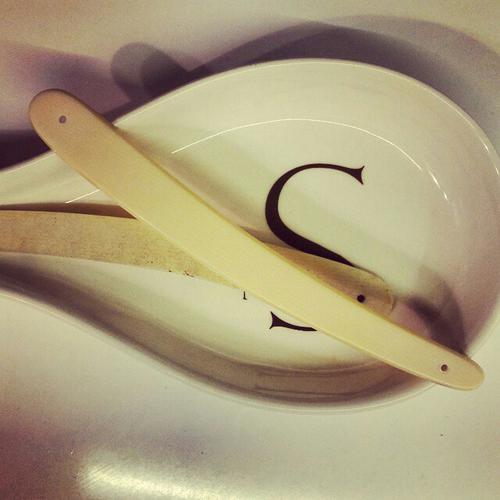
    Fig 1. - Just ordinary celluloid scales

    In this step you will need..... A decent pair of celluloid scales duh!

    Name:  Image-1447287077877.jpg
Views: 239
Size:  23.0 KB
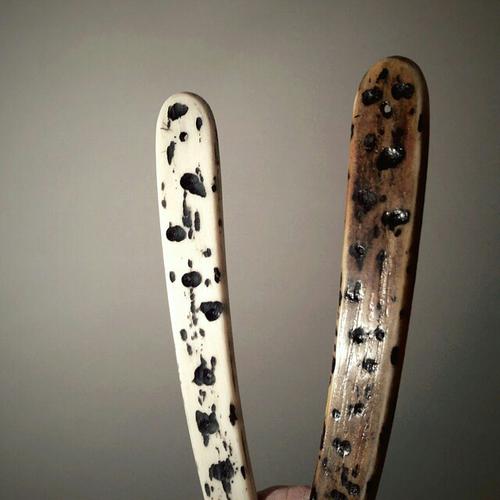
    Fig 2.a. - Left: The easy part (the beginning).
    Fig 2.b. - Right: Mid-process checkpoint


    2.a. Steps to get here apply to both sides, of course. This was done using an accu drill (hand held), a few bigger drill bits and a burr bit, a can of matte spray paint and some sand paper. Let's assume the drill bits were 10mm and 5mm, or approx 3/8" and 3/16". The burr bit was one of those 5-10mm ones and sandpaper used was probably 400-800 grit.

    I took the drill and created shallow dents with drill bits at first. Then I went on to deform those dents with a burr bit. Also created random lines, flecks, bites on the sides, etc. I then proceeded to paint the surface with my matte spray. Glossy spray may work, but I figured at this stage I wanted the entire surface to have the same look - so matte. I was going to let the CA alone give it the final, finished look. After they had dried at this stage, I took the sandpaper and lightly sanded off the surface. This removed everything but the paint in the dents, of course. After I was happy with the finish, I moved on to the fun part.

    2.b. To get here I needed: thin, or medium CA, ebony and cocobolo dust, two separate mixing containers, something thin to mix with, protective latex gloves and some kitchen towels (paper, like the toilet paper kind). The wood dust was created with 800 grit paper. I then proceeded to mix it with CA and apply it in thin layers to the scales. I realized I shouldn't try to apply both red and black dust in the same layer/same mix. They would combine into one mushy color and I wasn't after that. I wanted clear red and black areas, with a bit of yellow peaking out. This probably took as many as 12 layers, lightly (or aggressively) sanding each one after application. On 2, or 3 occasions, I'd remove the last layer completely, because I didn't like the blend. This is how I would coat:
    1. CA and ebony
    2. Clear CA
    3. Clear CA
    4. CA and cocobolo
    5. Clear CA
    6. CA and ebony
    7. Clear CA
    8. Clear CA
    9. CA and cocobolo
    10. Clear CA
    11. CA and ebony
    ....
    .... and so on, you get the picture. Clear CA coats are important to keep the dust mixes well separated, as I found.

    Name:  Image-1447287102678.jpg
Views: 233
Size:  26.3 KB
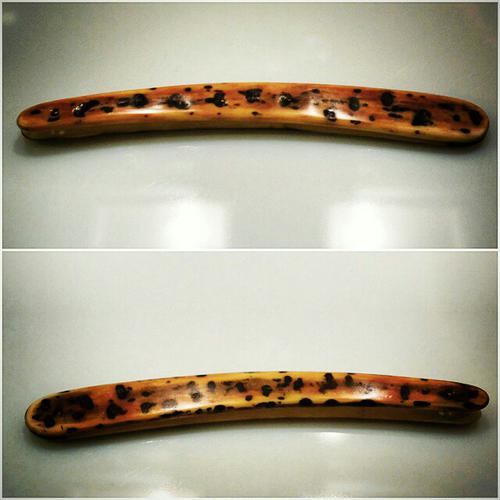
    Fig 3. - Completed

    3. The finished product probably has one, or two clear coats of CA applied at the end. Rough spots and excess CA was sanded down with 320 grit, moving to 400, 600, 800, 1000, 2000. After this I did a bit of polishing with a clean microfiber cloth and this gave them a nice shine.

    Cheers!
    S.

  2. The Following 8 Users Say Thank You to Srdjan For This Useful Post:

    aalbina (11-12-2015), bongo (11-12-2015), DeObfuscate (11-12-2015), outback (11-12-2015), RezDog (11-12-2015), spazola (11-12-2015), Thug (11-12-2015), Utopian (11-12-2015)

  3. #2
    Senior Member DeObfuscate's Avatar
    Join Date
    Nov 2015
    Location
    SouthWest Louisiana
    Posts
    105
    Thanked: 12

    Default

    Interesting finish. Thanks for sharing the technique.
    I have a Torrey that was damaged, lost 1/2" inch in length. It won't ever be beautiful, but distressed scales would suit this shorty well.
    Srdjan likes this.
    To deobfuscate is to convert something that is difficult to un͝d̡͝e҉͞r̴͝st̨̕a͘͢n̢̛d̕̕ ̧͝
    into one that is simple, understandable and straightforward.

  4. #3
    Pasted Man Castel33's Avatar
    Join Date
    Jul 2010
    Posts
    1,283
    Thanked: 269

    Default

    Some nice looking scales and interesting process
    Srdjan likes this.

  5. #4
    Senior Member Ernie1980's Avatar
    Join Date
    Dec 2013
    Location
    Texas
    Posts
    1,568
    Thanked: 269

    Default

    Interesting idea... I am always on the look out for interesting scale materials!
    Srdjan likes this.

  6. #5
    Senior Member blabbermouth outback's Avatar
    Join Date
    Mar 2015
    Location
    Akron, Ohio
    Posts
    11,944
    Thanked: 4300

    Default

    Quote Originally Posted by Srdjan View Post
    As Movember is long underway and I have not been shaving much, figured I'd post this bit of work I've done for fun a while ago. Several people found these scales interesting and have wondered what they are and how they were made. Some people have seen them temp-mounted on blades and asked: "Why aren't these permanent???".

    I will give as much explanation of the process, as I can. Sadly I don't have many pictures anymore, but the ones below should do just fine.

    Well anyway, for now they remain my test scales, I have no desire to peen any razor in them. Who knows, maybe when I run out of wood, horn, bone, G10...
    I hope you find this at least a little inspiring and of course, feel free to share your own ideas and creations. Rock on!

    Name:  Image-1447287067135.jpg
Views: 258
Size:  23.6 KB
    Fig 1. - Just ordinary celluloid scales

    In this step you will need..... A decent pair of celluloid scales duh!


    Name:  Image-1447287077877.jpg
Views: 239
Size:  23.0 KB
    Fig 2.a. - Left: The easy part (the beginning).
    Fig 2.b. - Right: Mid-process checkpoint


    2.a. Steps to get here apply to both sides, of course. This was done using an accu drill (hand held), a few bigger drill bits and a burr bit, a can of matte spray paint and some sand paper. Let's assume the drill bits were 10mm and 5mm, or approx 3/8" and 3/16". The burr bit was one of those 5-10mm ones and sandpaper used was probably 400-800 grit.

    I took the drill and created shallow dents with drill bits at first. Then I went on to deform those dents with a burr bit. Also created random lines, flecks, bites on the sides, etc. I then proceeded to paint the surface with my matte spray. Glossy spray may work, but I figured at this stage I wanted the entire surface to have the same look - so matte. I was going to let the CA alone give it the final, finished look. After they had dried at this stage, I took the sandpaper and lightly sanded off the surface. This removed everything but the paint in the dents, of course. After I was happy with the finish, I moved on to the fun part.

    2.b. To get here I needed: thin, or medium CA, ebony and cocobolo dust, two separate mixing containers, something thin to mix with, protective latex gloves and some kitchen towels (paper, like the toilet paper kind). The wood dust was created with 800 grit paper. I then proceeded to mix it with CA and apply it in thin layers to the scales. I realized I shouldn't try to apply both red and black dust in the same layer/same mix. They would combine into one mushy color and I wasn't after that. I wanted clear red and black areas, with a bit of yellow peaking out. This probably took as many as 12 layers, lightly (or aggressively) sanding each one after application. On 2, or 3 occasions, I'd remove the last layer completely, because I didn't like the blend. This is how I would coat:
    1. CA and ebony
    2. Clear CA
    3. Clear CA
    4. CA and cocobolo
    5. Clear CA
    6. CA and ebony
    7. Clear CA
    8. Clear CA
    9. CA and cocobolo
    10. Clear CA
    11. CA and ebony
    ....
    .... and so on, you get the picture. Clear CA coats are important to keep the dust mixes well separated, as I found.


    Name:  Image-1447287102678.jpg
Views: 233
Size:  26.3 KB
    Fig 3. - Completed

    3. The finished product probably has one, or two clear coats of CA applied at the end. Rough spots and excess CA was sanded down with 320 grit, moving to 400, 600, 800, 1000, 2000. After this I did a bit of polishing with a clean microfiber cloth and this gave them a nice shine.

    Cheers!
    S.
    I have to ask this because I've had this happen to just about all of my CA finnished scales.
    Has your finnish cracked yet after pinning. Takes a week or so.
    It doesn't seem to like the flexing of the scales, when opening and closing the blade.?
    Mike

  7. #6
    Junior Tinkerer Srdjan's Avatar
    Join Date
    Apr 2014
    Location
    Canberra
    Posts
    799
    Thanked: 242

    Default

    Quote Originally Posted by outback View Post
    I have to ask this because I've had this happen to just about all of my CA finnished scales.
    Has your finnish cracked yet after pinning. Takes a week or so.
    It doesn't seem to like the flexing of the scales, when opening and closing the blade.?
    Mike I hope you're doing well these days. I haven't had this problem yet.. but then again, I dont tighten the scales all that much - just enough for them hold the blade in a vertically open position, without it falling freely back into the scales.. if you know what I mean? I guess that might be one source of the problem. Another one may be coating.. how thick do you go and how many coats do you apply? I generally go as thin as possible with a medium CA and probably do as many as 8-10 coats. Another one that comes to mind .. how fresh is your CA? I think if it's not fresh, it may become weaker. I've read about shelf life once the stuff is open. I've gone past that period, but not too long.

    I will inspect the one blade I still have at home, finished in CA probably over 6 months ago... perhaps snap a photo and attach here as well.
    As the time passes, so we learn.

  8. #7
    Senior Member miha's Avatar
    Join Date
    Apr 2013
    Location
    Slovenia
    Posts
    489
    Thanked: 83

    Default

    Llooks great! do the CA layers and different wood dust create a 3D layer like effect, maybe more CA layers should be inbetween in order to achieve this effect?

  9. #8
    Senior Member blabbermouth outback's Avatar
    Join Date
    Mar 2015
    Location
    Akron, Ohio
    Posts
    11,944
    Thanked: 4300

    Default

    Quote Originally Posted by Srdjan View Post
    Mike I hope you're doing well these days. I haven't had this problem yet.. but then again, I dont tighten the scales all that much - just enough for them hold the blade in a vertically open position, without it falling freely back into the scales.. if you know what I mean? I guess that might be one source of the problem. Another one may be coating.. how thick do you go and how many coats do you apply? I generally go as thin as possible with a medium CA and probably do as many as 8-10 coats. Another one that comes to mind .. how fresh is your CA? I think if it's not fresh, it may become weaker. I've read about shelf life once the stuff is open. I've gone past that period, but not too long.

    I will inspect the one blade I still have at home, finished in CA probably over 6 months ago... perhaps snap a photo and attach here as well.
    Doing great now...
    Dates are good.
    Coat about the same.
    Give ample time between coats(gassing).
    And aren't too tight.
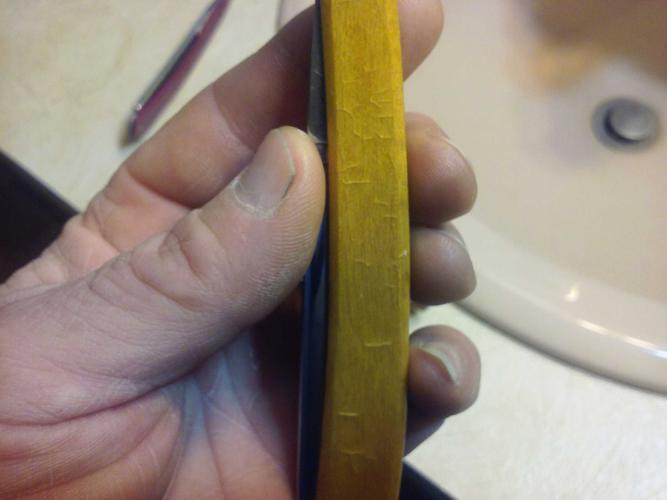
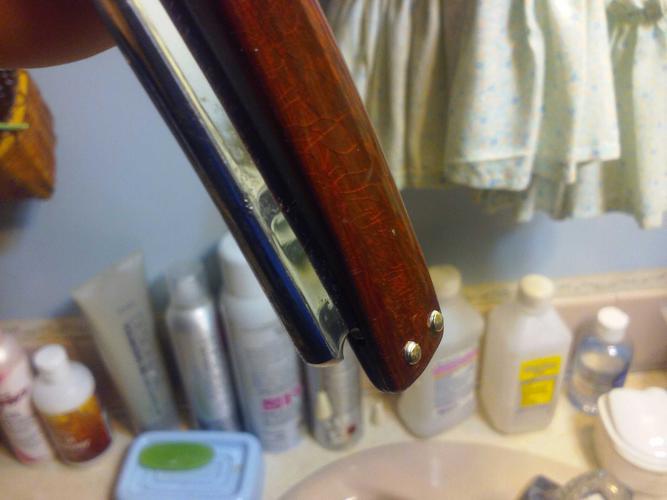
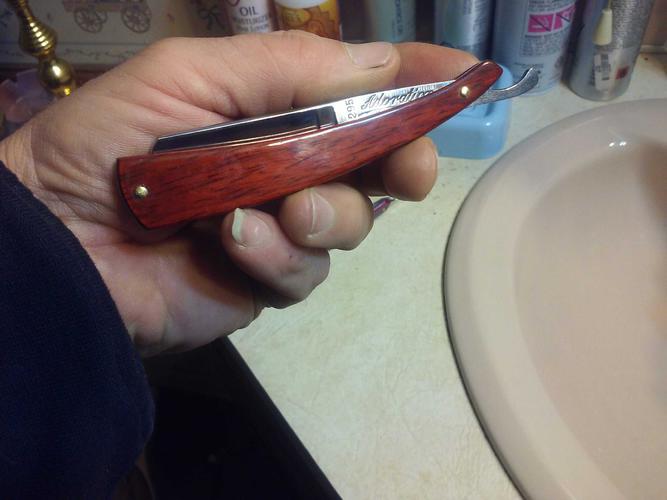
    They crack all over.

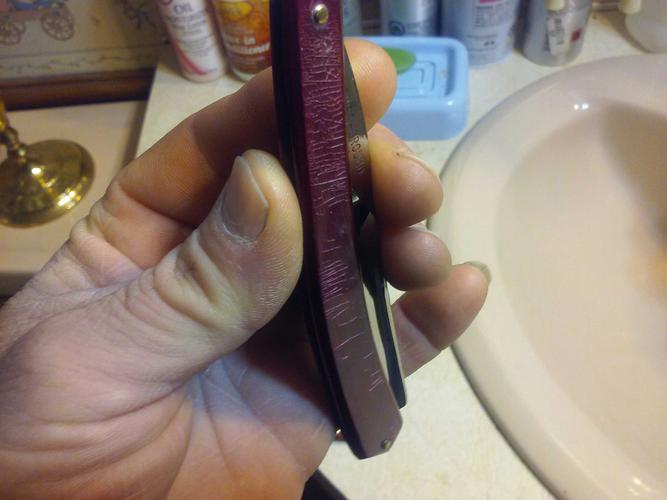
    Is it because i only do two thin coats inside the scales? ( just to seal).
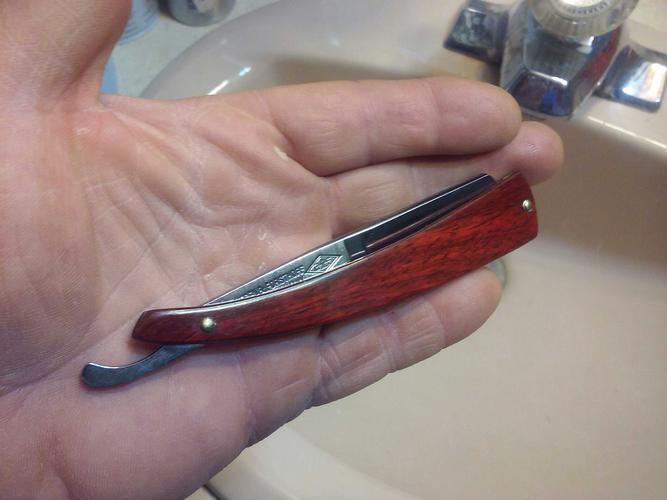
    Here's some pics.
    Name:  uploadfromtaptalk1447354573785.jpg
Views: 142
Size:  25.8 KBName:  uploadfromtaptalk1447354719003.jpg
Views: 144
Size:  32.2 KB
    The last one isn't as noticeable, and on only one side.
    Name:  uploadfromtaptalk1447354961321.jpg
Views: 137
Size:  32.7 KB
    My shorty is the only one that this hasn't happened to.
    Name:  uploadfromtaptalk1447355189633.jpg
Views: 140
Size:  31.8 KBName:  uploadfromtaptalk1447355367442.jpg
Views: 141
Size:  30.8 KB
    Srdjan likes this.
    Mike

  10. #9
    Fatty Boom Boom WW243's Avatar
    Join Date
    Jul 2012
    Location
    Rockville
    Posts
    3,258
    Thanked: 638

    Default

    Call it a crackle finish Mike and say you did it on purpose. It looks kind of cool.
    outback likes this.
    "Call me Ishmael"
    CUTS LANE WOOL HAIR LIKE A Saus-AGE!

  11. #10
    Junior Tinkerer Srdjan's Avatar
    Join Date
    Apr 2014
    Location
    Canberra
    Posts
    799
    Thanked: 242

    Default

    Dang Outback! I thought this had something to do with cracking around the pins.. This never happened to me. Perhaps my scales don't bend as much during normal use, or perhaps it's just the CA. I use this stuff:
    http://pages.ebay.com/link/?nav=item...819972&alt=web

    I agree it looks cool, kinda like the cracking on vintage guitars, done with nitro-cellulose lacquer.
    As the time passes, so we learn.

Page 1 of 2 12 LastLast

Posting Permissions

  • You may not post new threads
  • You may not post replies
  • You may not post attachments
  • You may not edit your posts
  •