
Results 1 to 7 of 7
 12Likes

Thread: Fixing a chipped toe
 LinkBack URL
 About LinkBacks
-
11-20-2015, 10:02 PM #1Senior Member


- Join Date
- Jul 2014
- Location
- The Lone Star State
- Posts
- 183
Thanked: 51 Fixing a chipped toe
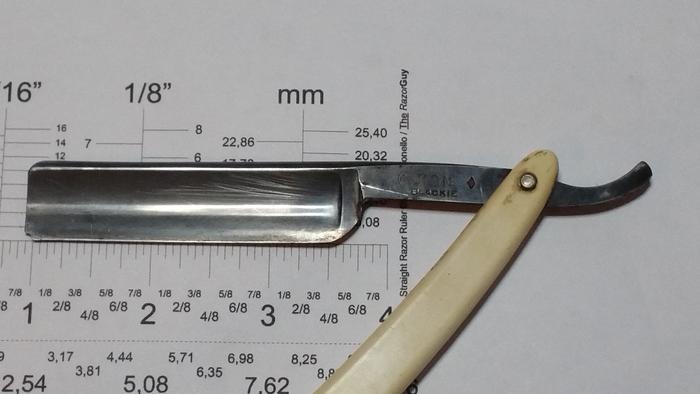
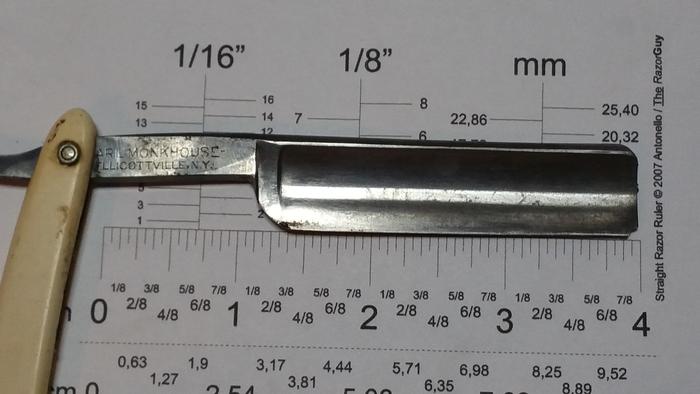
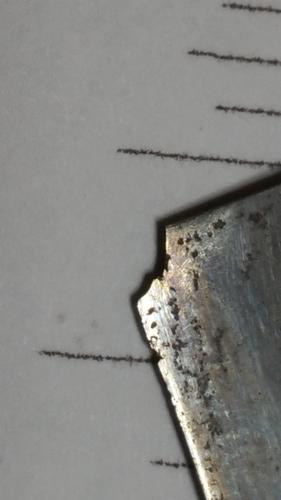
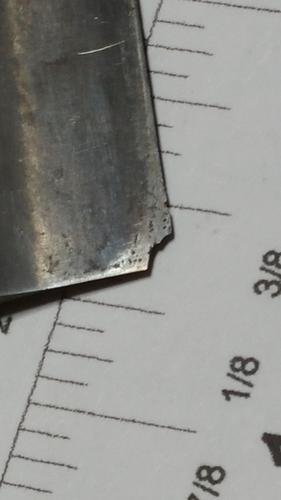
I picked up a C-Mon Blackie the other day for pretty cheap at an antique shop. I liked it in spite of the toe and I'm a sucker for a C-Mon. I've never taken on restoring a chipped toe before and need a little advice. I don't feel comfortable taking the Dremel to it especially with it being such a hollow grind. Here is what I have to work with, a Naniwa SS 220, DMT D8C, a Naniwa SS 1k, Chosera 1k and various grits of sandpaper. Which of those would you fellas recommend starting with? And any tips to minimize the risk of doing further damage would be greatly appreciated.
-
11-20-2015, 10:20 PM #2Senior Member


- Join Date
- Mar 2012
- Location
- Thunder Bay, Ontario, Canada
- Posts
- 17,324
Thanked: 3228
Just rework it to match what the toe end of the spine looks like with a DMT 325. At least that is what I would try.
BobChevhead and notitfortat like this.Life is a terminal illness in the end
-
11-20-2015, 11:20 PM #3At this point in time...


- Join Date
- Jun 2007
- Location
- North Idaho Redoubt
- Posts
- 27,052
- Blog Entries
- 1
Thanked: 13249
I was reading the answers you were getting on FB about that razor and just had to giggle..
Ok first off you need to check that Swiss Cheese looking steel at the toe
You want to get rid of that, and make sure you have solid steel to hone otherwise you are simply wasting time
Take a Black Sharpie and try coloring out the area that needs to be taken off to make the toe look natural, take a pic of each design then compare the pics so you can get an idea of the work involved..
Keeping mind that steel by the edge is easy to remove but to create a natural look you are going to have to grind the spine back also and that isn't as easy . I have found after doing many of these that the black magic marker and pics really helps me to see the smartest route to getting a good look..
Working that toe with a Dremmel is doable but they can get away from you pretty fast so take your time it you go that route, that will also keep the heat down..
Good luck go slow
-
11-20-2015, 11:36 PM #4Senior Member
- Join Date
- Jul 2014
- Location
- The Lone Star State
- Posts
- 183
Thanked: 51
Thanks Glen. Excellent advice. Hopefully it's not a lost cause. Are there any specific threads here that you know of with photos of grinding the spine as you mentioned? Thanks again.
-
11-20-2015, 11:38 PM #5At this point in time...
- Join Date
- Jun 2007
- Location
- North Idaho Redoubt
- Posts
- 27,052
- Blog Entries
- 1
Thanked: 13249
Yeah I did do one and even showed the Pics I took of it
IIRC it was a Dubl Duck let me see if I can find it for yanotitfortat likes this.
-
11-21-2015, 12:20 AM #6The Great & Powerful Oz

- Join Date
- May 2008
- Location
- Bodalla, NSW
- Posts
- 15,636
Thanked: 3751
Unless you're really keen to make it a spike point you could simply 'mute' the point.
After you get past the swiss cheesed edge to fresh steel that mute could be quite small.
If the heel is rusted also, it may need to be ground back a little.The white gleam of swords, not the black ink of books, clears doubts and uncertainties and bleak outlooks.
-
11-21-2015, 05:48 PM #7Senior Member
- Join Date
- Apr 2012
- Location
- Diamond Bar, CA
- Posts
- 6,553
Thanked: 3215
Put it on the 1k and see what a new bevel looks like, I suspect you will lose at least a 1/16 th to get to solid steel and a straight edge. The whole edge looks sketchy and yea, the toe need some work.
If you see pitting on the new bevel, either hone it out or just breadknife. It may decide for you how you will handle the toe.BobH and notitfortat like this.


 Reply With Quote