Results 1 to 9 of 9
Like Tree12Likes
  • 4 Post By Benjisco
  • 2 Post By Euclid440
  • 2 Post By ejmolitor37
  • 2 Post By engine46
  • 1 Post By sharptonn
  • 1 Post By Benjisco

Thread: My 1st re-scaling Wade and Butcher "Celebrated Hollow Ground"

  1. #1
    Member
    Join Date
    Jun 2014
    Location
    UK
    Posts
    67
    Thanked: 2

    Default My 1st re-scaling Wade and Butcher "Celebrated Hollow Ground"

    Name:  SURFACERT - WIN_20151221_125301.jpg
Views: 203
Size:  16.2 KBName:  SURFACERT - WIN_20151221_125311.jpg
Views: 193
Size:  18.6 KBName:  SURFACERT - WIN_20151221_125417.jpg
Views: 183
Size:  20.1 KB

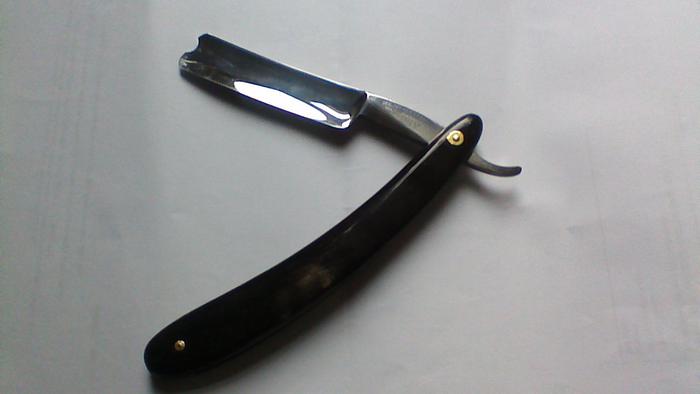
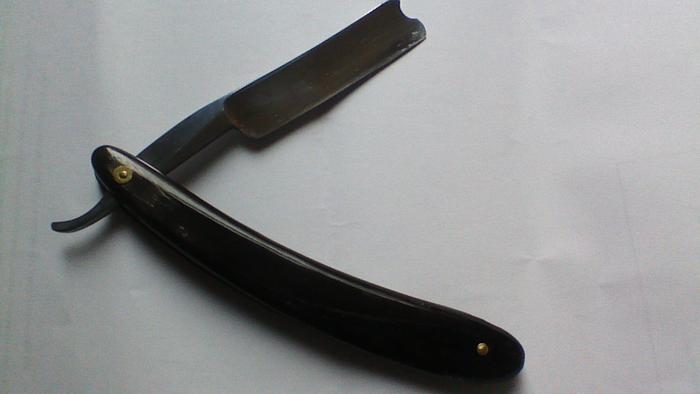
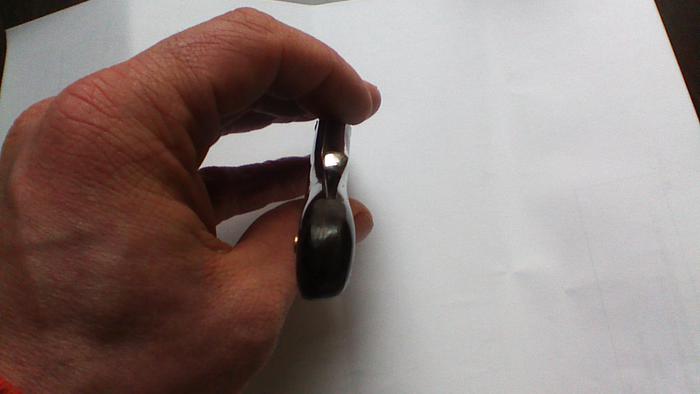
    Forgive my ropey photography. I bought this Wade and Butcher on EBay as a project, it arrived with a dreadful set of square edged blonde scales but the blade was in great shape, other than being polished to within an inch of its life. I found a set of horn scales that I thought would suit the blade from EBay and purchased shortly after.
    I must admit I made many mistakes along the way, 1st I tried to drill the holes in the scales free hand and although one hole was perfect but the other was a little off and caused me some problems when polishing the wedge and I think has caused the blade to shut off centre. The second was I lost one of the small brass washers in my old work bench so had to revert to using 2 larger on at the pivot.
    But nonetheless, I'm very happy with my results and despite all the mistakes it still looks better than when I received it. I'm open to criticism and advice, just be gentle

  2. #2
    Senior Member NewellVW's Avatar
    Join Date
    Apr 2015
    Location
    Illinois
    Posts
    282
    Thanked: 89

    Default

    Really nice job! Looking good! Love that you put it back to a more original look.

  3. #3
    Member
    Join Date
    Jun 2014
    Location
    UK
    Posts
    67
    Thanked: 2

    Default

    Thanks for the kind words NewellVW. I'm really happy with results and looking forward to honing it up and using it

  4. #4
    Senior Member blabbermouth
    Join Date
    Apr 2012
    Location
    Diamond Bar, CA
    Posts
    6,553
    Thanked: 3215

    Default

    Looks good. You can make the holes a bit larger than the pins to give you a little wiggle room to straighten a blade. Look at the blade on a flat surface to check for warp so you know going in what to expect, mocking up with small bolts will tip you to problems.

    You can chuck large washers in a hand drill, Dremel or drill press with nut and bolt and grind them smaller with a file or sandpaper glued to a paint stick or thin piece of wood, then polish at the same time. Brass cuts quickly. Doming also is a more finished look and provides a bit more tension at the pin.

    Putting washers in a small plastic condiment container from fast food store, immediately after disassembly, helps prevent losing small parts. And working on a clean paper towel help me find small parts.

    All that counts is that it is back in service and you are happy.

    Good work, should be a shaver.
    sharptonn and Willisf like this.

  5. The Following User Says Thank You to Euclid440 For This Useful Post:

    Benjisco (12-21-2015)

  6. #5
    Member
    Join Date
    Jun 2014
    Location
    UK
    Posts
    67
    Thanked: 2

    Default

    Thanks for the advice Euclid, ill bare that in mind on the next project

  7. #6
    Senior Member blabbermouth ejmolitor37's Avatar
    Join Date
    Oct 2015
    Location
    Knoxville,IA
    Posts
    2,368
    Thanked: 762

    Default

    Looks great, I just did one and it is not as easy as one might think. But all we can do is learn and do it again, good job
    sharptonn and outback like this.

  8. #7
    Senior Member blabbermouth engine46's Avatar
    Join Date
    Feb 2014
    Location
    Republic of Texas
    Posts
    7,810
    Thanked: 1744
    Blog Entries
    2

    Default

    Quote Originally Posted by Euclid440 View Post
    Looks good. You can make the holes a bit larger than the pins to give you a little wiggle room to straighten a blade. Look at the blade on a flat surface to check for warp so you know going in what to expect, mocking up with small bolts will tip you to problems.

    You can chuck large washers in a hand drill, Dremel or drill press with nut and bolt and grind them smaller with a file or sandpaper glued to a paint stick or thin piece of wood, then polish at the same time. Brass cuts quickly. Doming also is a more finished look and provides a bit more tension at the pin.

    Putting washers in a small plastic condiment container from fast food store, immediately after disassembly, helps prevent losing small parts. And working on a clean paper towel help me find small parts.

    All that counts is that it is back in service and you are happy.

    Good work, should be a shaver.

    Yep. I have drilled a hole slightly off a little on scales so I'll enlarge it or I have also bought some slightly larger drill bits off eBay by typing in what size I'm looking for & I usually find what I need. I need to get me a better drill press. I also have the drill press attachment for my Dremel but it isn't exactly a perfect 90 degrees so I will tweak the adjustment a little on it. I'll find me a better drill press though. The one I have came from Harbor freight & although my belt sander from there works ok & my buffer on a pedestal works good, the drill press sucks plus it won't hold a small 1/16" drill bit or even the slightly larger ones I have. For thinner thrust washers, I use the ones I get from Micro Fasteners & I will hammer them flatter on my anvil until I'm happy with the much thinner results but it closes the ID up so I will hold the thrust washer with my smooth needle nose pliers & drill the ID back out to the right size & deburr it from the drilling.

    Benjisco, you did a good job on your first set of scales.
    Last edited by engine46; 12-23-2015 at 12:51 AM.
    sharptonn and Willisf like this.

  9. #8
    Razor Vulture sharptonn's Avatar
    Join Date
    Oct 2010
    Location
    Lone Star State
    Posts
    25,877
    Thanked: 8589

    Default

    Hats-off to those who make scales. Lord knows I don't!
    Quite a journey to do it right! Got to begin with solid. These look quite solid!
    Hone it up!
    outback likes this.
    "Don't be stubborn. You are missing out."
    I rest my case.

  10. #9
    Member
    Join Date
    Jun 2014
    Location
    UK
    Posts
    67
    Thanked: 2

    Default

    All honed up and ready to go, used the dilucot method and finished it on my welsh slate hone, by the time I finished it, it passed a hanging hair test. I love honing Sheffield steel! Looking forward to my Christmas day shave with it.
    Name:  SURFACERT - WIN_20151223_095645.jpg
Views: 70
Size:  30.2 KB
    sharptonn likes this.

Posting Permissions

  • You may not post new threads
  • You may not post replies
  • You may not post attachments
  • You may not edit your posts
  •