
Results 1 to 10 of 11
 1Likes
 LinkBack URL
 About LinkBacks
-
12-27-2015, 09:40 PM #1Junior Member

- Join Date
- Dec 2015
- Posts
- 29
Thanked: 0 Best way to get rid of rust spider/ and pitting on a restore razor
Hi Wat is the best way to get rid of spider rust and pitting
On a razor I am restoring
hand sand/ bench polish
both
any.help much we'll come
robert
-
12-27-2015, 10:22 PM #2Senior Member

- Join Date
- Jun 2013
- Location
- Pompano Beach, FL
- Posts
- 4,049
Thanked: 636
Good photos first and then members can advise.
-
12-27-2015, 11:34 PM #3Junior Member
- Join Date
- Dec 2015
- Posts
- 29
Thanked: 0
Okay
will try tomorrow is a 4 of. Clock start for me so in the afternoon
will try then
I have about 15 of them
many thanks
bobby66
-
12-28-2015, 04:47 AM #4Junior Member
- Join Date
- Dec 2015
- Posts
- 29
Thanked: 0
 Originally Posted by bobby66

-
12-28-2015, 04:53 AM #5Senior Member

- Join Date
- Sep 2014
- Location
- Yorkton, Saskatchewan, Canada
- Posts
- 1,171
Thanked: 230
Nice straight razors.....
Well first off.... sanding. Start at a higher grit and see what happens. The lower the grit, the more aggressive it will on the blade. Also leaves deeper marks. That's why I said start at a higher grit and work down if needed. Take your time and work it until you like what you are seeing.
 Is it over there or over yonder?
-
12-28-2015, 04:53 AM #6Junior Member
- Join Date
- Dec 2015
- Posts
- 29
Thanked: 0
 [QUOTE=bobby66;1581546][/QUO
-
12-28-2015, 04:56 AM #7Junior Member
- Join Date
- Dec 2015
- Posts
- 29
Thanked: 0
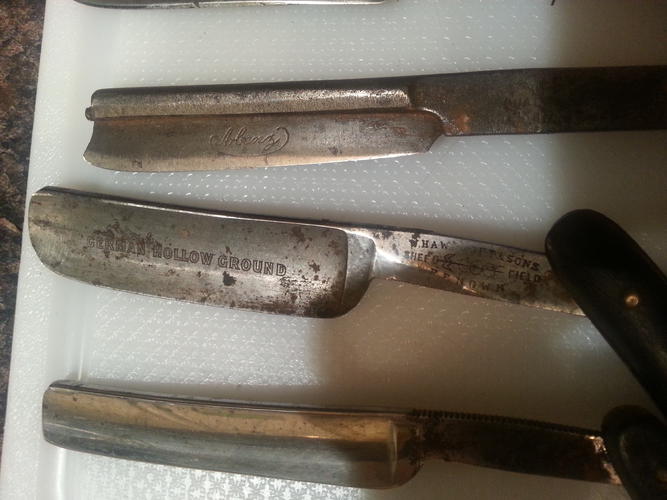
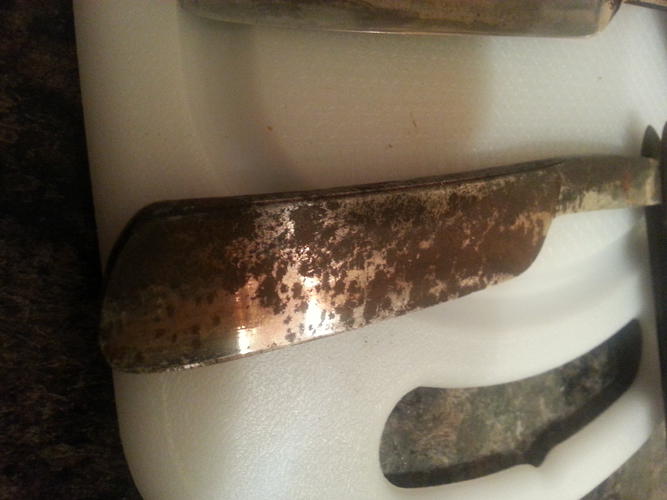
[ATTACH=CONFIG]222747[/ATTACH[QUOTE=bobby66;1581557]
Originally Posted by bobby66
-
12-28-2015, 05:43 AM #8Senior Member


- Join Date
- Feb 2013
- Location
- Haida Gwaii, British Columbia, Canada
- Posts
- 14,458
Thanked: 4830
It is most likely that you will have to do some sanding. You can clean them first with steel wool or a single edge razor blade and get some of the major gunk off first. I think that all those razors have some serious issues except the small full hollow. I trust by the question that these are your first project. They are not very good beginner projects. The larger hollow ground need to have a bevel set before you put very much work in to it because of the level of rust at the bevel on the back side. It needs to be ground back far enough to find good steel. Two of the frame backs have geometry issues and will be difficult for you to asses and repair at this point. The outside frame back looks to be fairly rusty and will also need a bevel set before you do much with it. See if you can get the small hollow ground leaned up with some 000 steel wool and WD-40. It is likely your best candidate for recovery.
It's not what you know, it's who you take fishing!
-
12-28-2015, 05:57 AM #9Senior Member
- Join Date
- Sep 2015
- Posts
- 695
Thanked: 77
I prefer to start with a high grit and only move down if necessary. My reasoning for this is that using lower grits leaves a lot of room to loose medal that you don't need to loose. Very important to prevent loosing blade etchings. Originally Posted by Willisf
-
12-28-2015, 09:19 AM #10Senior Member

- Join Date
- Apr 2008
- Location
- Saint Paul, Minnesota, United States
- Posts
- 2,944
Thanked: 433
Start with steel wool and metal polish and see where you get. You might be surprised. The heavier red rust will need some wet/dry sandpaper
rolodave likes this.


 Reply With Quote