Page 1 of 2 12 LastLast
Results 1 to 10 of 11
Like Tree26Likes

Thread: oval wedge making

  1. #1
    Senior Member Oustoura's Avatar
    Join Date
    Apr 2015
    Location
    paris
    Posts
    449
    Thanked: 13

    Default oval wedge making

    hi

    i would like to make a wedge for a new scales i will do soon. but as i saw on some other razors i would like to make a wedge with the shape getting finer at the end. do you have any advice to give for see how i should proceed?

    a pic to show what i talk about:

    Name:  wedfe.jpg
Views: 196
Size:  3.4 KB

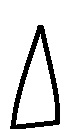
    it's not very clear picture but at least i hope you see what i mean?

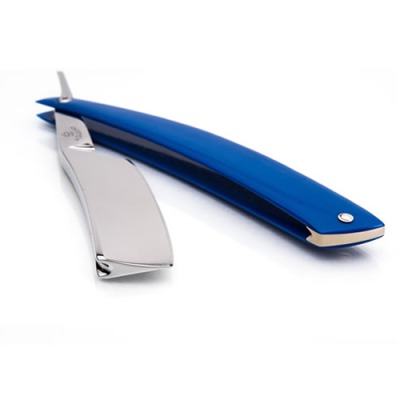
    here an other picture more clear.

    Name:  alex_jacques_straight_razor_blue_09_017.jpg
Views: 231
Size:  12.8 KB
    sharptonn and Substance like this.

  2. #2
    Senior Member blabbermouth
    Join Date
    Apr 2012
    Location
    Diamond Bar, CA
    Posts
    6,553
    Thanked: 3215

    Default

    To make that wedge, I would file the v groove in the edge of your material, with a triangular file. Measure the thickness of the razor, where you want it to hit at the top of the scales. And make the thickness the same.

    Once you have the V cut, then just shape the wedge by gluing the wedge to a piece of wood, paint stir stick, and shape with a file, sandpaper or belt sander. Some guys double stick tape to a finger, then touch the sander. I use a belt sander and a file to fine tune.

    You could also use a router and a v cut bit and make a jig or use a router table to cut the V.

    There are lots of good video and post on making wedges, I think Charlie Lewis has one or is in one of his scale making videos. You should look at Charlies Scale making videos, they are packed full of good info.

    Do post photos of the completed project, seems like you are putting a lot of thought into it. Love to see it done.
    sharptonn and Substance like this.

  3. The Following User Says Thank You to Euclid440 For This Useful Post:

    Oustoura (08-21-2016)

  4. #3
    illegitimum non carborundum Utopian's Avatar
    Join Date
    Jan 2008
    Location
    Rochester, MN
    Posts
    11,544
    Thanked: 3795
    Blog Entries
    1

    Default

    In general, wedges should be tapered in two directions, as are depicted in the photo. They should be wider closer to the blade and tapering to narrower on the end that is farther away from the blade. They also should taper from top to bottom, with the top being wider than the bottom.

  5. The Following 3 Users Say Thank You to Utopian For This Useful Post:

    criswilson10 (08-20-2016), Geezer (08-20-2016), Oustoura (08-21-2016)

  6. #4
    Razor Vulture sharptonn's Avatar
    Join Date
    Oct 2010
    Location
    Lone Star State
    Posts
    25,880
    Thanked: 8589

    Default

    Dang! I suppose I will dial the 'Wedge-O-Mat to get this done.

    Name:  DSCN2529.jpg
Views: 168
Size:  30.9 KB

    Seriously, v-cut in the wedge front or not, the principles of tapering down to form the wedge and notwithstanding the tapering of the wedge from top to bottom seriously allows for proper fit. Seems that is a razor from Alex?

    I think the v-cut (in the OP's pic) in the end of the wedge is controlling a great deal (if not all) of blade location, JMO.

    A neat idea.
    A fine fitment job for a custom, from what I can see. Looks keen!
    Last edited by sharptonn; 08-20-2016 at 03:35 AM.

  7. #5
    Senior Member criswilson10's Avatar
    Join Date
    May 2014
    Location
    Easley, SC, USA
    Posts
    1,861
    Thanked: 480

    Default

    Quote Originally Posted by Utopian View Post
    In general, wedges should be tapered in two directions, as are depicted in the photo. They should be wider closer to the blade and tapering to narrower on the end that is farther away from the blade. They also should taper from top to bottom, with the top being wider than the bottom.
    I must have missed that somewhere along the line.
    I've only had to make a couple of wedges and always ended up tapering them vertically because the scales didn't look right.
    Glad to hear that I'm not crazy and they are supposed to be that way.
    sharptonn and Clayglen like this.
    Some people never go crazy. What truly horrible lives they must lead - Charles Bukowski

  8. #6
    Senior Member karlej's Avatar
    Join Date
    Oct 2011
    Location
    Standish, Maine
    Posts
    816
    Thanked: 952

    Default

    Make a wedge gizzy like Outback or I use. Hold the wedge material vertical on a disc sander. Only takes a minute to make a perfect wedge. http://straightrazorpalace.com/works...-accurate.html

  9. The Following 3 Users Say Thank You to karlej For This Useful Post:

    Geezer (08-20-2016), ScoutHikerDad (08-21-2016), xiaotuzi (08-20-2016)

  10. #7
    Senior Member blabbermouth tintin's Avatar
    Join Date
    Jun 2013
    Location
    archbold ohio
    Posts
    2,364
    Thanked: 545

    Default

    Quote Originally Posted by criswilson10 View Post
    I must have missed that somewhere along the line.
    .
    Me too, made quite a few too. A quick check of my razors show that not all are that way though. something to try next time.
    ScoutHikerDad likes this.

  11. #8
    Senior Member Oustoura's Avatar
    Join Date
    Apr 2015
    Location
    paris
    Posts
    449
    Thanked: 13

    Default

    Quote Originally Posted by Euclid440 View Post
    To make that wedge, I would file the v groove in the edge of your material, with a triangular file. Measure the thickness of the razor, where you want it to hit at the top of the scales. And make the thickness the same.

    Once you have the V cut, then just shape the wedge by gluing the wedge to a piece of wood, paint stir stick, and shape with a file, sandpaper or belt sander. Some guys double stick tape to a finger, then touch the sander. I use a belt sander and a file to fine tune.

    You could also use a router and a v cut bit and make a jig or use a router table to cut the V.

    There are lots of good video and post on making wedges, I think Charlie Lewis has one or is in one of his scale making videos. You should look at Charlies Scale making videos, they are packed full of good info.

    Do post photos of the completed project, seems like you are putting a lot of thought into it. Love to see it done.
    Quote Originally Posted by Utopian View Post
    In general, wedges should be tapered in two directions, as are depicted in the photo. They should be wider closer to the blade and tapering to narrower on the end that is farther away from the blade. They also should taper from top to bottom, with the top being wider than the bottom.
    thanks for these advices. gonna try.

    Quote Originally Posted by sharptonn View Post
    Dang! I suppose I will dial the 'Wedge-O-Mat to get this done.

    Name:  DSCN2529.jpg
Views: 168
Size:  30.9 KB

    Seriously, v-cut in the wedge front or not, the principles of tapering down to form the wedge and notwithstanding the tapering of the wedge from top to bottom seriously allows for proper fit. Seems that is a razor from Alex?

    I think the v-cut (in the OP's pic) in the end of the wedge is controlling a great deal (if not all) of blade location, JMO.

    A neat idea.
    A fine fitment job for a custom, from what I can see. Looks keen!
    nice machine deserve to be selled on shutandtakemymoney.com

  12. #9
    Senior Member blabbermouth Substance's Avatar
    Join Date
    Jun 2013
    Location
    Gladstone QLD AUSTRALIA
    Posts
    3,245
    Thanked: 804

    Default

    I have used the Grooved top wedge method on a Spanish point blade, it is purely to have a short wedge with & close gap to the blade spine but still allows the blade tip to clear the wedge top edge
    Name:  iphone photos 17534.jpg
Views: 119
Size:  18.3 KBName:  iphone photos 17535.jpg
Views: 119
Size:  12.1 KB
    32t and xiaotuzi like this.
    Saved,
    to shave another day.

  13. The Following User Says Thank You to Substance For This Useful Post:

    xiaotuzi (08-22-2016)

  14. #10
    Senior Member xiaotuzi's Avatar
    Join Date
    Jun 2016
    Location
    NH
    Posts
    1,924
    Thanked: 1363

    Default

    That's really cool looking, it looks almost like the blade might not fit in there but it does. Nice!

Page 1 of 2 12 LastLast

Posting Permissions

  • You may not post new threads
  • You may not post replies
  • You may not post attachments
  • You may not edit your posts
  •