
Results 1 to 10 of 26
 58Likes
Thread: Joseph Rodgers and Son -- Wedge
 LinkBack URL
 About LinkBacks
-
10-27-2016, 04:12 PM #1Senior Member


- Join Date
- Sep 2015
- Location
- I'm thinking...
- Posts
- 447
Thanked: 79 Joseph Rodgers and Son -- Wedge
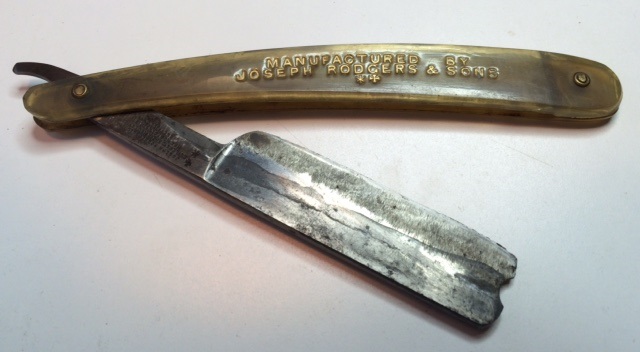
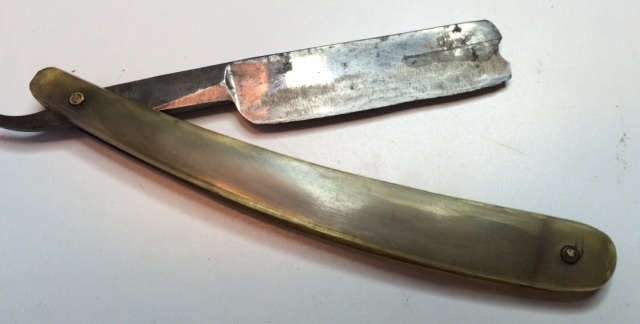
My weekend restoration project is this Joseph Rodgers and Sons wedge razor. The edge is a little rough...I will need to straighten the edge. I have never restored or honed a wedge razor before...any tips or suggestions?
-
10-27-2016, 04:40 PM #2Senior Member


- Join Date
- Feb 2013
- Location
- Haida Gwaii, British Columbia, Canada
- Posts
- 14,443
Thanked: 4828
You picked a doozy to start with. My process is pretty much the same for most restores. WD-40 and 000 or 0000 steel wool to clean it up, I may or may not first take the top layer of gunk off with a razor blade, it depend what is above the surface and what is in the steel. Once the steel is cleaned and I can see what I am dealing with the likely next step is to get a clean bevel. I most often start that with a 1K, but that often takes far too long on such a job. At which point I will resort to a 600 grit. With nice clean bevel you can then kill the edge and remove the scales. Nice scales like those go into a bag with some neatsfoot oil. I then start on the blade with either 1K or 600 grit paper with a hard backer and use long strokes to get an even blade surface. And then progress up from there. Once the blade is clean and you have removed as many of the pits as you want you then begin to polish out the scratches. Once I start to remove the scratches I use WD-40 with my wet dry. That is the basics.
It's not what you know, it's who you take fishing!
-
The Following 2 Users Say Thank You to RezDog For This Useful Post:
ScoutHikerDad (11-05-2016), Whizbang (10-27-2016)
-
10-27-2016, 04:41 PM #3the deepest roots


- Join Date
- Feb 2011
- Location
- Seattle
- Posts
- 1,221
Thanked: 169
Multiple layers of tape on the spine and get ready to remove a lot of steel.
-
10-27-2016, 04:45 PM #4the deepest roots
- Join Date
- Feb 2011
- Location
- Seattle
- Posts
- 1,221
Thanked: 169
also when you say straighten the edge, do you mean it's got a bend/twist in the spine or the bringing the cutting edge in line by removing dings/chips?
Whizbang likes this.
-
10-27-2016, 06:16 PM #5Senior Member

- Join Date
- Oct 2011
- Location
- Standish, Maine
- Posts
- 816
Thanked: 952
There appears to be a frown in the center of the blade. If that is true my choice to remove that would be to breadknife the blade until it is straight and then set the bevel. I'd doesn't look too bad but it can be a long way back to a bevel for someone that has limited experience. Putting a few layers of tape on the spine and honing away until the edge is straight will take longer than I care to guess but it will work. GSSIXGUN has a great video out on the breadknifing process. Watch it a couple of times before your attempt to restore the bevel. Glen's process works great and I have used it countless times. Be warned. It's not a process for beginners.
-
10-27-2016, 06:23 PM #6Senior Member
- Join Date
- Mar 2012
- Location
- Thunder Bay, Ontario, Canada
- Posts
- 17,311
Thanked: 3228
That looks like a great project razor. You have had good advice so I won't say any more except good luck.
BobWhizbang likes this.Life is a terminal illness in the end
-
10-27-2016, 07:18 PM #7Senior Member
- Join Date
- Sep 2015
- Location
- I'm thinking...
- Posts
- 447
Thanked: 79
All great advice...thanks (as usual).. The one thing I will say is this is one heavy chunk of metal!! I can tell it will take some time. I am in no rush...and my life doesn't depend on the outcome...so I will just take my time and enjoy the process. I do all my restoration work by hand, so this may spread over into more than one weekend.
@TwistedOak regarding the edge -- it is not twisted...what I meant was it is not a nice clean even edge...there is some chipping (very minor). It may have been used for other purposes than shaving if you know what I mean. I think what happened (using my powers of observation and deduction) is the previous owner did not maintain this razor very well. Judging by the scraping across the face of the blade it leads me to believe it was sharpened using any old wetstone that was at hand and the edge was uneven. It was certainly not sharpened by someone who knew what to do.
Regarding taping the spine (when I get to that point)...how many layers of tape is appropriate?
Regarding the scales I can't tell what these are made of...some early form of plastic? Celluloid? Horn? @RezDog you think they are some natural material...hence the Neatsfoot oil? If you look at the non-pivot end of the scales you can see they are slightly translucent...so that leads me to think it is celluloid. But I am not really sure.
Anyway...I will proceed using your sage advice and keep you posted on my progress!
-
10-27-2016, 07:39 PM #8KN4HJP

- Join Date
- Feb 2015
- Location
- Chesapeake, Virginia
- Posts
- 932
Thanked: 261
Breadknifing to eliminate the frown will also get rid of the chips. I would use at least 2 layers to start with, and replace the outer frequently as it wears. Watch Glenn's video and see the answers to your questions. The scales look like pressed horn, i.e. cut slabs boiled until soft (like pasta) and then clamped in a mold until cold. These were the most common scales for most of the 19th century. Also, the blade appears to originally have been a heavy hollow grind that has been made flat by excessive honing - note the smooth areas in the middle of each face. Take your time and have fun!
"Every normal man must be tempted at times to spit on his hands, hoist the black flag, and begin to slit throats." -H. L. Mencken
-
10-27-2016, 07:49 PM #9Senior Member
- Join Date
- Sep 2015
- Location
- I'm thinking...
- Posts
- 447
Thanked: 79
Interesting your comment on the scales. The scales are certainly different from my other razors. They have a different feel than any of the early plastics I am familiar with. Other than Neatsfoot oil...is there anything else I need to do to preserve the scales? Is WD-40 safe to use on the scales? Or just mild soapy water and a soft toothbrush? Originally Posted by sqzbxr

Any idea on the date of this razor? You mentioned 19th century...?Last edited by Whizbang; 10-27-2016 at 07:55 PM.
-
10-27-2016, 08:00 PM #10KN4HJP
- Join Date
- Feb 2015
- Location
- Chesapeake, Virginia
- Posts
- 932
Thanked: 261
Mild soapy water to clean them and then a soak in neatsfoot oil when they have dried. For date, I'd guess 1870's or 1880's from what I can see.
"Every normal man must be tempted at times to spit on his hands, hoist the black flag, and begin to slit throats." -H. L. Mencken


 Reply With Quote