Page 1 of 2 12 LastLast
Results 1 to 10 of 19
Like Tree45Likes

Thread: This is my first go at cleaning a razor

  1. #1
    Junior Member
    Join Date
    Dec 2017
    Location
    Kingston Ontario Canada
    Posts
    28
    Thanked: 4

    Default This is my first go at cleaning a razor

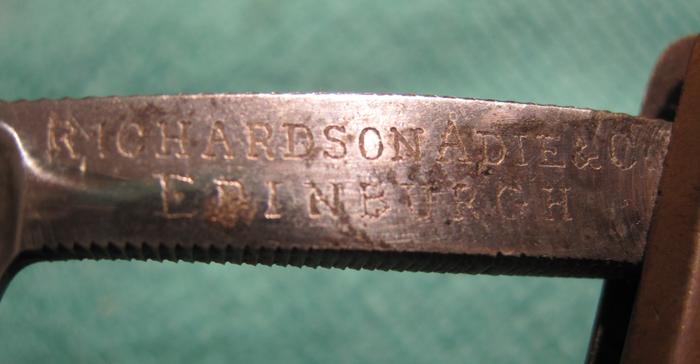
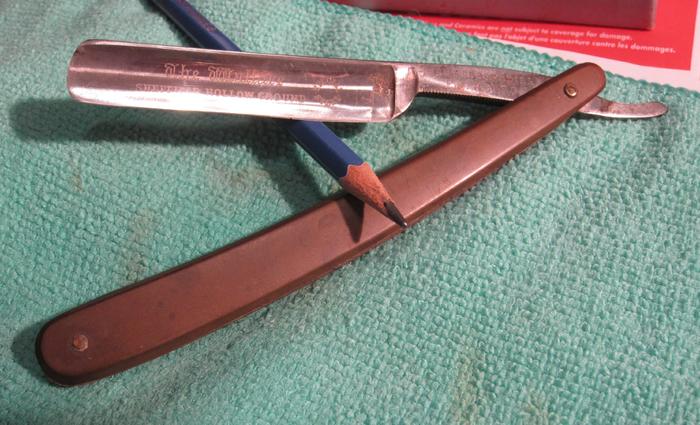
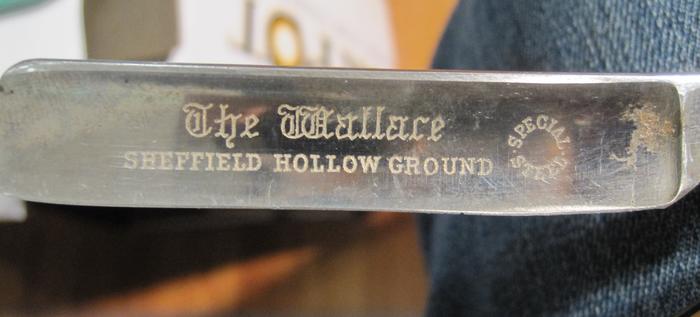
    I'm a new member here and senior member Gasman gave me some tips to clean a straight razor. Thank you Gasman and this is my first attempt ever to clean a razor and I am quite pleased with the results. I went to my basement and opened an old tin can and grabbed about ten razors and choose this one. The tang is stamped Richardson Adie & Co Edinburgh and the blade is etched " The Wallace Sheffield " "Hollow Ground " " Special Steel ". That old can contained what I thought was garbage, and some are, but some are salvageable??? I cleaned this with WD 40 and some Sun Glo brass wool. There was a glob spot of rust at the shoulder to the right side of the etching that cleaned up but there is now some pitting and it shows but this is how it will stay for now. I really like the blades with etchings and I'll watch for those in my travels. This is a great site and I wish I had joined years ago. Thank you to everyone for all the kind words. Mike D.
    Name:  Wallace1.jpg
Views: 247
Size:  59.6 KBName:  Wallace2.jpg
Views: 222
Size:  27.3 KBName:  Wallace3.jpg
Views: 215
Size:  26.7 KBName:  Wallace1.jpg
Views: 247
Size:  59.6 KBName:  Wallace2.jpg
Views: 222
Size:  27.3 KBName:  Wallace3.jpg
Views: 215
Size:  26.7 KB

  2. The Following 2 Users Say Thank You to vintageconundrum For This Useful Post:

    Geezer (12-21-2017), RezDog (12-21-2017)

  3. #2
    Skeptical Member Gasman's Avatar
    Join Date
    Nov 2016
    Location
    Colorado Springs
    Posts
    10,481
    Thanked: 2185

    Default

    Looks like you got the ugly off. Sometimes you have to live with pitting as the steal is thin and cant take a lot of metal away. Looks as if it has a small chip and a frown. Some time on a hone should square that away but then you might have to work on the stabilizer as it will be too close to the level of the blade and might hook on ya.

    There is a lot of little things to concider when doing restorations. Now you have a taiste at what it takes. Be careful of stamped and etched blades as you can damage the stamps/letters. Deep sharp lettering always looks better than thin rounded letters from sanding.

    Just go slow and take your time. Make yourself a jig to hold the blade while sanding. There are a few examples around here somewhere of different types. Someone should post up a pic of one. Being on the raod i dont have any with me.
    Geezer and outback like this.
    It's just Sharpening, right?
    Jerry...

  4. The Following User Says Thank You to Gasman For This Useful Post:

    Geezer (12-21-2017)

  5. #3
    Junior Member
    Join Date
    Dec 2017
    Location
    Kingston Ontario Canada
    Posts
    28
    Thanked: 4

    Default

    Jerry. Cleaning a razor up is definitely a challenge and takes a lot of time, effort and patience. When I picked this up I counld't read the name and I could barely see the blade was etched. Only after I started the cleaning did I realize how much clearer all the information was. I have the big dremel tool set in my garage with 50 or 60 different grinders and when I get time I may touch up that spot with a soft head. Over time I may get a honing stone as well. I'm going to practice on these from the tin can but when I find some big old W&Bs with the 8/8 blades then things will get a bit more serious. I go to at least one auction a week and I've bought and sold dozens of W&Bs on ebay over the years but I don't think I'll be selling anymore of them big boys. I'll be adding them to my collection. My lord some of you guys have such beautiful collections. I admire the work you put into collecting these and your knowledge of them is unbelievable. When they are restored to their former glory they are so beautiful. Thanks again for your help and encouragement I appreciate it a lot. Stay safe on the road and I hope you have a merry Christmas with your family. Mike D.
    Geezer likes this.

  6. #4
    Senior Member blabbermouth Geezer's Avatar
    Join Date
    Jul 2010
    Location
    EauClaire,WI
    Posts
    7,685
    Thanked: 3825
    Blog Entries
    1

    Default

    Here is one razor safety jig:
    making-blade-safety-jig
    There are a lot more since then.

    ~Richard
    MrZ likes this.
    Be yourself; everyone else is already taken.
    - Oscar Wilde

  7. #5
    Skeptical Member Gasman's Avatar
    Join Date
    Nov 2016
    Location
    Colorado Springs
    Posts
    10,481
    Thanked: 2185

    Default

    Thanks for posting it Richard.
    Mike, just so you know, we have many many more folks that know more than i do when it comes to this stuff. I started 1 year ago but my collection is now pushing 70 razors. Be sure to get comments from a few guys as s9me folks will recommend other ways of doing things. Just wanted to come clean on this point.

    Enjoy your efforts and be careful as they say a dull razor is as sharp as a sharp knife.
    Geezer, xiaotuzi and MrZ like this.
    It's just Sharpening, right?
    Jerry...

  8. The Following User Says Thank You to Gasman For This Useful Post:

    Geezer (12-21-2017)

  9. #6
    Senior Member blabbermouth
    Join Date
    Mar 2012
    Location
    Thunder Bay, Ontario, Canada
    Posts
    17,251
    Thanked: 3222

    Default

    Quote Originally Posted by vintageconundrum View Post
    I have the big dremel tool set in my garage with 50 or 60 different grinders and when I get time I may touch up that spot with a soft head.
    I'd very careful about using a Dremel tool on a straight razor blade. If it catches the blade the wrong way the blade can become a projectile and it can build up too much heat in the blade ruining the temper.

    The razor looks pretty good now so you could just hone it and use it as is. Have fun with it.

    Bob
    Life is a terminal illness in the end

  10. #7
    Senior Member xiaotuzi's Avatar
    Join Date
    Jun 2016
    Location
    NH
    Posts
    1,924
    Thanked: 1363

    Default

    Looking good so far! Jerry set you on the right path. How about the scales? They look like they may have faded some. A little plastic polish could spiff 'em up. I use Mother's Plastic Polish (the stuff for headlights and such) and there's many other good products available too.

    Bob has wise words about the dremel. It can be useful but it can also be instantly disastrous. Eye protection each and every time.
    Geezer, BobH, outback and 1 others like this.
    "Go easy"

  11. #8
    Junior Member
    Join Date
    Dec 2017
    Location
    Kingston Ontario Canada
    Posts
    28
    Thanked: 4

    Default

    Richard. Thank you for that diagram. I understand how that works and it does make razor work much safer. I'll be buying one or making one. Best regards. Mike D.
    Geezer likes this.

  12. #9
    Junior Member
    Join Date
    Dec 2017
    Location
    Kingston Ontario Canada
    Posts
    28
    Thanked: 4

    Default

    Bob. I don't have a stone yet to work with but in time as I get into this I will have what I need. I can't wait to get more W&B razors. I'll be putting those big boys away but I will share photos with the group. Thanks again. Mike D.

  13. #10
    Junior Member
    Join Date
    Dec 2017
    Location
    Kingston Ontario Canada
    Posts
    28
    Thanked: 4

    Default

    Jerry. As long as you keep writing I'll keep reading and learning. All the advice I read I am grateful for. I'll heed all the messages from all the members. Thanks again. Mike D. My son just phoned and he's about 3 hours from home. Broing on Christmas. I can't wait. Jerry Thanks again. Mike D.
    Geezer and outback like this.

Page 1 of 2 12 LastLast

Posting Permissions

  • You may not post new threads
  • You may not post replies
  • You may not post attachments
  • You may not edit your posts
  •