
Results 1 to 7 of 7
 11Likes
Thread: Repinning A Straight Razor
 LinkBack URL
 About LinkBacks
-
03-11-2018, 05:54 PM #1Member

- Join Date
- Mar 2013
- Location
- Indiana
- Posts
- 32
Thanked: 2 Repinning A Straight Razor
Hello forum,
So I need to pin some scales on my razor I restored. All the tutorials I read about peening say I need a surface with a small indent for the pin to rest in while I tap the other side so the side I'm not working on doesn't flatten...how important is this? Can I just use a flat metal surface? What happens if the other side flattens?
-
03-11-2018, 06:23 PM #2Senior Member

- Join Date
- Jun 2013
- Location
- Pompano Beach, FL
- Posts
- 4,041
Thanked: 634
The reason for the indent I think is to help with rounding over the pin and keeping it from being pushed into the scales. I use a small hammer as an anvil and drilled a small indent in the side. I then use a Jewelers hammer to peen over the pins to round them off.
-
03-11-2018, 06:58 PM #3Senior Member

- Join Date
- May 2014
- Location
- Easley, SC, USA
- Posts
- 1,861
Thanked: 480
The small indented metal keeps you from flattening the already rounded over side. If you flatten the rounded over side, then you have to come back with a file to reshape it.
The trick is to get the indention the correct size and depth to support the pin head without touching the scales. I used a 5/16" bit and went down about 1/16" of an inch and that gave me the right size and curvature.
You can also by a doming block which I keep forgetting to do.Slawman likes this.Some people never go crazy. What truly horrible lives they must lead - Charles Bukowski
-
03-11-2018, 07:06 PM #4Senior Member


- Join Date
- Feb 2013
- Location
- Haida Gwaii, British Columbia, Canada
- Posts
- 14,443
Thanked: 4828
I have several indents of different sizes on my “anvil” that I use while pinning. What took my pinning to very consistent was getting my pin lengths figured out. I pin one end in a drill chuck then put it in position and trim the length and peen the second side. Here is a couple of pictures.
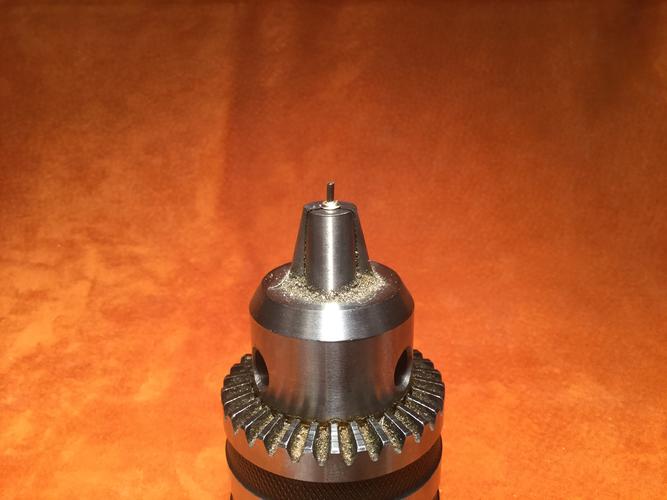
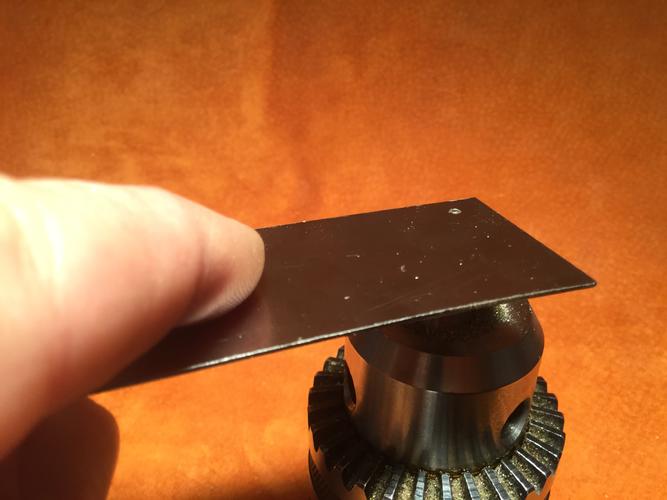
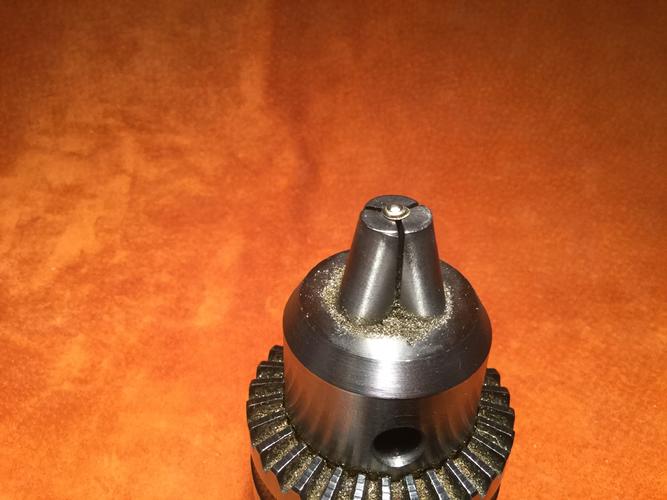
I know these picture are not for you specific question, but rather about forming one end in the chuck first. I do use the flat part of my pinning anvil some, but the very shallow dimples help keep the collar and domed pin shape. The dimple need to be less than the combined height of the pin and collar or you will break your scales fairly easily. My dimples are the same diameter as my collars, so there are several of them, as well as dimples for doming collars.It's not what you know, it's who you take fishing!
-
03-13-2018, 02:51 AM #5Member
- Join Date
- Jan 2018
- Location
- CA
- Posts
- 70
Thanked: 23
I just pinned my first set of scales maybe two weeks ago. I didn't know why I needed the little divot in the side of my ham-vil, but I sure did put one in there - and it was about 1/16th too deep. which meant that I was nearly finished, it was too deep for the newly peened bit of rod to hit the bottom, instead, the scales were riding on the rim of the divot I made = the damn thing wouldn't get tight. I tapped and tapped and tapped...and finally moved it out of the hole I made and with a few more taps it tightened right up. Experience is still the best teacher I guess.
They even have a name for it dear, it's called Razor Acquisition Disorder...
-
The Following User Says Thank You to cwomg For This Useful Post:
Diboll (03-13-2018)
-
03-13-2018, 10:40 AM #6Member

- Join Date
- Feb 2018
- Location
- Salt lake city utah
- Posts
- 48
Thanked: 5
Thanks for askingthat quesfion i am pinning 2razors and had not even thought about the dimple flattening etc. Ive spent a long time on these razors and would like to have them as nice as i possibly can.
-
03-13-2018, 01:55 PM #7Senior Member

- Join Date
- Feb 2015
- Location
- Duluth, GA - Atlanta OTP North
- Posts
- 2,546
- Blog Entries
- 1
Thanked: 315
Not sure, but I think in one video they actually mentioned rolling the pin as you tap it to help keep the back side if the pin rounded. Mine will probably end up being pretty flat (at least in the beginning) since I'll probably have to use the side of an Estwing as an anvil.


 Reply With Quote