
Results 1 to 8 of 8
 12Likes
Thread: Broken scale repair?
 LinkBack URL
 About LinkBacks
-
05-01-2018, 10:18 AM #1Senior Member

- Join Date
- Nov 2012
- Location
- Seattle,WA.
- Posts
- 579
Thanked: 55 Broken scale repair?
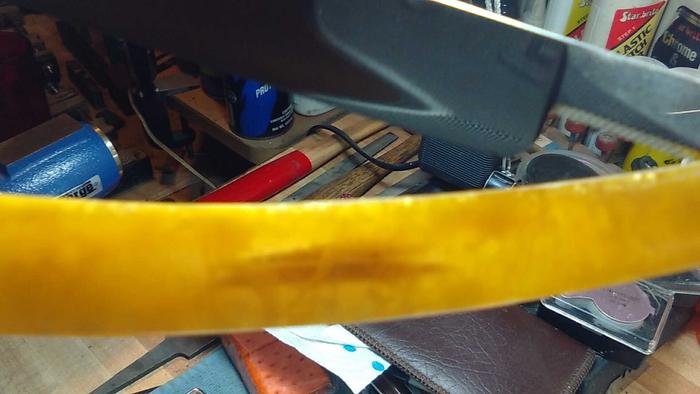
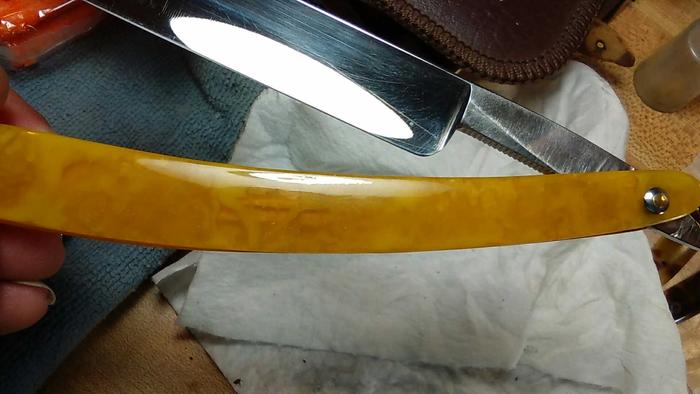
I have a razor that has school bus yellow plastic/celluloid scales with bolsters. I paid $25 for it on Ebay (years ago) and when I got it one scale was broken in two (not at a pin).
I made a deal with the seller to keep it for a $15 refund. I used some superglue and it held for a while and was a pretty clean repair.
Later the bond popped open and when I redid it I guess I didn't get the two parts in perfect alignment so you can see the line where the two parts come together now.
I tried to find some matching nail polish to apply over the crack line but I have to build it up too thick to hide the line and it doesn't really look all that great.
Is there a tip or trick to making a fast and dirty cosmetic repair for broken (non-black) scales?
This is a good shaving razor, inexpensive but fairly good looking and I'd like to just make it a little better.
If this were a guitar with a blemish, the nail polish trick would be an acceptable coverup. It's just not working well in this case.
I had a cheap shaving brush where the rubber handle was cracking and I stabilized things with superglue, smoothed things out with household spackle (easy to form and sand) and then I painted the handle and it was an acceptable repair for a cheap brush.
I don't want to spray paint the scales but I wondered if I could do something similar such as sanding over the superglue repair, molding something over the visible repaired crack that would hide the crack and then use nail polish over that.
I could try spackle again but I wondered if there was something better for such a small repair?Last edited by gcbryan; 05-01-2018 at 10:21 AM.
-
05-01-2018, 10:53 AM #2Senior Member


- Join Date
- Mar 2015
- Location
- Akron, Ohio
- Posts
- 12,118
Thanked: 4316
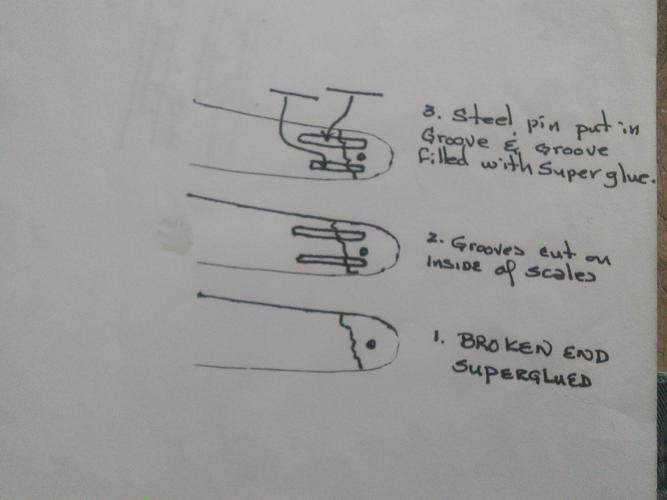
I've repaired a set like that with epoxy and a piece of toothpick split in half.
I removed the scales, dug out a groove on the inside of the broken scale, taped the two pieces together from the outside, placed the toothpick in the groove and covered with epoxy. Once cured, sand the inside flat again, and coat the outside with CA, sand and polish. That took care of the line on the outside.
 Mike
Mike
-
The Following User Says Thank You to outback For This Useful Post:
MrZ (05-01-2018)
-
05-01-2018, 02:53 PM #3Senior Member

- Join Date
- Apr 2008
- Location
- Saint Paul, Minnesota, United States
- Posts
- 2,944
Thanked: 433
I've used thin brass sheets you can get at a hobby store, cut to size with a scissors and glue in place with super glue, it makes for a very stable repair. I'm not sure on the best way to hide the line on anything other than black scales which can be fixed with pencil lead powder and slow drying super glue then sanded and polished
-
05-01-2018, 04:53 PM #4Senior Member
- Join Date
- Jun 2013
- Location
- Pompano Beach, FL
- Posts
- 4,049
Thanked: 636
Here is a method I have posted in the past.
-
05-03-2018, 06:58 PM #5Senior Member

- Join Date
- Apr 2009
- Location
- Boulder County CO
- Posts
- 1,004
Thanked: 127
I do something similar but a bit more time consuming. Line the insides of both scales with a thin metal sheet of stainless steel or other material like copper, cut to size, glued and pinned into place.
-
05-04-2018, 03:30 AM #6Senior Member
- Join Date
- Nov 2012
- Location
- Seattle,WA.
- Posts
- 579
Thanked: 55
This is slightly off-topic but I've read of people trying to straighten scales that were deformed causing the blade to not be centered and to hit one side of the scales.
The technique I read of always involves boiling water and sticking the scales in. It seems sometimes it works and sometimes it doesn't.
I haven't needed to try something like this yet with razors but I have worked with shaping or flattening plastic for other purposes. I've done this by putting it in the oven at no more than 250 F for about 30 seconds (on a cookie sheet).
You just take it out, put a book on top until it cools and if it needs to flatten more, you just repeat the above steps.
Has anyone here tried that with razor scales? I could see this being a problem possibly with celluloid but for other types of plastic this would seem to work.
-
05-04-2018, 04:02 PM #7Senior Member
- Join Date
- Apr 2008
- Location
- Saint Paul, Minnesota, United States
- Posts
- 2,944
Thanked: 433
I've done the boiling water fix and it does work, 20-30 seconds in boiling water, reshape the scales then set them with cold water Originally Posted by gcbryan

-
05-04-2018, 05:42 PM #8Senior Member
- Join Date
- Mar 2015
- Location
- Akron, Ohio
- Posts
- 12,118
Thanked: 4316
I've always used a heat lamp, works with horn or plastic


 Reply With Quote