Page 1 of 3 123 LastLast
Results 1 to 10 of 24
Like Tree40Likes

Thread: When to move to from sanding to buffing with compound?

  1. #1
    Member
    Join Date
    May 2018
    Location
    San Mateo County, California
    Posts
    48
    Thanked: 3

    Default When to move to from sanding to buffing with compound?

    Hi All -

    Btw I also posted on another forum so those who see this twice please excuse.

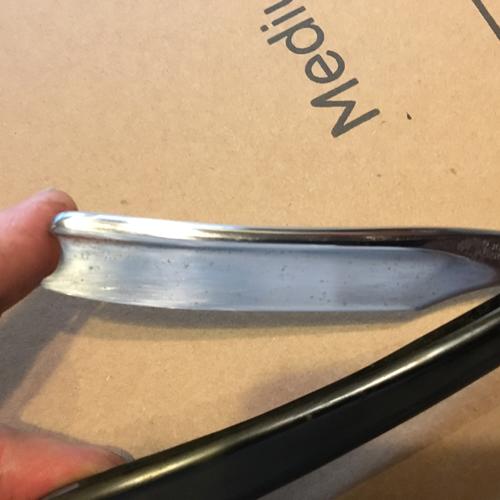
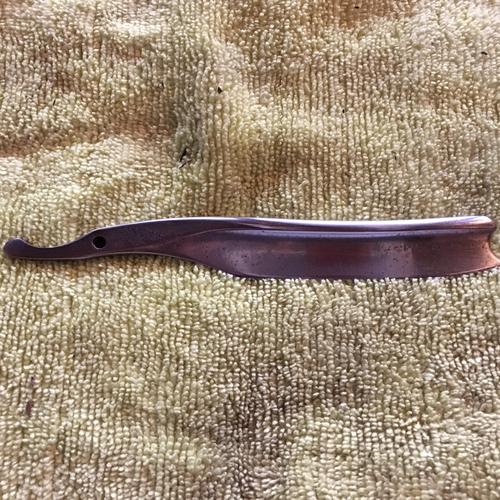
    Could use some Pointers on when it's time to move from sanding to buffing with compound as the only thing I have ever buffed if my cars... I'm working on my first restore/cleanup on a Joseph Elliot and it has a good amount of pitting scars after two rounds of sanding. I don't think I want to make it pristine nor should I try...

    Has anyone used the buffing compounds from Harbor freight?

    any pointers is always much appreciated.

    I think making progress...

    The Starting subject
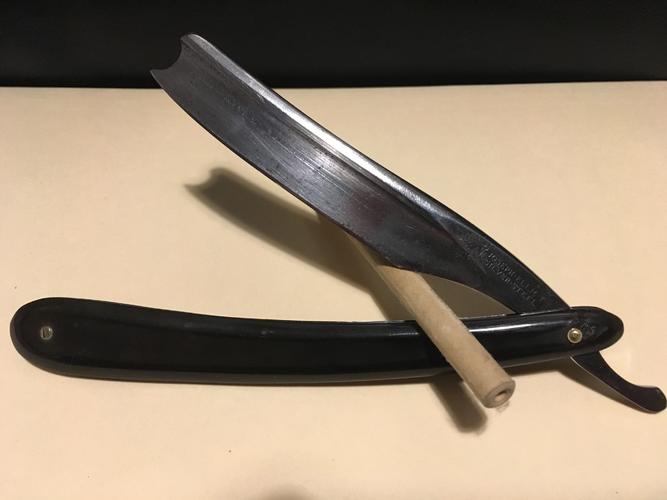
    Name:  image.jpg
Views: 577
Size:  23.1 KB

    After first round

    Name:  image.jpg
Views: 547
Size:  24.9 KB

    Now after 2 rounds to 150 - 1500grit
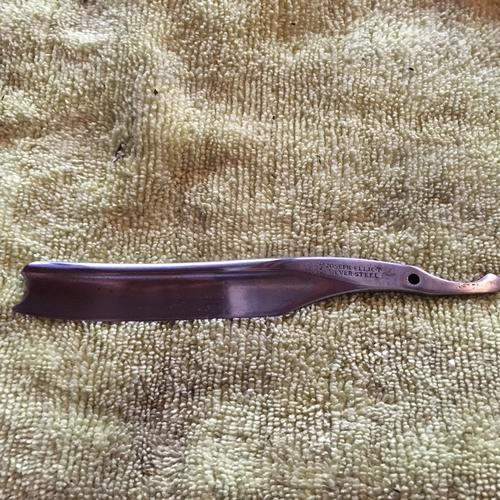
    Name:  image.jpg
Views: 543
Size:  76.0 KBName:  image.jpg
Views: 542
Size:  76.7 KB
    JOB15 likes this.

  2. #2
    Senior Member Pete123's Avatar
    Join Date
    Jan 2017
    Location
    Nashville, TN
    Posts
    350
    Thanked: 193

    Default

    Welcome to SRP! This is a great community.

    I move from sand paper to compound with a buffing wheel at 600 grit sand paper for steel. 600 grit looks very similar to a satin finish on a new knife or razor. I haven't used Harbor Freight buffing compound, though would guess it would work.

    Your posting brings up other comments for me as well.

    Personally, I don't like to make historical items look new, though plenty of folks do. I think of preserve rather than restore. The rust needed to come off. A little piece of pure copper sheet will remove rust far less aggressively than sand paper.

    I bring this up as it sounds like you are getting a great start with straight razors and suggest deciding which way you want to go.

    I'm not sure how much you have used a buffing wheel. Buffing a knife or razor blade is very dangerous and requires much concentration. If the edge of the item you are buffing gets caught by the buffing wheel, which can happen in the blink of an eye, it will send it flying with solid possibility to cut you badly. I always put painters tape on the cutting edge if possible. If I can't do that, I stay very, very focused.

    This is a great start. I look forward to seeing more of your projects. Looks like you have scales for this blade, though that is also a fun project.
    Last edited by Pete123; 06-10-2018 at 08:41 PM.

  3. The Following 2 Users Say Thank You to Pete123 For This Useful Post:

    JBHoren (06-12-2018), Shojo510 (06-11-2018)

  4. #3
    Skeptical Member Gasman's Avatar
    Join Date
    Nov 2016
    Location
    Colorado Springs
    Posts
    10,542
    Thanked: 2192

    Default

    Im with Pete on this one. An older blade like that shouldnt be brought to a mirror shine. JMO. A little dulness on the blade and some pitting but still being cleaned up well has more appeal to me. A buffer will bring it to a mirror finish with the right compounds. And ive never tried HF compounds so can help you there. I go to the buffer around 600 or 800 and start with 400 compound. I know its going backwards but it dont take much time on the buffer to finish it off to a nice look. Non mirror.

    Good luck and let us know how it goes for ya. You got an old blade and it will be a great piece for a collection. Now, make your scales as clean and shinny as possible. Again, JMO.
    JBHoren and JOB15 like this.
    It's just Sharpening, right?
    Jerry...

  5. The Following User Says Thank You to Gasman For This Useful Post:

    Shojo510 (06-11-2018)

  6. #4
    Senior Member Pete123's Avatar
    Join Date
    Jan 2017
    Location
    Nashville, TN
    Posts
    350
    Thanked: 193

    Default

    Regarding the buffing compound, I can share what I do.

    My buffing blocks are color coded. They may have come with info on the grit, though I know them by color. There isn't a standard for the colors, though my experience is that most companies are somewhat similar.

    I have four:

    Black: Most aggressive. I don't use this on steel as it leaves scratches.
    Brown: I'll start steel on this one.
    Pink: I use this as a next step, as well as the go to for polishing acrylic and other resins, horn, micarta. I sand to a higher grit before moving to the buffer with them. At least 800, sometimes more.
    White: This is meant for chrome. I use with with steel, acrylic and other resins for the extra shine.
    RezDog, JOB15 and Substance like this.

  7. The Following User Says Thank You to Pete123 For This Useful Post:

    Shojo510 (06-11-2018)

  8. #5
    'with that said' cudarunner's Avatar
    Join Date
    Aug 2010
    Location
    Walla Walla in WA State USA
    Posts
    11,235
    Thanked: 4237

    Default

    Congratulations on your project.

    From what the pictures show, I think I'd just use a metal polish such as Mothers, MASS, Blue Magic etc and see what you have.

    As it has been said, buffers that aren't used properly are Very Dangerous! I started with a cloth wheel on a bolt attached to a cordless drill and got some good results.

    Yes I do have a buffer and it's variable speed so I can control the way the compounds are working and how hot the blade gets--YES! You have to be very careful about that also.

    Now, there are various 'Compounds' out there some are listed as 'Polishing Compounds' which have many colors to designate the grits and then there are 'Greaseless Compounds' and the lower grits are all red in color but the 400 and 600 are black. I prefer to use the Greaseless Compounds.

    Back to using a buffer safely. Here's a link and if you read what's there including the PDF you'll have to download or at least watch separately you'll have a better idea of how to Safely use a buffer.
    https://www.caswellplating.com/buffman.htm

    Now to Harbor Freight's compounds. While I've never tried them, IF they are anything like their sandpapers, I'd avoid them like the plague! Your money will be better spent on compounds that are sold by reputable sellers such as Caswell and others like them.

    Eye Protection is a MUST! Respiration Protection is Highly Recommended.

    Take your time and go slow, the body part you save may just be your own. To hell with the razor/it can be replaced!
    Our house is as Neil left it- an Aladdins cave of 'stuff'.

    Kim X

  9. The Following 3 Users Say Thank You to cudarunner For This Useful Post:

    criswilson10 (06-12-2018), Pete123 (06-11-2018), Shojo510 (06-11-2018)

  10. #6
    Member
    Join Date
    May 2018
    Location
    San Mateo County, California
    Posts
    48
    Thanked: 3

    Default

    Taking in the wealth of info here, thank you all for your input...

    John

  11. #7
    Senior Member AirColorado's Avatar
    Join Date
    Apr 2009
    Location
    Boulder County CO
    Posts
    1,004
    Thanked: 127

    Default

    Not totally sure what you're asking, but GENERALLY, here's my progression on a badly rusted and pitted blade...

    I'll start by lightly hand sanding a few places on the blade and shoulder just to see what I'm working with. Usually this is done with wet sandpaper that's maybe 150 grit. I go lightly and don't spend more than a few minutes in each area. After that, if it's a tough job with loads of rust and pitting I'll go right to the greaseless compounds. Start at about 150 grit and a slow speed on the buffing wheels. Once one grit seems even and it's taken out most of what I want gone, it's time to move up in grit. I'l stay with greaseless to 600 grit. Some blades only need a few passes on a particular grit and others need repeated passes - all slowly to keep the blade from losing it's temper treatment. After that, I MAY use 800 grit sandpaper only because I've never found 800 grit in greaseless.

    At this point I'm done sanding and ready to start the polishing part. Since it's all scratching and grinding, polishing (to me) just a term. For polishing I'll go directly to any number of easy to get metal polishes if I have the finish I want already. If I want to go to mirror finish then it's the color coded polishes and I'll take that all the way up to white - at that point it should be a mirror. Then I'm on to scaling and sharpening.

    That's the basic outline, each razor seems to want something different and what I want it's final appearance to be may differ as well. So there are many variations in there. Hope it helps.

    ADDED: I use a few variable speed buffers with felt wheels. I keep compound grits on different wheels (2 wheels each) and keep the same gritted on wheels in a single plastic bag. So both 400 grit wheels are together in a bag, all rouge wheels in the same one, etc. It would be a nightmare to have them all in a box where grits of various size fall off onto higher grit wheels. Always use wheel prep to make greaseless stick to the wheels and I use the rake once a year on each wheel just to remove compound and start fresh.
    Last edited by AirColorado; 06-11-2018 at 04:45 AM.
    JOB15 and Pete123 like this.

  12. The Following User Says Thank You to AirColorado For This Useful Post:

    Shojo510 (06-11-2018)

  13. #8
    Senior Member blabbermouth RezDog's Avatar
    Join Date
    Feb 2013
    Location
    Haida Gwaii, British Columbia, Canada
    Posts
    14,443
    Thanked: 4828

    Default

    I mostly hand sand and use the cakes to do some polishing and then back to working it by hand.it takes a little practise to get the knack of the buffer. I bought a small lot of nearly dead blade as sacrificial lambs to begin with. Be sure to keep the edge down and not pushed against the wheel too hard. You can erode the edge with greaseless pretty quickly. You do need to be aware of heat generation. To more directly answer your question, you can hit the buffer right after 600 or 1000 grit wet sanding. The higher you take it with sand paper the less time you will spend on the buffer. I am far more comfortable hand sanding then buffing and tend to use the buffer less. I use the Cadwell polishing cakes and pretty much follow the reference page at Caswells website.
    JOB15, Pete123 and MrZ like this.
    It's not what you know, it's who you take fishing!

  14. The Following User Says Thank You to RezDog For This Useful Post:

    Shojo510 (06-11-2018)

  15. #9
    Senior Member Pete123's Avatar
    Join Date
    Jan 2017
    Location
    Nashville, TN
    Posts
    350
    Thanked: 193

    Default

    Cudarunner put a link to an article on Caswell's website above. That article is awesome. I'll be making some changes based on what it says.

    Thanks Cudarunner!

  16. The Following User Says Thank You to Pete123 For This Useful Post:

    Shojo510 (06-12-2018)

  17. #10
    Member
    Join Date
    May 2018
    Location
    San Mateo County, California
    Posts
    48
    Thanked: 3

    Default

    great stuff here! I have zero time with a buffer and am pretty new to all things SR. Also new to how to use the forum tools for responses...

    Vision - gloss frame, tang and tail( still working on my parts name knowledge ;-) ) with a fine satin blade, pitting marking smoothed out giving that old world worn by years of use and care. Picking up some blonde horn to use for scales but may go to a darker scale as that is what it had. The current scales are only good for getting a shape for the new ones.

    My main reason other than total inexperience with this process...there are some speckled areas around the pitting marks and I was trying to figure out if those are needing to go or if they can blend into a satin finish...

    Also I did rub a little brasso on the blade with a micro fiber cloth to see how she looks. The frame portion came out pretty nice and most of the existing scratches have smoothed out...I think my low grit sanding may have softened the frame a little between the blade and Shoulder(?) so was thinking of getting a small rotary tool that is low speed to bring a little more detail back, there is an 8$ one with attachments at HF that might be worth trying...was also looking at their bench top buffer/ flex shaft unit. Btw I like getting quality tools trying to keep my cash outlay low on this first go round, super helpful to her process from other experienced members. Thx so much!

    Going to check out the link for the buffing today and see where new ideas take me. Will update as I go.

    Best Regards All and thank you again!

    John
    JBHoren likes this.

Page 1 of 3 123 LastLast

Posting Permissions

  • You may not post new threads
  • You may not post replies
  • You may not post attachments
  • You may not edit your posts
  •