
Results 21 to 29 of 29
 80Likes
Thread: Inlays in horn
 LinkBack URL
 About LinkBacks
-
01-29-2019, 12:31 AM #21Senior Member


- Join Date
- Nov 2012
- Location
- Across the street from Mickey Mouse in Calif.
- Posts
- 5,320
Thanked: 1185
You may be able to "brand it" in. About the only thing I haven't tried with horn. You can bend and shape horn with a hair dryer. I tried some heating methods with and without oil in toaster oven but what a mess that turned into. Made horn bacon and that ended that experiment. The funk took 2 years to leave the garage and had to hazmat the oven :<0) Soaking does make horn soft like it does your finger nails but not sure that would help pressing a thin plate into it. I would just cut it in if I were to do it. You don'y see a lot of detail in those old inlays that I recall. Diamonds shapes and such are easy enough to cut out.
Good judgment comes from experience, and experience....well that comes from poor judgment.
-
The Following User Says Thank You to 10Pups For This Useful Post:
MikeT (01-29-2019)
-
01-29-2019, 03:32 AM #22Senior Member

- Join Date
- Jan 2015
- Location
- Pinole, ca
- Posts
- 1,526
Thanked: 339
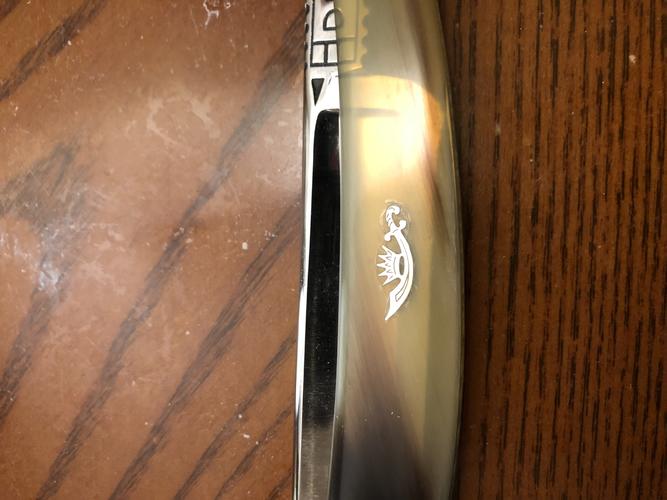
So this came out like s***, but I got a lot of info from trying it. Long term is yet to be seen. As the horn shrinks I’m afraid the inlay will pop out.
I took the embossment from a set of celluloid that was completely twisted and off gassing, luckily the blade is ok and only needed light hand sanding and buffing with very little pitting left.
I started by finishing the rough out of the scales which ends for me at 320 grit, at this point any shaping has been done and I’m about to move to wet sanding. I used some scotch 2 sided tape and put it on the scales then applied the inlay where I wanted it and firmly pressed it on. It was pretty stable. I used a marking knife to out line it which went fine, then I removed the inlay and tape and was left with just the outline. I used an 1/8” chisel and started excavating the horn inside of the outline, I also continually cut the out line deeper and deeper. Mind you, the inlay is only about .005” thick. The inlay was is so intricate and small it took me about 30 minutes to get the depth I wanted. Unfortunately the horn started delaminating if I wasn’t careful. The delaminations appear as whitish spots. To combat it I tried cutting them out. It worked but then you can see the areas where the horn is cut out wider than the inlay.
I tried filler, that resulted in white outline. I tried using ca glue to fill in the delaminations, which didn’t work though I believe would have if I had had the ultra thin ca.
2 things:
Next time I’ll do the outline the same, but, afterwards I’d steam the horn to make it softer and less likely to start delaminating/flaking while I cut out the recess.
I’ll have the ultra thin ca and do a coat inside the recess then apply the inlay with normal viscosity ca.
-
-
01-29-2019, 03:35 AM #23Senior Member
- Join Date
- Jan 2015
- Location
- Pinole, ca
- Posts
- 1,526
Thanked: 339
The inlay is exposed and flush, it can’t be felt if you run your fingers over it. The recess for the inlay is inlay as deep as the inlay is thick, I’m hoping this allows the horn to shrink and move and just take the inlay along for the ride without any finish issues.
-
01-29-2019, 04:18 AM #24Skeptical Member


- Join Date
- Nov 2016
- Location
- Colorado Springs
- Posts
- 10,548
Thanked: 2194
Not a bad job. I bet cutting out that tiny shape would be tough.
It's just Sharpening, right?
Jerry...
-
01-29-2019, 04:33 AM #25Senior Member
- Join Date
- Jan 2015
- Location
- Pinole, ca
- Posts
- 1,526
Thanked: 339
Pain in the rear, had I’d done a better job it would have been well worth the trouble. If I do it again a far simpler shape and some steam would make an easily job of it.
-
01-29-2019, 02:23 PM #26Senior Member

- Join Date
- Jun 2015
- Location
- South Carolina
- Posts
- 1,838
Thanked: 516
Thank you for this tutorial! This was very informative! Every bit of inlay info I'm trying to really take in, inlays have always been a big interest for me, though I've never really dug in to the project. Originally Posted by jfk742

When dealing with most scale material (I assume g10 doesn't expand/contract much though), you will always experience a degree of warping I think. The usual temp expansion/contraction could pop inlays out, but usually bounces back. Long term contraction though, like with horn, seems an issue. I assume keeping it oiled is key.
I wonder if oiling it before the process will help the horn find a stable resting place before the work..? Probably.
Old horn too is a good idea.
I have experienced warping in a few ways, so I'm always keeping it in mind now. Having thicker CA on one side of scales than the other, caused a set of scales to warp because CA contracts when it dries, and the one side "overpowered" the other.
You had a tough job on that horn because it's so hard to cover up or blend delamination, even with thin CA, and inclusions are a result. (Tough job also with the intricacy of inlay and other challenges). And so the scales are often just dyed.
Ive wondered how effective a vacuum chamber would be, though I don't think anything will remove the inclusions 100%.
Maybe keeping the spot wet with oil while digging out, but that would mess with the glue when inlay is placed.. Unless glue is not used.jfk742 likes this.You must unlearn what you have learned.
Yoda
-
01-29-2019, 02:38 PM #27Senior Member

- Join Date
- Feb 2015
- Location
- Duluth, GA - Atlanta OTP North
- Posts
- 2,546
- Blog Entries
- 1
Thanked: 315
Thanks JFK. Always enjoy seeing restoration tutorials.
Gasman likes this.- Joshua
-
The Following User Says Thank You to JP5 For This Useful Post:
jfk742 (01-29-2019)
-
01-29-2019, 02:39 PM #28Senior Member
- Join Date
- Jun 2015
- Location
- South Carolina
- Posts
- 1,838
Thanked: 516
Oh, excellent job on the inlay by the way!
We are often our own toughest critics, I think your work was very good, especially since its "hopefully" only the beginning, and you continue to explore and develop the process..You must unlearn what you have learned.
Yoda
-
The Following User Says Thank You to MikeT For This Useful Post:
jfk742 (01-29-2019)
-
01-29-2019, 03:32 PM #29Senior Member
- Join Date
- Jan 2015
- Location
- Pinole, ca
- Posts
- 1,526
Thanked: 339
I think with some small carving tools would be a much better choice. I assume inlays in Bakelite they molded them in. The usual horn inlays seem much more straight forward as they’re way less intricate, though they are also way thicker and have tabs on the back, so no adhesive needed. Keeping the scales hydrated with oil would probably take care of the usual issues we see in vintage razors with inlayed horn.
I need to find another victim and try some different things.


 Reply With Quote