
Results 1 to 10 of 13
 69Likes
Thread: Beginning Buffing
 LinkBack URL
 About LinkBacks
-
01-03-2020, 06:43 PM #1Member

- Join Date
- Jul 2016
- Location
- Burbank, California
- Posts
- 44
Thanked: 5 Beginning Buffing
I can't find any info in the forums on this, if something is already posted, appreciate a link.
I have some experience with tools and metal, but about to buff some razors for the first time.
Do you ALWAYS begin with 80 grit compound? Is it always needed?
I bought a few used razors at antique shops, etc. No rust. Cleaned up with some Maas and Dremel just fine. Patina removed, smooth, but now I'd like to unpin, buff really well, including places the Dremel won't reach under scales, then repin. Some will need new scales, but not all.
They are already shiny. Some have minor surface blemishes, not quite deep enough to call a scratch.
Should I start at 80 grit all the time just to buff down smooth? Or do you sometimes start at a higher grit? How do I know?
Again, if a post in the forums answers this, appreciate a link. Thanks guys.JOB15 likes this.
-
01-03-2020, 06:59 PM #2Senior Member
- Join Date
- Sep 2018
- Location
- Palm Harbor Fl
- Posts
- 382
Thanked: 49
No expert here but the several I did I use wet dry by hand 320 grit. I've been told that coarser grits would produce scratches that would.be very hard to remove. Then hit the buffers.
-
01-03-2020, 07:41 PM #3Senior Member


- Join Date
- May 2010
- Location
- Upstate South Carolina
- Posts
- 3,308
Thanked: 987
Mark-80 grit compound on a buffing wheel WILL round off every square, sharp corner on any razor and give it a "melted" look that makes expert restorers cringe (ask me how I know this!). A few experts will step down to 80 for deep pitting, but even then, a light, judicious touch is required, especially on a 3500 rpm buffer with a larger wheel. If you've done some buffing before, you also know that that buffer is basically a high-speed missile launcher if you get one pointy part into the turning wheel (again, ask me how I know!)
 Think like the physician's Hippocratic oath: "First, do no harm." And honestly, if they are shiny, with just some minor surface blemishes and no rust-that describes about 80% of my collection AFTER restoring the blade and rescaling.
Many of the best restorers on here do more hand-sanding with various jigs and aids to prevent strain, and even then, going below about 320-400 must be done with care as, yes, those deeper scratches will need to be removed.
If you've got them to the shiny/minor surface blemishes stage, and you're sure you're comfortable with un-pinning and re-pinning, consider just polishing them with a good metal polish like 3M Marine, MAAS, Mother's, Wenol Blue or similar. After doing much of my sanding in a knife vise, I will sometimes use a buffing wheel loaded with 3M Marine polish to give it a good final going over, then hand-polish with Wenol Blue and done. Fabuluster on a loose wheel is great if I want a real shiny look.
If you want a near-Phd level of razor restoration instruction, working your way through the "What Are You Working On?" thread covers almost every possible topic over a period of years. Just skim through the banter.
Lastly, I invested in all the greaseless compounds and wheels years ago after watching all of Brad Maggard's videos (which are still available on his site here: https://www.maggardrazors.com/gallery/videos/. If you look at his restoration archive, it and those videos are a master class in how to master the buffer without "melting" a razor. That said, I'm no Brad Maggard, so I almost never use the greaseless anymore.
Post pics if you get a chance-others on this forum will no doubt post more helpful info. soon. AaronLast edited by ScoutHikerDad; 01-03-2020 at 07:43 PM.
There are many roads to sharp.
-
01-03-2020, 07:49 PM #4www.edge-dynamics.com

- Join Date
- Feb 2013
- Location
- London
- Posts
- 3,066
Thanked: 512
There is a buffing thread some where around here and I know that some one will link you in soon.
I would say get some soft wheels and polishing rouges etc, watch our for heat.
I'm making a video with buffing soon to hit YouTube
Good luck..
-
01-03-2020, 09:24 PM #5
My recommendation
Before using power tools on a blade do a few by hand with wet dry paper.
Different grinds need different approaches.
The goal is to remove the minimum amount of metal to get the finish you want.
Caswell has a large range of wet dry. You will be able to get the finish you want. It does take time but you will not trash your blade.
Go slow. Preserve the blade. The pros can make it look easy. It is not.If you don't care where you are, you are not lost.
-
01-03-2020, 09:53 PM #6Senior Member
- Join Date
- May 2010
- Location
- Upstate South Carolina
- Posts
- 3,308
Thanked: 987
+1 to what Rolodave said. Also, a well-stocked auto parts store will usually have wet-dry paper in grits up to 2500 if you want to save shipping. 0000 steel wool is also useful either with WD-40 or one of the polishes as a lube.
There are many roads to sharp.
-
The Following User Says Thank You to ScoutHikerDad For This Useful Post:
rolodave (01-03-2020)
-
01-04-2020, 01:38 AM #7Senior Member

- Join Date
- Jan 2015
- Location
- Pinole, ca
- Posts
- 1,526
Thanked: 339
You could always start at 600 grit first and work you way down grit from there.
Keep the razor below center of the wheel, preferably no further up than 7 oclock. Try using a clean loose cotton buff and practice. If the buffer catches a little and you have a decent grip on it you can usually keep the buffer from taking it from you. Razors are delicate, buffing a thin full hollow is a great way to destroy it, the metal at the edge is generally .008 or less in thickness.
Same thing goes for hand sanding, always start higher than you think you should, it could save you hours of work, takes a long time to remove 80 grit scratches.Last edited by jfk742; 01-04-2020 at 01:40 AM.
-
01-04-2020, 04:02 AM #8Senior Member


- Join Date
- Mar 2015
- Location
- Akron, Ohio
- Posts
- 12,118
Thanked: 4316
I restore everything by hand, i even polish by hand, but occasionally I'll use a dremmel for reshaping a heel, or toe, or taking out the hone wear from under the spine.
400 is as low as I go, sometimes 320 on the greaseless compound, using the dremmel.
You'll keep your grind lines much crisper, if done by hand.

Patience is a virtue, good things come to those who have it.Mike
-
The Following User Says Thank You to outback For This Useful Post:
bartds (01-04-2020)
-
01-04-2020, 08:05 AM #9Home of the Mysterious Symbol


- Join Date
- Dec 2019
- Location
- Chauvin, LA
- Posts
- 864
Thanked: 123
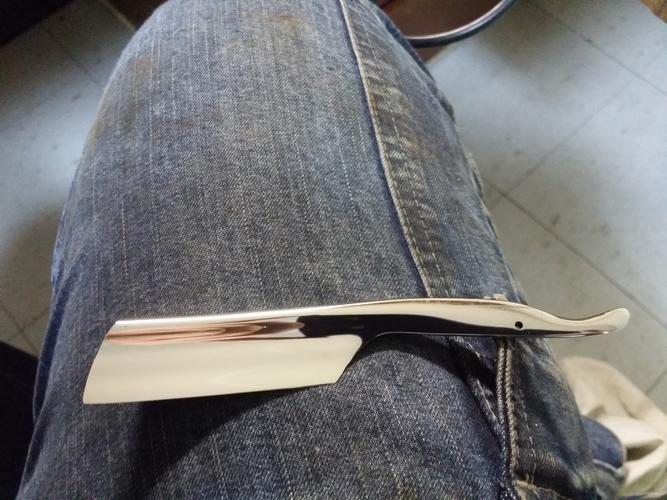
That's a somewhat modified Gold Dollar 66. I started the process with a 60 grit belt on a belt sander. The final stage was .1 micron diamond paste handrubbed with a piece of old tshirt. It's all about what you got and what you want to end up with. When you start out with very coarse media, you will end up removing a lot of steel just progressing through the grits. Each stage must completely eliminate the scratches left by the previous stage. You can't remove 60 grit scratches with 600 grit abrasives. You can certainly remove them with 100 grit. But then, you have 100 grit scratches to be removed. Forget about that 1000 grit for a moment. You need to get hateful on that razor with some 150 grit. 220. 320. 400. 600. 800. 1000. Only once you get up into the 4 figure range in ANSI grit do you get where the amount of steel removed in order to progress properly, is no longer terrifying. The fewer very coarse stages you go through, the better. OTOH, if you start out too fine, then the blemishes you hoped to remove are going to be with you for not hours, but days or even weeks. The severity of the polishing is then limited by how much steel you can afford to lose. In the case of the pictured GD66, there was a lot of steel there, and I wanted a very thin and fine razor, so the mechanically assisted 60 grit belt was not so bad a choice, especially since I was also doing a lot of shaping with the belt sander. But let's say I wasn't interested in modifying, in effect completely regrinding the clunky old 66 into a completely different razor. But I wanted to fix all surface imperfections and have a nice matte finish. Maybe I would have started with 400 grit or so. And finished with maybe 2k grit. If I wanted a mirror finish I might have started with 400 and ended up at .1u, roughly 200,000 grit. Or maybe I was okay with it at the 1u level, which is about what a typical finishing hone will rate. The 400 is needed due to the crude grinding of the stock razor. A lovely old vintage with a patchy, ugly patina and a few scuff marks I might start at 1k grit. It's all about what you got and what you want to end up with. But you do not either want to start too coarse for the job, and peel off steel like an onion, nor start too fine and never get done.
The pressure and speed, particularly when using machinery, matter a lot. A light hand sanding doesn't scratch nearly as deeply as a bench grinder with a flap wheel, or a Dremel and a sanding drum. lubricating or buffering agents such as water, wax, soap, oil, etc will make a difference, too.
When unsure about which of two grits to start with, lean toward the finer of the two. If it is taking too long, you can always back down to the coarser one. But if you start too coarse, you can't really undo that.
A few standard warnings about power sanding, shaping, or polishing. Rotating machinery and razors are an almost explosive mix. In the briefest instant a razor can go from being in your hand to being in pieces across the room, or in an eye socket. Pay attention to rotational direction, and always use eye protection. Never keep going on thin steel long enough to make it too hot to hold. It only takes about three seconds, even less, to ruin a piece of steel through overheating. When you see the Blue Stain of Death, your temper is hopelessly pushed beyond the point of usefulness. Practice on a junk razor. Deliberately overheat the razor and see what I mean. The spine or shank can easily tolerate a half minute or more. Not so, the edge area. Some guys lay the razor on a plate of aluminum, which serves partly to guard the edge, and partly to serve as a heat sink.
-
The Following 3 Users Say Thank You to CrescentCityRazors For This Useful Post:
bartds (01-04-2020), JOB15 (01-04-2020), ScoutHikerDad (01-04-2020)
-
01-04-2020, 02:32 PM #10Home of the Mysterious Symbol
- Join Date
- Dec 2019
- Location
- Chauvin, LA
- Posts
- 864
Thanked: 123
Nice. Great job on the scales! Most guys would have tossed them and made new ones. That was a good save. Originally Posted by outback

-
The Following User Says Thank You to CrescentCityRazors For This Useful Post:
outback (01-05-2020)


 Reply With Quote


