
Results 1 to 10 of 42
 110Likes
Thread: Scale restoration question
 LinkBack URL
 About LinkBacks
Hybrid View
-
03-09-2022, 12:38 AM #1Senior Member


- Join Date
- Mar 2015
- Location
- Akron, Ohio
- Posts
- 11,975
Thanked: 4304
I'm trying fellas.....
I've completed half of the info 3 times now, only to have someone send me a PM in the middle of it. Well....I locks my phone up, till I close what I'm doing and answer it. I loose several hours of typing and downloading pics, every time. I'll try again tomorrow, for Im about livid with this, right now.
Think I'll head to the workshop, got a FBU in the mailbox today. Needs a bit of TLC Mike
Mike
-
The Following User Says Thank You to outback For This Useful Post:
skald (03-09-2022)
-
03-09-2022, 01:34 AM #2Senior Member

- Join Date
- Feb 2015
- Location
- Duluth, GA - Atlanta OTP North
- Posts
- 2,546
- Blog Entries
- 1
Thanked: 315
I would clean the scales first, repair on flat surface, add liners after glue has cured well, then condition to make them less brittle. Mike may correct me though.
If he posts a "how-to" they should make it a sticky or add it the library. I'm going to print it out lol.
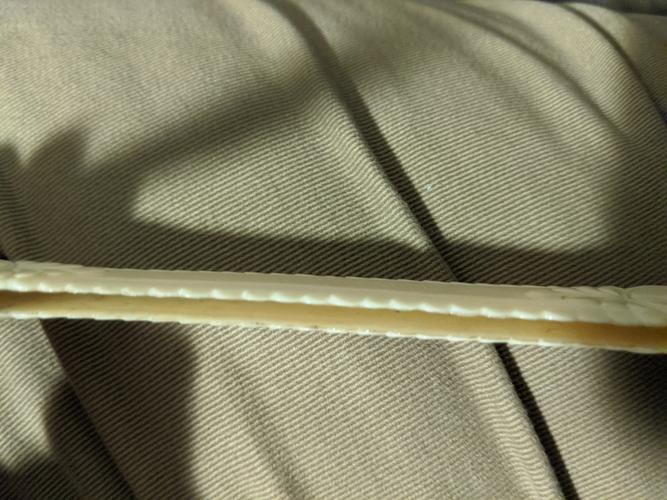
Here is the razor Mike posted from a different angle.
-
The Following User Says Thank You to JP5 For This Useful Post:
skald (03-09-2022)
-
03-09-2022, 03:00 AM #3Member
- Join Date
- Feb 2022
- Location
- Vancouver Canada
- Posts
- 56
Thanked: 0
Do you have tips on the "clean" and "condition" part of this advice? I've never worked with bone, and while I've unpinned, cleaned up, and reassembled several razors, I've never really done any major repair before. Originally Posted by JP5

-
03-09-2022, 02:59 AM #4Member
- Join Date
- Feb 2022
- Location
- Vancouver Canada
- Posts
- 56
Thanked: 0
Hey, Bud, Originally Posted by outback
Take your time. I'm not doing this tomorrow.
Also, feel free to send it in 27 small pieces. I can assemble them together later.
You're doing me a big solid, so feel free to make it as easy on yourself as possible!
Thanks!
-
03-09-2022, 03:33 AM #5Member
- Join Date
- Feb 2022
- Location
- Vancouver Canada
- Posts
- 56
Thanked: 0
Hey, also, if you'd find it easier, you could just write all of this by hand, take some photos, put those here, and I could transcribe them for you. Originally Posted by outback
I'm guessing I type faster on my laptop than you do on your phone.
My dad didn't teach me much, but my mom was an English teacher, so we are now in my wheelhouse.

-
03-09-2022, 12:07 PM #6Senior Member
- Join Date
- Mar 2015
- Location
- Akron, Ohio
- Posts
- 11,975
Thanked: 4304
I'd thought about that, but then I can't put in pics where they need to be.
I'll keep trying, though.skald likes this.Mike
-
03-09-2022, 01:04 PM #7Skeptical Member


- Join Date
- Nov 2016
- Location
- Colorado Springs
- Posts
- 10,486
Thanked: 2186
cleaning bone is a hydrogen peroxide soak. conditioning is a soak in neatsfoot oil.
But Mike will put it all together.It's just Sharpening, right?
Jerry...
-
03-11-2022, 01:00 AM #8Senior Member
- Join Date
- Mar 2015
- Location
- Akron, Ohio
- Posts
- 11,975
Thanked: 4304
OK. First off. I'm no pro, the resources/knowledge, all came from this forum. Either through our library, or other members, here. And yes, some of my own ideas, and techniques, or modifications of others, ideas.
The library and the workshop, are jampacked with restoration information.
But as for bone or ivory. I guess first thing is determining how dry or brittle they are. If their in a fragile state...I'd soak the whole razor in mineral oil, for a couple weeks.
Preferably, somewhere warm. During this time of year, I put them on the furnace, where it doesn't get too hot. In the summer, I put them in a sunny, window sill.
This will give some life to the scales, and ease in the disassembly of the razor.
So here's my process, hopefully the best I can describe for y'all ta understand, and try fer yasef.
1st.
A. Carefully drill pins, and save collars, (if applicable)
separate scales and razor.
B. Clean as much dirty and rust from scales, as
possible. (Toothbrush, degreaser, ect)
C. Let dry.
D. Once dry, glue n clamp any cracks with CA. ( if
applicable)
E. Sand scales with 220 grt., to smooth out and
remove excess CA., and to prep the scales for
bleaching.
2nd.
A. Find a small bowl/dish with a lid, that will
accommodate the scales.
B. Place scales in container, and cover with hydrogen
peroxide, install lid, soak to your liking.
Note: This takes awhile with normal, everyday
peroxide. Solon grade, is another beast.
It works faster, but it'll burn your skin, too.
C. Once bleached to your liking, remove and rinse
under water, let dry.
3rd.
A. Find a hard, flat, surface to work on. Preferably,
portable. I use a piece of corian countertop.
B. Cover it with wax paper, taped down flat. "No
wrinkles" !! And make sure there's no debris
between the paper and the work surface. " IT'S
GOTTA BE FLAT" !! Its the mold for the inside of
the scales, and the release agent for the work
surface.
4th.
If I had a large piece that needed patched/
replaced, I would do the repairs before the
fiberglass backers.
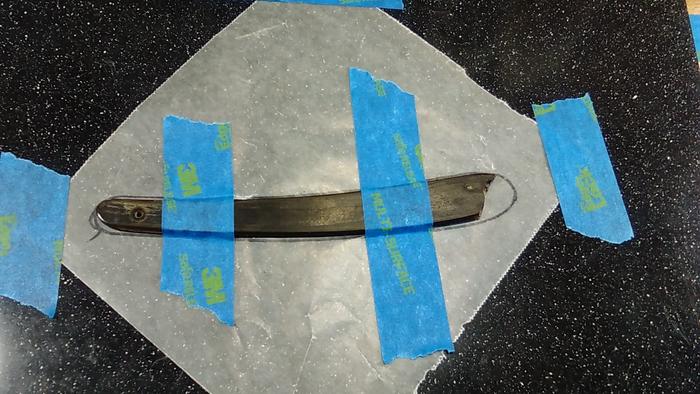
A. Tape scales down to the wax paper, so they won't
move.
B. Don't tape over the repair area.
C. Using baking soda, build up the missing area, so
its slightly higher and bigger than it needs to be.
You'll need it to sand and blend the repair to the
original scale dimensions.
D. Apply "Thin CA" to the entire area of baking soda,
starting at the scale, working towards the edge of
the repair. It hardens instantly, so move fast.!
If your repair isn't big enough, just add more soda
and CA. Building in layers is favored for large
areas, because of how fast it cures. I've had
some cure, before all the soda was saturated.
It was a mess.!
E. If successful... Remove tape, and carefully remove
scales from wax paper. It may tear the paper, the
heat generated by the CA n soda, kinda melts the
paper to the scales.
F. Sand repair to original, outer contour
G. Sand repair to original thickness, and shape.
I do most of the heavy sanding, with 220 grt. W/D.
Then progress with 400,600,1000 grt., after I've done
the glass work. Then polish.
If all went well with the CA n soda, the inside of the
scales should be flat, and only need a good scuffing
with 220, before bonding the fiberglass. If not...
Add more CA n soda, then sand, till it is.
5th.
A. Replace wax paper. Same as before... Tight n
flat.
B. Make a support that will evenly distribute the
weight, put on both the scales. I use Popsicle
sticks for my support, and my pinning anvil for the
weight. (4" piece or RR track). Its gotta have
some heft to it. Like a jar of loose change. It
needs to press out all air bubbles and excess
epoxy, for a proper bond to the scales.
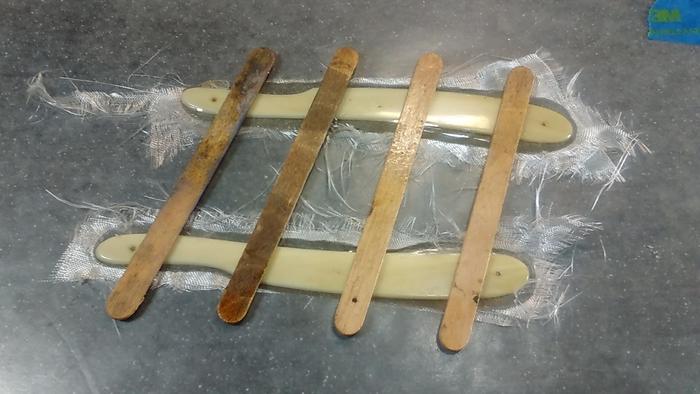
6th.
A. Gather your fiberglass strips.
B. Prepare your epoxy. I use System Three, T-88
structural epoxy.
C. Wipe down scales, with denatured alcohol.
D. Coat the inside only of one scale, with epoxy.
Don't goop it on, or your going to have epoxy on
everything.
E. Place one layer of glass at a time on the scale,
making sure its saturated, centered, and flat, over
the scale. " No Wrinkles "
F. Carefully apply another coat of epoxy, without
disturbing the first strip of glass. And install
second strip of glass, like the first.
G. Place on wax paper covered work space,
fiberglass side down. Make sure that's where
you want to put it. You can't pick it back up,
once you do. Always thinking ahead.!
H. Repeat with second scale, place next to other
scale on work space.
I. Place support on scales, and install weight.
Note:
Keep a close eye on the scales for several minutes,
while everything is squishing down n out. The first
set I did, slid apart. Had to start over, and steady
the weight till all got smooshed down.
7th.
A. Once cured, (72 hrs. for T-88) you can remove
weight, support and scales.
B. Removal of excess fiberglass n epoxy from outer
edge of scales, with a utility knife/razor blade.
Make sure its sharp, or you'll have little strands of
fiberglass sticking from your scales.
Besides your final sanding and polishing to the tops of the scales, your done.!! The inside of the scales should be smooth n perfectly flat. Ready for pinning, or putting in mineral oil, for a good soak.Last edited by outback; 03-11-2022 at 02:42 AM.
Mike
-
The Following 10 Users Say Thank You to outback For This Useful Post:
32t (03-11-2022), DZEC (03-11-2022), Gasman (03-11-2022), JP5 (03-11-2022), markbignosekelly (03-15-2022), PaulFLUS (03-11-2022), randydance062449 (03-11-2022), RezDog (03-11-2022), skald (03-15-2022), STF (03-11-2022)
-
03-11-2022, 01:44 AM #9Senior Member

- Join Date
- Dec 2018
- Location
- Gainesville, FL
- Posts
- 5,980
Thanked: 608
No pro...sheesh. Maybe I could answer the phone and take messages. "Mike's school of razor restoration. How may I direct your call? I'm sorry Mike can't come to the phone right now. He's busy schooling the rest of us."
Nice tutorialIron by iron is sharpened, And a man sharpens the face of his friend. PR 27:17
-
The Following User Says Thank You to PaulFLUS For This Useful Post:
outback (03-11-2022)
-
03-11-2022, 01:56 AM #10Senior Member
- Join Date
- Dec 2018
- Location
- Gainesville, FL
- Posts
- 5,980
Thanked: 608
Also Mike you can always, before you leave your post or if you get the "... because the token expired," message, hard tap, select all, copy and then when you revisit, hard tap paste...you may have to add the pics back in because sometimes the copy/paste doesn't translate the photos but you should be able to save it all otherwise.
Iron by iron is sharpened, And a man sharpens the face of his friend. PR 27:17


 Reply With Quote