
Results 1 to 10 of 13
 LinkBack URL
 About LinkBacks
-
02-12-2009, 09:57 PM #1Mostly Harmless


- Join Date
- Nov 2008
- Location
- Netherlands
- Posts
- 566
Thanked: 103 J.A Henckels .. my first restore.. well it will be.
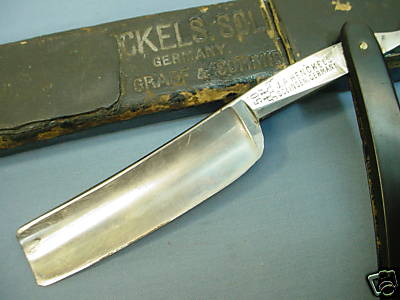
This is what I got in the mail today....
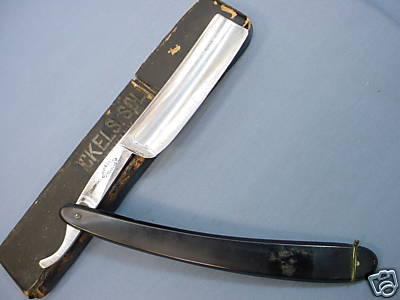
This is what I'm planning to do:
-Take it apart
-clean the blade and sand it and polish it(dont know if I'll get it to a miror finish but I'll give it a go)
-not sure if I'm going to straighten out the smile.. its not realy an even smile and there is a chip on the point.
-find or make some new scales.. I like the G10 materials and the like but dont think that it will be easy to make scales out of them the first time..
It will probably take me a lot of time as I will only be working on it every once in a while..
Maarten
-
02-12-2009, 11:01 PM #2The Shell Whisperer


- Join Date
- May 2008
- Location
- Sin City
- Posts
- 5,597
Thanked: 3384
Maarten, Originally Posted by mlangstr

I have a Henckels #50 that is amongst my best shavers. I have not known a Henckels be a bad shaver.
I would concentrate one thing at a time. Sanding and getting that blade back to life. It should take a nice and shiny finish.
Personally I would not recommend using G10 as your first scaling job. It will take some experience to get it cut and sanded to perfection. G10 is even an PITA for me and many of the pros.
A smiling edge or not is a personal choice. If you plan on removing the smile be prepared for some butterknifing and getting the edge straight and honed again. You might be taking on more than you can handle so take it as it comes and don't rush.
Good luck!
əˌfisyəˈnädō | pərˈfekSH(ə)nəst | eS'prəSSo | düvəl ləvər
-
The Following User Says Thank You to Maximilian For This Useful Post:
mlangstr (02-13-2009)
-
02-13-2009, 10:17 AM #3Mostly Harmless
- Join Date
- Nov 2008
- Location
- Netherlands
- Posts
- 566
Thanked: 103
Thanks Max,
I really like your razors and your work is one of the reasons I like G10..
I've ordered some microfasteners and some new scales and some extra wedges so I should be able replace the scales pretty easily..I will probably fit the razor with some temporary scales until I get my scale making skills ar up to par.
Maarten
-
02-13-2009, 12:13 PM #4Coticule researcher
- Join Date
- Jan 2008
- Location
- Belgium
- Posts
- 1,872
Thanked: 1212
I don't know where you ordered your microfasteners, but because you live in Holland, I like to add that I'm going to place an order with this firm:
http://www.microscrews.nl/index.html
I find it a bit easier, because they list metric sizes, and I think the postage will be less expensive too.
Good luck,
Bart.
-
The Following User Says Thank You to Bart For This Useful Post:
mlangstr (02-13-2009)
-
02-13-2009, 12:53 PM #5Mostly Harmless
- Join Date
- Nov 2008
- Location
- Netherlands
- Posts
- 566
Thanked: 103
I've ordered them at Micro Fasteners - Hobbyists Source - Locknuts - Washers - Machine Screws - Fasteners - Rivets - Wood Screws
I've also ordered the small wrenches so I should be ok with the non-metric stuff.. well maybe the holes are an issue but then I only have to find a drill.
Maarten
-
02-14-2009, 12:58 AM #6The Great & Powerful Oz


- Join Date
- May 2008
- Location
- Bodalla, NSW
- Posts
- 15,638
Thanked: 3751
Great advice so far. I'l just add if you ignore the chip at the toe till you've finished restoring and honing you'll find it may be greatly reduced. You don't say how experienced you are with metal work but shortening the tip of the razor by a 1or 2 mm may be a solution.
The white gleam of swords, not the black ink of books, clears doubts and uncertainties and bleak outlooks.
-
The Following User Says Thank You to onimaru55 For This Useful Post:
mlangstr (02-14-2009)
-
02-14-2009, 07:56 PM #7Mostly Harmless
- Join Date
- Nov 2008
- Location
- Netherlands
- Posts
- 566
Thanked: 103
Thanks a lot for all the advice...
I'm pretty inexperienced with metalwork but I'm pretty handy so I'm pretty confident that I'll do fine if I set my mind to it.. I just removed the scales and put them in some temporary ones .. I got the microfasteners this morning and some other scales from the invisible edge Yesterday..
I bought some other scales for another razor of which I didnt like the scales ... found out that i bought the same scales from the invisible edge...
So now I'll go and sand the razor until its nice and shiny...
Maarten
-
02-15-2009, 03:05 PM #8Mostly Harmless
- Join Date
- Nov 2008
- Location
- Netherlands
- Posts
- 566
Thanked: 103
Yesterday evening I sanded the razor with 400-1000 and 1500 then I polished it today with a dremel with small felt pad and dremel polishing stuff..
The results are quite ok but not a real mirror finish .. it still has some realy fine scratches.. The blade looks a lot better than it did so I'm not sure what I'll do..
For a real mirror should I go back to 1000?then 1500 find some 2000 and what should I use as polishing compound? How long should polishing take when all the sanding is done?
My Girlfriend decided that I'm going to keep the smile.. It suits my face best..
And if it doesnt work I can always straighten it out on the DMT-C or F
Maarten
-
02-15-2009, 09:29 PM #9Coticule researcher
- Join Date
- Jan 2008
- Location
- Belgium
- Posts
- 1,872
Thanked: 1212
Maarten,
For a perfect polish, you need to progress from a low grit sandpaper all the way to 600 or 1000 grit. The steps should not be greater than doubling the previous grit, p.e. 60 - 120 - 240 - 400 - 600 -1000.
It is very important that all scratches from the previous grit are completely gone before you step up to the next. This is easily said, but not as easy to achieve (you already know I struggle with it myself )
)
Every scratch that stays behind is out of reach of the felt with polishing compound. It is impossible to tell at which grit you left some scratches behind, the best thing you can do is drop down, one step at a time, till you can successfully remove the scratches.
Then you need to step up again. It helps to change the direction of the scratches with each successive grit. That way it's easier to spot when the underlying scratches are gone.
Polishing on the Dremel never gave me as good results as polishing on stationary buffing wheels. I use buffing wheels for a drill, that I lock in a vise. http://www.kwb-burmeister.com/_pdf/b...ENG_screen.pdf
Look at page 139. They are very cheap, buffing compound included.
Because of the low RPM and the small diameter of the wheels, they're not as dangerous to operate as a real buffer. But you still need to be focused that the wheel doesn't grab the razor.
Bart.
-
The Following User Says Thank You to Bart For This Useful Post:
mlangstr (02-15-2009)
-
02-16-2009, 10:02 AM #10Mostly Harmless
- Join Date
- Nov 2008
- Location
- Netherlands
- Posts
- 566
Thanked: 103
Well I can live with the tiny scratches they arent that bad and I'm not a perfectionist anyway... The razor is looking great the way it is now..
I've removed the chip on the tip and I've reset the bevel yesterday.. it took me a long time to set it al along the edge.. one CM from the tip and 1 cm from the heel it didnt want to pass the TNT for a long time.. Probably because of the smile in the blade. but in the end the bevel was set all along the edge. . tomorow I will be honing it up to shavereadyness and I'll give it a go..
I will post some pictures then. It has really made a big transformation from the first pictures..Its not perfect but I'm really pleased with it.
Maarten


 Reply With Quote