
Results 1 to 9 of 9
 1Likes
 LinkBack URL
 About LinkBacks
-
07-12-2009, 09:27 PM #1At this point in time...


- Join Date
- Jun 2007
- Location
- North Idaho Redoubt
- Posts
- 27,063
- Blog Entries
- 1
Thanked: 13249 Scale Repair 201 - or slightly more advanced
Lets look at a slightly more advanced scale repair...
Basics being Glue / Epoxy / Acetone / Fiberglass etc:
Starting with a set of broken scales for a C-MON, these were actually broken at the pivot so this is my only option for the repair...
To make this more difficult these scales have inlays and bolsters...
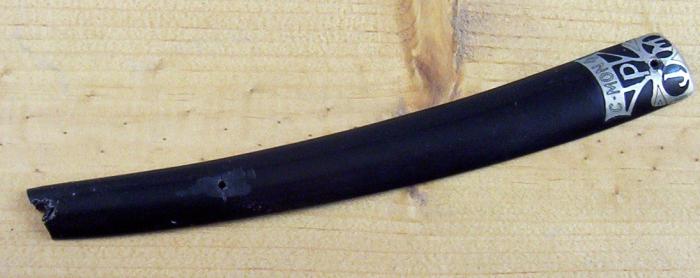
First I look for an old scale that is close enough in size and curvature to work with... Never, ever, through away old razor parts...
After I find one that is close, I line up the scales and drill out the holes to match...
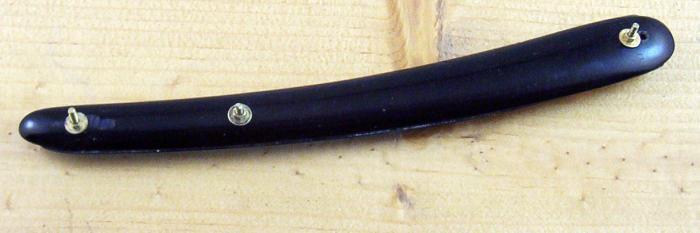
As you can see adjustable pins from Microfasteners come in very handy...
After every thing is lined up and drilled out I sand and file the scales to fit
these will need to be polished out also after all the fitting...
Hint: always shine up inlays and bolsters before removing from the old scales it is way easier and safer...
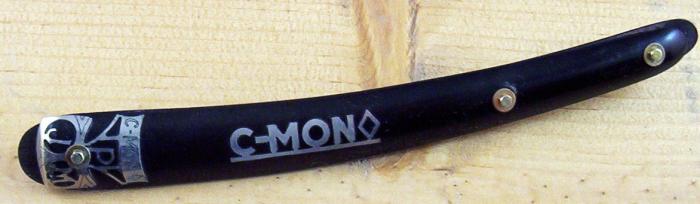
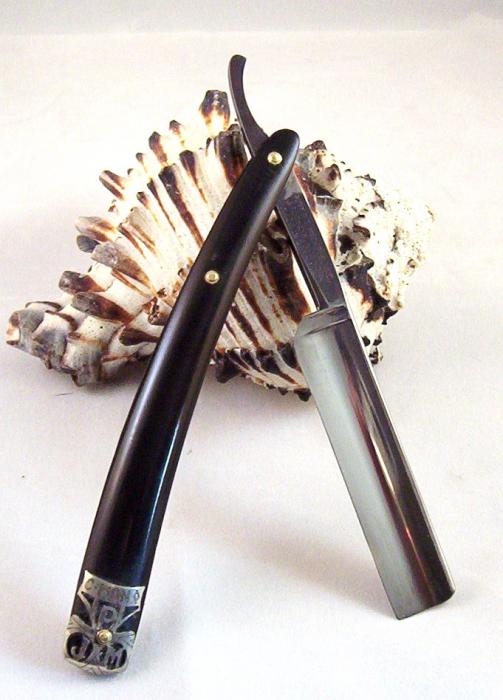
Using an acetone dip I pop loose the old bolsters and re-attach them to the new scale using some Med CA... After re-pinning and some minor fitting the scales are back on and as strong as new.... actually the one is new
-
The Following 5 Users Say Thank You to gssixgun For This Useful Post:
aroliver59 (07-12-2009), BeBerlin (07-12-2009), Hillie (07-12-2009), SR-CMT (07-13-2009), thebigspendur (07-12-2009)
-
07-12-2009, 09:44 PM #2The straight road.

- Join Date
- May 2009
- Location
- Passaic County, N.J.
- Posts
- 130
Thanked: 26
That is a wonderful job and gret walk through on the process !
-
The Following User Says Thank You to Bigbee For This Useful Post:
gssixgun (07-12-2009)
-
07-12-2009, 10:07 PM #3Senior Member

- Join Date
- Jan 2008
- Posts
- 842
Thanked: 165
Nice, I can hardly tell the difference.
-
The Following User Says Thank You to smythe For This Useful Post:
gssixgun (07-12-2009)
-
07-12-2009, 10:08 PM #4Retired Developer
- Join Date
- Mar 2008
- Location
- Berlin
- Posts
- 3,490
Thanked: 1903
Wikified as part of your existing article on scale repair: Restoring a Straight Razor - Straight Razor Place Wiki. Thanks a lot, Glen - sterling stuff!
-
The Following User Says Thank You to BeBerlin For This Useful Post:
gssixgun (07-12-2009)
-
07-12-2009, 10:15 PM #5Freakin' Ladies Man

- Join Date
- Apr 2009
- Location
- Bay Area
- Posts
- 351
Thanked: 47
Very nice Glen, you show off your quality skills once more!

-
The Following User Says Thank You to Hillie For This Useful Post:
gssixgun (07-12-2009)
-
07-12-2009, 10:34 PM #6Senior Member


- Join Date
- Feb 2008
- Location
- Bergen County,N.J.
- Posts
- 4,340
Thanked: 832
Great job with the explanation of the task at hand,,,with step by step pics to boot.
Bamasamson likes this.Having Fun Shaving
-
The Following User Says Thank You to coachmike For This Useful Post:
gssixgun (07-12-2009)
-
07-13-2009, 02:24 AM #7Senior Member

- Join Date
- Mar 2008
- Location
- Dale City, VA
- Posts
- 574
Thanked: 182
Man, you are always on time with these kinds of helpful tips and techniques.
Thanks for freely sharing!!
-
The Following User Says Thank You to mrbhagwan For This Useful Post:
gssixgun (07-13-2009)
-
07-13-2009, 09:50 AM #8Lookin like a crim


- Join Date
- Apr 2009
- Location
- Coffs Harbour Australia, Home of the Big Banana
- Posts
- 2,706
Thanked: 1072
Thankyou. i knew i was keeping all these old parts for a reason.
Very nice work by the way.
-
The Following User Says Thank You to baldy For This Useful Post:
gssixgun (07-13-2009)
-
07-14-2009, 08:21 PM #9illegitimum non carborundum


- Join Date
- Jan 2008
- Location
- Rochester, MN
- Posts
- 11,552
- Blog Entries
- 1
Thanked: 3795
"... Never, ever, throw away old razor parts..."
There's a reason I have a box of razors labeled "wretched refuse," and you just showed why. I have yet to ever try to swap bolsters but maybe I'll give it a shot soon. Thanks for yet another great lesson.Last edited by Utopian; 07-15-2009 at 03:19 PM.
-
The Following User Says Thank You to Utopian For This Useful Post:
gssixgun (07-15-2009)


 Reply With Quote