
Results 1 to 10 of 10
Thread: A little advice?
 LinkBack URL
 About LinkBacks
-
09-10-2010, 03:04 AM #1Junior Member

- Join Date
- Sep 2010
- Posts
- 18
Thanked: 2 A little advice?
I grabbed this at a local antiques place. Seemed in the best shape. Can't shave, though. I want to get it shaving with the least amount of work. Not that I'm lazy, I just know that the less I mess with it, the less likely I am to screw something up.
The edge seems very fine and sharp, but there is black rust on it. I'm hoping I wouldn't need to reset the bevel. Just take a little steel off of what's there. Whichever case you fine folks decree this be, what level hone would I start with? I've never done this and have no equipment atm.
I'm also hoping I wouldn't have to dissamble it. I found another thread that I feel covered that satisfactorily, though. I really could just let the tang rust sit for a while, despite it being the evil red kind.

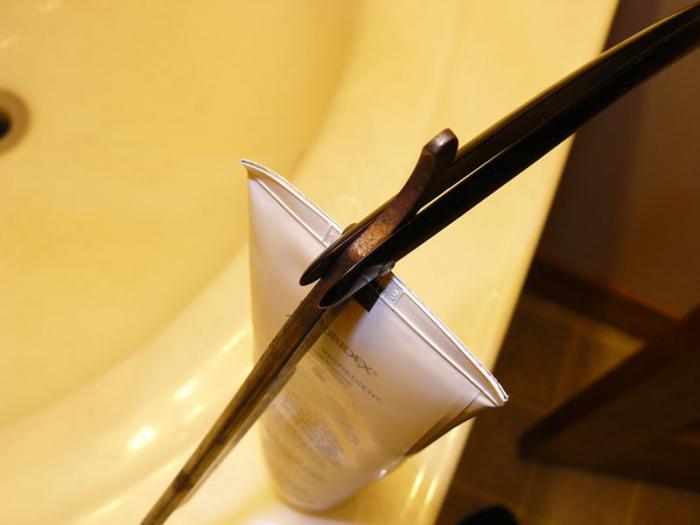
Oh, and it's an extra hollow. Another reason less work is better. I read the step-by-step restore in the wiki, and I've been eyeballing it for a while, and everything on it seems dead straight to me. I notice the slight smile, and the uneven bevel, but a smile isn't really a bad thing, is it? and the bevel looks like a honer error to me.Last edited by stevepoppers; 09-10-2010 at 09:06 AM. Reason: resized to normal viewing size
-
09-10-2010, 03:36 AM #2Str8 & Loving It

- Join Date
- Apr 2010
- Location
- Twilight Zone
- Posts
- 3,740
Thanked: 3180
I am not a restoration expert, but seems like you got some rusting throughout the blade which I think may be fixable and some pitting around the edge, which in my estimate will need a bevel reset at best.
Wait a bit and an expert will be along to give you better advice. Also, if I were you, I would send this out to be done professionally (unless it's a "project" razor and you don't mind messing it up)
-
09-10-2010, 03:50 AM #3Junior Member
- Join Date
- Sep 2010
- Posts
- 18
Thanked: 2
To get more info out there...
It is basically a project razor. I've got one in good condition coming from the classifieds.
I've seen a job where someone did nothing but work the cutting edge, leaving the patina on the rest of the surface. I figured I could get away with that for now.
Ah, here we go: http://straightrazorpalace.com/razor...tml#post647484Last edited by stevepoppers; 09-10-2010 at 05:36 AM.
-
09-10-2010, 09:52 AM #4
From the pictures it looks like you'll have to reset the bevel and get past any rust or pitting on the edge to get down to fresh steel. Once you're down to fresh steel you can continue honing from there.
In terms of the rest of the razor, I've been able to clean eBay razors in similar condition with MAAS and a cloth. MAAS will remove a suprising amount of tarnish, rust and crud, and I'd definately recommend trying this before you do anything with abrasives like sandpaper.
The face of the blade should clean up pretty well with just MAAS and a cloth as there is only some patina and mild tarnish on there.
After the MAAS takes off the rust on the tang you might find that there is some pitting underneath though, and the only way to get that out is to use some sort of abrasive like sandpaper or a buffer with polishing compounds. You're getting into much more serious restoration there though, and as long as the pitting isnt horrendous I'd leave it.
You cant really sandpaper the tang without doing the rest of the blade though, otherwise you'll end up with a shiny tang and a patina'd blade!
If you want it fully restored I'd definately recommend sending it out to a pro, unless its a project razor as Robert says, and they will be able to hone it for you as well.
Good luck and keep us posted!Last edited by Stubear; 09-10-2010 at 04:43 PM.
-
09-10-2010, 09:54 AM #5The Great & Powerful Oz


- Join Date
- May 2008
- Location
- Bodalla, NSW
- Posts
- 15,638
Thanked: 3751
The rust at the edge will cause trouble until you have a clean bevel set & any pitting is away from the cutting edge. Every little black speck at the edge is a potential chip. I would start at 1k.
The white gleam of swords, not the black ink of books, clears doubts and uncertainties and bleak outlooks.
-
09-11-2010, 01:36 AM #6Junior Member
- Join Date
- Sep 2010
- Posts
- 18
Thanked: 2
Well, dang. I had obviously hoped it would require less work and equipment. Looks like this one goes on the shelf for now...
But thanks for the help.
-
09-11-2010, 03:04 AM #7Senior Member


- Join Date
- Oct 2009
- Location
- Silicon Valley, CA, USA
- Posts
- 3,157
Thanked: 853
Not so fast.... consider this. Originally Posted by stevepoppers

Pick up some 3M wet/dry paper 1K, 2K at the local
hardware or auto shop and give it a sanding.
Lay it flat on a board and sand or sand with a pinch of paper
ALWAYS keeping the sharp bit and your skin that bleeds
well separated. You do not need to sand it to infinity
and beyond but just enough to see what is under the crud.
Use wet/dry and a chopstick to sand out the red rust hear the
heal and other small bother areas.
Then hone it up with what you got. A combo pack of
pressure sensitive abrasive film at Woodcrafters is not
expensive and glued to a scrap of AB exterior grade
plywood will get you a tolerable honing kit (15 micron,
5 micron, 0.3 micron). 15 micron is about 600 grit
and 5 micron about 4500 Grit US, or 3000 grit in Japanese
Whetstone speak. Note that film cuts FAST so the big jump is OK...
You do have some corrosion near the edge but we cannot
tell if it involves the edge... Small pits that do not involve
the edge once cleaned out well enough for sanitary reasons
can be ignored for the most part. You can see the pits
with ease with a small magnifier once your get a bevel
shaped.
This process will tell you volumes and may get you a good shaver.
Do remember to lightly oil the blade after sanding and honing.
Wet/dry can be used with a light mineral oil too... Do not forget
the pivot when lightly oiling.
-
09-11-2010, 03:50 AM #8Senior Member
- Join Date
- Aug 2010
- Location
- Vancouver, BC, Canada
- Posts
- 1,377
Thanked: 275
FWIW --
I more-or-less followed "niftyshaving" advice (before I had it!) on a Wade & Butcher I liberated from an antique shop. Wet-or-dry sandpaper is cheap, and I used 5 micron microabrasive paper and 0.5 micron Cerium Oxide paste (Lee Valley Tools) on a fabric strop for final polishing.
That razor is now shaving nicely.
Those spots of rust on the edge? Each one of those pits goes into the steel, and you'll have to grind enough metal off to get a _clean_ edge, which may take a while. I still have rust spots on the bevel of my razor, but they're far enough from the edge so that I'm comfortable with them.
Don't worry about the patina -- use some MAAS or Flitz to get off the worst of it.
What _matters_ is that the edge is clean and sharp -- no notches, no rounding. Everything else is window-dressing. [This attitude may get me banned !<g>]
Two other notes:
1. I suggest putting a layer of electrical tape over the spine. It changes the bevel angle slightly, but it avoids adding more "honing wear" to the spine.
2. Keep the "smile" by using "rolling X-strokes", which grind the ends of the bevel a bit more than the center of the bevel.
Charles
-
09-11-2010, 05:27 PM #9Junior Member
- Join Date
- Sep 2010
- Posts
- 18
Thanked: 2
Hey, I have access to wet/dray sandpaper and flat surfaces! Now these methods seem more in line with my budget.
I really like the chopstick tip, but I still fear for the pinhole and areas I just can't reach without disassembling it. Repinning looks like a challenge, though, so that will have to wait.
-
09-13-2010, 11:32 AM #10Junior Member
- Join Date
- Sep 2010
- Posts
- 18
Thanked: 2
So, I took some 1k wetordry to it. I actually taped it to the narrow side of a brick, put a bit of mineral oil on it, and treated it like a hone. I depended on the grit of the paper to become finer with use, and I think it may have. I got a clean bevel and was actually able to shave with this razor with a result better than my two-blade Gilette disposables! No irritation either! Though not as comfortable as them and not as comfy or smooth as the shavett-like thing I have. Store didn't have any 2k paper atm, but I'd need something quite a bit finer than that to finish it up anyway. I should have a barber's hone getting into the mail for me sometime today, so perhaps that will do the job.
Oh, and if it never became clear as my intention, I'm leaving the patina alone. It should be largely protective and provide an aesthetically pleasing contrast to the shiny shiny bevel.


 Reply With Quote
