
Results 11 to 20 of 35
Thread: Cutting thin acrylic.
 LinkBack URL
 About LinkBacks
-
10-08-2010, 08:40 PM #11Thread Killer


- Join Date
- Aug 2008
- Location
- SoCal
- Posts
- 212
Thanked: 34
One more vote for the Dremel with a thin cutting wheel. I score the acrylic about mid-depth moving quickly and snap off excess with tin pliers. Using the Dremel to score allows me to follow a nice curved line and limits the amount of sanding to get the proper shapes.
-
The Following User Says Thank You to Shooter For This Useful Post:
1971Wedge (10-09-2010)
-
10-08-2010, 09:42 PM #12Senior Member

- Join Date
- Feb 2007
- Posts
- 392
Thanked: 105
I use a laser takes about a minute to cut. Then round the top edge a little, then on to the buffer.
Simple. But not everyone has a laser.

-
10-09-2010, 02:34 AM #13Senior Member

- Join Date
- Oct 2009
- Location
- Cardington, Ohio 43315
- Posts
- 311
Thanked: 101
Hahaha....
That I have to see to believe....lol..

 Originally Posted by oldblades

-
10-09-2010, 02:35 AM #14Senior Member
- Join Date
- Oct 2009
- Location
- Cardington, Ohio 43315
- Posts
- 311
Thanked: 101
Yep that seems promising, as I have a dremel and the thinner cutting disc's...
Figure a couple practice cuts and I'll be doing it just fine.
Thanks
Aaron
Originally Posted by Shooter
-
10-09-2010, 02:29 PM #15Junior Member
- Join Date
- Sep 2010
- Posts
- 14
Thanked: 2
Laser? Well, if you really wanted to you could use the waterjet if you have access to one or have a friend that has access. With the waterjet you would NEVER have to worry about burning. Not to boast (OKAY, I am boasting) but my brother in law works in a shop with a 5 axis CNC mill, laser cutter, waterjet, and a host of other manual and CNC machines. And he loves to do off the clock stuff.
-
10-09-2010, 03:40 PM #16Senior Member


- Join Date
- Sep 2008
- Location
- Crossville, TN
- Posts
- 1,711
Thanked: 304
I use a belt sander to shape my acrylic scales which basically melts & chips away the melted material. I fasten both sides together so they will be the same size and shape. Start with 40 grit to cut to the outline of the scales, 120 grit to smooth and round edges. Hand sand with 220, 400, 1000 & 2000 to get rid of scratches from sanding. You can then finish with buffer and/or polish to make them shine. It's quick, takes maybe an hour start to finish, fairly easy and get surprising results.
"If You Knew Half of What I Forgot You Would Be An Idiot" - by DoughBoy68
-
The Following 2 Users Say Thank You to DoughBoy68 For This Useful Post:
1971Wedge (10-10-2010), str8fencer (10-10-2010)
-
10-10-2010, 01:31 AM #17Senior Member
- Join Date
- Oct 2009
- Location
- Cardington, Ohio 43315
- Posts
- 311
Thanked: 101
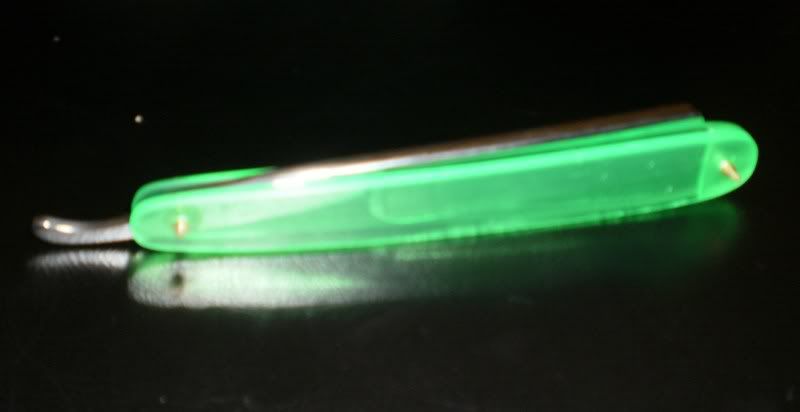
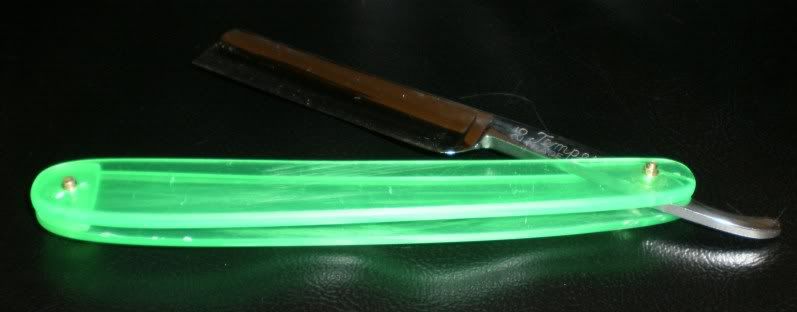
Doughboy, yep found out how quick it can be. Just did home made scales today. I should have left well enough alone, but I felt my hand sanded wedge needed to be thinner, which lead to a crack in one scale after tightning a micro-fastner. No matter, I have plenty of clipboards left. Your belt sander technique was something I considered as I handed sanded the edges down through the grits with wet and dry sandpaper. The blade I mounted is a Case 'Temperite' that I had also sanded down and polished. So far I'm impressed, and learning as I go along here, but these aren't bad for my first set.
Where did you get the clear acrylic from? Forgive my horrible photography skills...I'm not done with this one yet...the last pic show's what happens when I experimented further with the wedge...o'welll.
Aaron

-
10-16-2010, 04:53 PM #18
Nice first attempt!
Many materials chip or splinter when cut by a saw. the most common problem it the the material is not supported next to the cutting blade.
To prevent splintering and chipping of acrylic and other somewhat brittle materials, which will allow cutting closer to the required outline and less sanding afterward:
My experience has been that; whatever saw method used, a piece of wood of about a half inch thick affixed to the saw table will help. It should be slotted first with the saw and then, with saw power off, slid to the end of the slot against the blade teeth and fastened to the table. Carpet tape works well. I have not tried using two pieces of wood. That may also work,; if I were to try it, I would stick one piece down against the blade, start the saw to make the blade-space, shut it off and then add the second piece of wood.
The wood could be a piece of Baltic birch plywood or similar flat wood. If the wood is the size of the saw table, cut the slot carefully to the center of the piece.
I also have found that it seems to help from having the blade load up with acrylic and then melt the blade teeth full of acrylic.
The second most common problem is that the material is pushed into the blade at too high a rate of travel.
~Richard
Originally Posted by Legion
Be yourself; everyone else is already taken.
- Oscar Wilde
-
The Following User Says Thank You to Geezer For This Useful Post:
1971Wedge (10-21-2010)
-
10-21-2010, 02:28 PM #19Senior Member

- Join Date
- Jul 2010
- Location
- Corvallis, OR
- Posts
- 706
Thanked: 410
Been trying my scroll saw but have problems with melting. Wish I had a band Saw. Might have to just get a coping saw.
-
10-21-2010, 03:50 PM #20
You might try a very thick soap solution on the acrylic and /or wax the blade often. a wedge in the kerf behind the saw blade, as you are sawing, can help.If you have an "AC/DC brush type" motor, a cheap "Router speed control" will slow it down. ( that means a motor with replaceable contact brushes to the commutator.)
Very low tooth count of the blade can also help.( big teeth )
Respectfully
~RichardBe yourself; everyone else is already taken.
- Oscar Wilde


 Reply With Quote

