
Results 1 to 7 of 7
Thread: beginning my first restoration
 LinkBack URL
 About LinkBacks
-
01-16-2011, 10:30 PM #1Senior Member


- Join Date
- Dec 2010
- Location
- North Carolina
- Posts
- 336
Thanked: 35 beginning my first restoration
Just started my first restoration, i have all my gear, gave the sanding process a try by starting on the tang...it came out awesome!! i cant wait to begin the rest of it. A few questions though, since there are some spots i'd like to get out around the wording, is there any technigue to take out the spots without erasing the words? Should i do anything to protect the shaving edge (i.e. cover the edge with something?) Also, any tips on getting into some of the smaller tight spots? and lastly if the pitting isnt that deep should i still start as low a grit as 80 and go up as i have on the tang? I know it seems like newbie question but thats why i wanted to ask. Thanks again for all your help.
-
01-16-2011, 11:46 PM #2Junior Member
- Join Date
- Dec 2010
- Location
- york
- Posts
- 23
Thanked: 3
i recently started doing a few razors i have lying around, ive only done two so i would wait for someone with more experience to answer as well.
i've used wet and dry paper starting with an 80grit then 120, 240, 320, 600, and then 1000. the grits you use will depend on what finish you want at the end, i'm not a fan of complete mirror finishes on old razors so 1000 is enough for me, if theres slight pitting and its not affecting the edge then i leave it, just making sure i get all the bits of grime and rust off but not completely sanding the pits out, i would imagine it would take a pretty long time even with low grit paper.
i didnt bother protecting the edge because they're completely blunt anyway and all need a complete hone when i've cleaned them up.
to get into the fiddly areas i wrapped a bit of the wet and dry around a small screwdriver i had. i find that the abrasive falls off the paper a lot faster if its folded rather then wrapped around something circular.
from what i understand if you want mirror finishes the next step is finer grit paper and then metal polish.
hope it all goes well with the restoration, wait and see what others say though, they will probably have better advise.
link below is my restoration not including honing, just in case ive missed anything out
http://straightrazorpalace.com/works...storation.htmlLast edited by pc566; 01-16-2011 at 11:48 PM.
-
01-17-2011, 01:19 AM #3Senior Member
- Join Date
- Dec 2010
- Location
- North Carolina
- Posts
- 336
Thanked: 35
Thanks for the ideas. I used a plastic chopstic as one side has a square end, while the other side is a round end. It tapers as well so it works well in a tight spot. Still trying to find out about the wording though... that's what makes it who it is.
-
01-17-2011, 01:22 AM #4Junior Member
- Join Date
- Dec 2010
- Location
- york
- Posts
- 23
Thanked: 3
chopstick, i didnt even think of that, thats a brilliant idea.
it would depend how deep the lettering is, mines pretty shallow so i just did sanding it with all the grits and applying a really slight amount of pressure, past 240 grit it wont take off significant amounts of metal so you should be alright if your careful up to there.
-
01-17-2011, 04:03 AM #5Senior Member
- Join Date
- Aug 2009
- Location
- New Orleans, La
- Posts
- 176
Thanked: 22
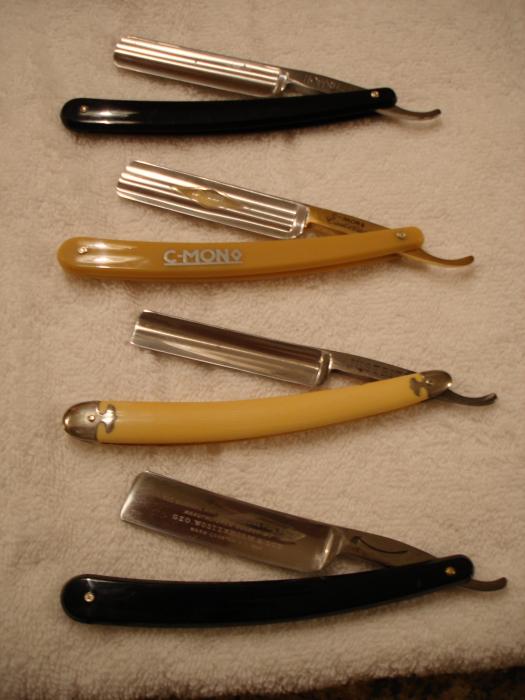
Take a look at the razor at the very bottom. It's a George Wostenholm & Sons Original Pipe razor and was my first restore in which I did some sanding on and put a new scale. The inscription in the tang is very deep but, the etching on the blade is not as deep. I had the same concerns as you, so I didn't sand that much on it before putting the polishing passes on it. You should be able to see by the pic, there are some more blemishes that can be taken out. I have future plans to un-pin it and do some more sanding on. You might want to post a pic of the blade you are talking about and see what some of the more experienced restorers have to say.
-
01-17-2011, 04:10 AM #6Senior Member
- Join Date
- Dec 2010
- Location
- North Carolina
- Posts
- 336
Thanked: 35
I've considered posting a picture, but unfortunately my camera doesn't take good enough pictures to really be able to see any intricate detail. Like I had mentioned the blade doesn't Ned much care, just some spots Hera and ther and very minor pitting. Do I need to start at such a low grit as 80 or does it depend on the extent of damage?
-
01-17-2011, 06:00 AM #7At this point in time...


- Join Date
- Jun 2007
- Location
- North Idaho Redoubt
- Posts
- 27,053
- Blog Entries
- 1
Thanked: 13249
Restoring a razor is a balancing act really...
When you have etching/stamps there is always a question of how far to go...
My personal rule is try to never take all the identifying marks off the razor, keeping in mind that you do not get to make that decision, the razor does hehehe
Murphy's law of restore states that
"The deepest pits will always be just deeper than the etch"
The safest cleaning system for lettering is the tumbler method, but it cannot fix pits, see it is always a balancing act...
When I used to hand sand, I started the first attack at 400 grit, that gave me a good idea of where things stood...
I hope some of that helps...
ps: Yes you are going to have to hone the razor after a restore...Last edited by gssixgun; 01-17-2011 at 06:03 AM.
-
The Following User Says Thank You to gssixgun For This Useful Post:
baldy (01-18-2011)


 Reply With Quote