
Results 1 to 10 of 11
Thread: Been sanding...
 LinkBack URL
 About LinkBacks
Hybrid View
-
02-14-2011, 09:25 PM #1Junior Member

- Join Date
- Dec 2010
- Location
- The Netherlands
- Posts
- 3
Thanked: 0 Been sanding...
Gentlemen,
I have an old straight (from my wife's grandpa) that I am restoring. I want to get it in mint-condition if possible, and shave with it!
Before (razor has been stored in it's box for many, many years):

Been sanding for a while now (taking it easy, no deadline on this project). Started at 150 grit, than 180 and just finished the 240 grit:


It's heading into the right direction imho, the corrosion wipes off quite easy. Nevertheless, because this straight has been in the family for a long time, I am considering one of the specialists on SRP to continue this restore-job. Rescaling, pinning, honing and such is not my cup of tea (yet). It feels better to practice and get the hang of it on an e-bay find than on this one. Nevertheless it's great to shine up an old piece of steel using some elbow-grease!
-
02-14-2011, 09:36 PM #2aka shooter74743


- Join Date
- Sep 2009
- Location
- SE Oklahoma/NE Texas
- Posts
- 7,285
- Blog Entries
- 4
Thanked: 1936
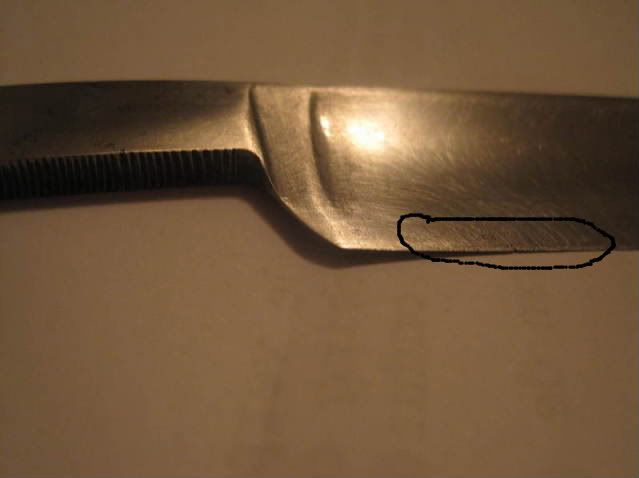
Before you spend the $ on it, it should be evaluated if the rust ate the edge up. I can see a bit of pitting at the edge, the worst place. Only way to evaluate it would be to take the blade to the stones and establish a bevel and then look at it under magnification. If there is good steel there, then you may consider restoration. If there isn't, I'd just keep it as it is IMO.
Southeastern Oklahoma/Northeastern Texas helper. Please don't hesitate to contact me.
Thank you and God Bless, Scott
-
The Following User Says Thank You to ScottGoodman For This Useful Post:
Stainless (02-14-2011)
-
02-14-2011, 10:00 PM #3At this point in time...


- Join Date
- Jun 2007
- Location
- North Idaho Redoubt
- Posts
- 27,161
- Blog Entries
- 1
Thanked: 13249
I have to agree with Shooter this spot looks rather deep...
Put it on a low grit stone and see what you have before Restoration, it saves a ton of time...
-
The Following User Says Thank You to gssixgun For This Useful Post:
Stainless (02-14-2011)
-
02-15-2011, 12:48 AM #4Senior Member

- Join Date
- Oct 2010
- Location
- Everett, Ontario
- Posts
- 1,554
Thanked: 309
It looks cracked to me.
-
The Following User Says Thank You to TrilliumLT For This Useful Post:
Stainless (02-16-2011)
-
02-15-2011, 03:48 AM #5Senior Member

- Join Date
- Jan 2010
- Location
- Fall River, NS
- Posts
- 266
Thanked: 58
The few times I've done hand sanding I learned not to skip grits. You skipped 220, and I see scratches from the heavier grits still.
It could be that you left 180 before getting all the 150 scratches out. If so then you're in a pickle. I was there before on a junker I practiced on, and I ended up having to go back, but that was fruitless because I realized I was sanding so much in the end that there was no way the spine would be even when I'd go to hone it. I learned to be very careful up towards the spine.
The pros seem to think you're in worse trouble than I'm bringing up with your edge damage, so maybe you don't have to worry too much about those lines. If you do decide though to just have it as a display piece then no harm going back and trying to get rid of them I say!
You did a great job at not wiping away the nice stamp.
-
The Following User Says Thank You to RobertH For This Useful Post:
Stainless (02-16-2011)
-
02-15-2011, 05:20 AM #6aka shooter74743
- Join Date
- Sep 2009
- Location
- SE Oklahoma/NE Texas
- Posts
- 7,285
- Blog Entries
- 4
Thanked: 1936
Actually, I have to agree that there could be a crack there. Didn't notice it before, but looks like it may run up about 1/8" from the edge in the heavily pitted area. Please inspect that area closely and if there is a crack, there would be no need to go any further. Hate to give bad news, but I hope you would rather the truth than the alternative. Originally Posted by TrilliumLT
 Southeastern Oklahoma/Northeastern Texas helper. Please don't hesitate to contact me.
Thank you and God Bless, Scott
-
The Following User Says Thank You to ScottGoodman For This Useful Post:
Stainless (02-16-2011)
-
02-16-2011, 04:14 AM #7Hones & Honing

- Join Date
- May 2005
- Location
- Saint Paul, Minnesota, United States
- Posts
- 8,023
- Blog Entries
- 1
Thanked: 2209
IMHO, if there was a crack he would certainly have noticed it when sanding. It would have "popped" out.
I just worked on a blade with a far worse edge today. Just hone off, not sand off, the old, oxidized, weak steel along the edge. You will be fine.
Just my $.02,
Last edited by randydance062449; 02-16-2011 at 04:17 AM.
Randolph Tuttle, a SRP Mentor for residents of Minnesota & western Wisconsin
-
The Following User Says Thank You to randydance062449 For This Useful Post:
Stainless (02-16-2011)


 Reply With Quote