
Results 11 to 19 of 19
 3Likes
Thread: Regeldso - nothin' to lose.
 LinkBack URL
 About LinkBacks
-
05-12-2011, 12:49 PM #11Senior Member


- Join Date
- May 2011
- Location
- Saudi Arabia and Scotland
- Posts
- 314
Thanked: 60
Well nobody can accuse nphocus of having a major vice... There, I said it. I just couldn't stop myself.
The Regeldso is looking marvellous, and must feel so much more of an achievement than even the same restoration of an item examined and guaranteed sound by a specialist dealer. You backed your judgement, and you won.
The scales actually look pretty good, and should be looked at pretty carefully before replacing them. I don't doubt they can be straightened with hot water, whether they are celluloid, as I believe, or horn. The question is whether they will stay straightened.
Sometimes apparent warping is true warping of the material, and other times it arises, either until the rivets are released or longer term, because one side has become longer than the other. Lying on a damp or condensation-provoking surface, or in sunlight, can do that. It might be worth assembling it with only the pivot rivet, and leaving it joined with only double sided tape at the wedge end, until you are sure they have settled down.Last edited by Caledonian; 05-13-2011 at 09:02 AM.
-
05-12-2011, 07:35 PM #12Geriatric Gamer/Surf Fisher

- Join Date
- Mar 2011
- Location
- Manassas, VA
- Posts
- 298
Thanked: 42
Thanks... Originally Posted by Caledonian

Yep, you're right... one scale is actually shorter than the other one, very likely due to laying on a window sill for who knows how long. The scales weren't long enough for the blade to start with and the wedge banged against the end of the blade - it was fortunate that didn't damage the blade I suppose.
These are inexpensive enough and come with the necessary pins and washers as well: Vintage Strops, Hones, and Scales for Straight Razors
I retained the inner washers, but if they don't fit for some reason I'll have to pick up a bag from the hardware store.Last edited by tonycraigo; 05-12-2011 at 07:38 PM.
-
The Following User Says Thank You to tonycraigo For This Useful Post:
Caledonian (05-13-2011)
-
05-13-2011, 09:09 AM #13Senior Member
- Join Date
- May 2011
- Location
- Saudi Arabia and Scotland
- Posts
- 314
Thanked: 60
That is an extremely useful link, which is much appreciated. No doubt I should have seen it somewhere on the site, but I hadn't. Originally Posted by tonycraigo
Much as I like making things, replacement with possibly contemporary old scales seems less obtrusive.
-
05-13-2011, 07:06 PM #14Geriatric Gamer/Surf Fisher
- Join Date
- Mar 2011
- Location
- Manassas, VA
- Posts
- 298
Thanked: 42
Yea, and I almost lost it too. The link was posted in a thread that got buried and it took me forever to find it again - when I did I set a bookmark to it.
The Superior Shave folks are right on top of things. I ordered at 03:30 this morning after getting home from my shift at the university and I have already been notified that my order has shipped. Free shipping too.
I got a couple of those little brass bolts and washers sets and that will let me put the scales on for honing and test shaving and then I'll be able to try my hand at making those Epay scales - if successful the little bolt can be easily removed and the pins can be employed.Last edited by tonycraigo; 05-13-2011 at 07:08 PM.
-
05-22-2011, 05:14 AM #15Geriatric Gamer/Surf Fisher
- Join Date
- Mar 2011
- Location
- Manassas, VA
- Posts
- 298
Thanked: 42
Here we are, at the end...
I used the little bolts and washers... filed down the long end of the bolt and struck it with the back of a stainless spoon - as suggested by another member... worked like a charm.
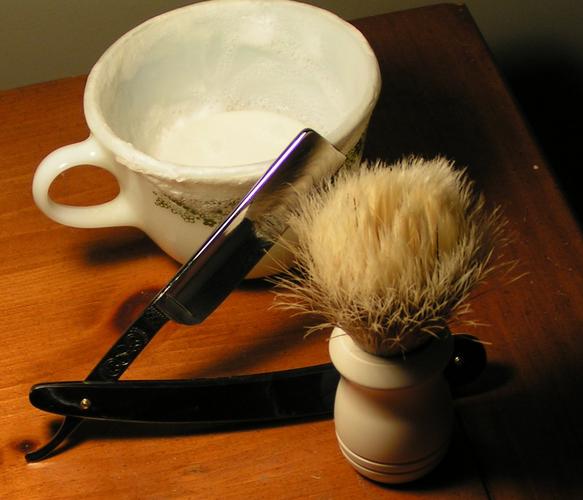
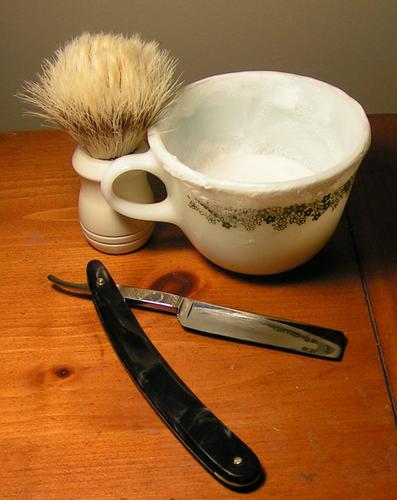
I'm not really happy with the scales, but the blade fits nicely into them albeit they are a bit too large for my blade... I sanded off the trailing end of the scales... I'll still be working on those epay jobs...
Still...
I'll call it done... it has to impress no one but me... and it has.
The best part is it shaves wonderfully. Very comfortable. Set the bevel on a Norton 4000... (whew, that took a while) finished it on the 8000 side and the strops. She's good to go.
Nothing to lose... nothing lost... about 40 bucks into the restoration...
Not too shabby...

Borrowed a camera for the weekend... will try to get a better pic for the finish...Last edited by tonycraigo; 05-22-2011 at 08:28 PM.
-
05-22-2011, 12:07 PM #16Senior Member


- Join Date
- Sep 2010
- Location
- Oslo Norway
- Posts
- 1,848
Thanked: 438
Nicely done, grats on a job well done. And what a nice result from your first resto.
I've enjoyed watching this razor progress, and it looks great in the end.
And you even sharpened it yourself, way to go
-
05-22-2011, 12:56 PM #17Senior Member
- Join Date
- Mar 2011
- Location
- Richmond, Virginia
- Posts
- 104
Thanked: 11
I've tried bevel setting and bevel correction on a norton combo 4k/8k... you Sir, have my full respect.
-
05-22-2011, 08:27 PM #18Geriatric Gamer/Surf Fisher
- Join Date
- Mar 2011
- Location
- Manassas, VA
- Posts
- 298
Thanked: 42
I had just flattened the thing with some wet 320 grit on the kitchen counter and you know how smooth they are after that as opposed to how they come new. Originally Posted by Nphocus
I could tell it was cutting, it was just going slow. I used the 'circle' patterns Lynn explained about in the video set from the 09 get together. I just had to use a little more pressure and do more sets. The closer I got the easier it became. I'm glad I did it on my 4000 because now I have that skill in my quiver and know how it's supposed to feel as it progresses to the correct bevel.
-
08-17-2011, 04:03 PM #19Disposable blades = Disposable men.

- Join Date
- Jul 2011
- Location
- Houston
- Posts
- 682
Thanked: 55
looks awesome. great work. Originally Posted by tonycraigo


 Reply With Quote
