
Results 1 to 10 of 25
 7Likes
Thread: Adventures in Tung Oil
 LinkBack URL
 About LinkBacks
Hybrid View
-
06-13-2011, 04:28 AM #1Senior Member

- Join Date
- Mar 2011
- Location
- Richmond, Virginia
- Posts
- 104
Thanked: 11 Adventures in Tung Oil
More pics of the process:
https://picasaweb.google.com/nphocus...uresInTungOil#
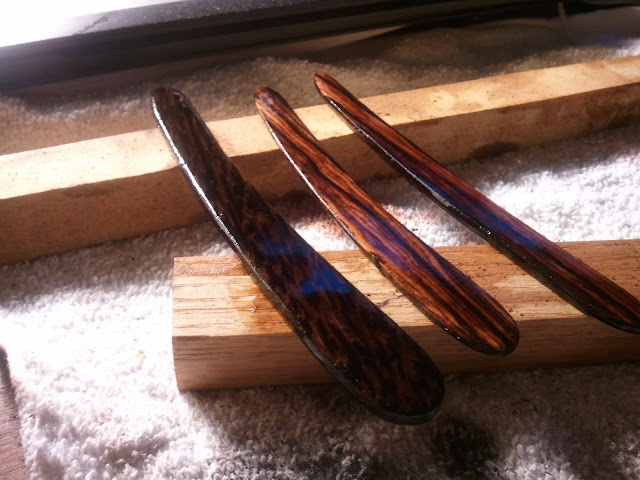
I really am enjoying the organic nature of the tung oil. No fumes. No gloves required. Good feel to it. These have had the grains filled - I believe - by using 400 grit sand paper on a foam block and a good amount of tung oil applied to the work and sand paper. I sanded all surfaces using the same portion of sand paper and sure enough saw a slurry come up in/with the oil and I just worked that in and around all sides and surfaces. That pic is two halves of the scales temporarily bonded together with rubber cement. I'm kind of concerned about them actually being too thin because of all of the sanding I've been doing to them. That's really ironic because I look at my first pair of scales and think they're too thick! Maybe by the third go around I'll have the thickness and definitely the sanding procedure down pat.
That darn it to heck splintery black palm wood on the left is now buttery smooth. I think the first round of tung oil raised the grain and the subsequent sanding and filling has allowed me to smooth it all out pretty well. I would actually like to try a red cherry stain on that black palm wood and see how that pops. When fresh cut, the grain is very bright and striking and would look great as is with just some clear finish. The tung oil really darkened it up.
I am not sure if I'm going to leave these guys at the 400 grit finish or take them up the scale of micromesh to 12,000. If I do, should I keep working the oil in with a slurry in each grit - 12 or so grits to get to 12k - or should I just stop with the oil and work it just like a normal piece of unfinished wood? I do plan on doing a final sealing and buffing coat or ren wax, if that makes a difference.
Thanks,
Bobbyniftyshaving likes this.
-
06-13-2011, 04:30 AM #2the deepest roots


- Join Date
- Feb 2011
- Location
- Seattle
- Posts
- 1,221
Thanked: 169
i've used tung oil as well but mine doesn't come out glossy like yours. What steps do you take to get that effect?
-
The Following User Says Thank You to TwistedOak For This Useful Post:
Nphocus (06-13-2011)
-
06-13-2011, 04:35 AM #3Senior Member
- Join Date
- Mar 2011
- Location
- Richmond, Virginia
- Posts
- 104
Thanked: 11
My bad, for the confusion. That's the last pic from this weekend's work. It's actually still wet with tung oil. I'm leaving it to soak in over night. I intend to wipe it down when I'm ready to progress further with the finish. Originally Posted by TwistedOak

I really posted this in hopes that someone would be familiar with how to get a nice gloss or at least semi-gloss finish with tung oil and "hopefully" some other relatively non-toxic solution. If you check the link, it will show the different phases I went thru after picking up the fresh cut wood from my local carpenter.
-
06-13-2011, 10:49 AM #4..mama I know we broke the rules...


- Join Date
- Feb 2010
- Location
- Toronto, Ontario, Canada
- Posts
- 2,895
- Blog Entries
- 8
Thanked: 993
With the Tung oil, you are most likely going to have an end result that is flat or semi-gloss. Polymerized Tung Oils can give you a higher gloss finish, but like our Max has said a number of times....Polymerized Tung Oils often do not contain tung oil at all, or very little.
The advantage to tung oil is that if you cut the first coat, it does a magnificent job of penetrating the wood and results in a product that is very resistant to water.
After your last coat (maybe #4), I would suggest sanding at a very fine grit such as 2000. I've never used micro mesh and gone to 12000, but that doesn't mean that you can't do it. Try sanding it out at 2000 and 2500 and then buffing it. You may like the wood at that point. If you don't, as an experiment continue to go further....
....and then post your results so we can all learn a bit from your process and experience.
Hope this helps a bit.
-
The Following User Says Thank You to Maxi For This Useful Post:
Nphocus (06-13-2011)
-
06-13-2011, 12:40 PM #5Senior Member

- Join Date
- Jun 2011
- Location
- Northampton, England
- Posts
- 324
Thanked: 68
Looking good! I've yet to try tung oil but when I do knives I soak them in boiled linseed oil or Danish oil for 24 hours. Once dry I buff them up with compound. I've been tempted to try ca glue and sanding/buffing but it looks time consuming and dirty in comparison to using oils. Looking forward to seeing the final results you get!
-
The Following User Says Thank You to Sasquatch For This Useful Post:
Nphocus (06-13-2011)
-
06-13-2011, 12:57 PM #6aka shooter74743


- Join Date
- Sep 2009
- Location
- SE Oklahoma/NE Texas
- Posts
- 7,285
- Blog Entries
- 4
Thanked: 1936
So you had to go ahead and try the Black palm huh? I found it was a PITA, but once you are successful with making a set out of it they are great looking! Looking good so far. If you are looking for a bit more sheen without the full "gloss", you might try rubbing a couple coats of Renaissance Wax over the tung oil finish after a light sanding of 2K. I am personally not a fan of high gloss on wood scales...but of course that's just one of the many opinions here.
BTW...should get to dance with the PHIG today or tomorrow for the first time...Southeastern Oklahoma/Northeastern Texas helper. Please don't hesitate to contact me.
Thank you and God Bless, Scott
-
The Following User Says Thank You to ScottGoodman For This Useful Post:
Nphocus (06-13-2011)
-
06-13-2011, 01:04 PM #7Senior Member
- Join Date
- Mar 2011
- Location
- Richmond, Virginia
- Posts
- 104
Thanked: 11
I work in a Homeshop, so the non-noxious nature of the tung oil really appeals to me. I have buffing compound and was wondering the exact same thing. What color or combination of compound do you use? Wouldn't the compound color the wood? Originally Posted by Sasquatch
The oil is plenty dirty too, at least the grain filling is. Oddly, I find it to be the most satisfying. Since I work in my home with little to no ventilation, I try to keep the fumes and toxic chemicals to a bare minimum. The long thin scale on the right was finished from raw with just tung oil and 400 grit sand paper. One additional selling point is that the oil keeps the dust to a minimum.
-
06-17-2011, 12:55 AM #8The Great & Powerful Oz


- Join Date
- May 2008
- Location
- Bodalla, NSW
- Posts
- 15,638
Thanked: 3751
This is the process I use for oil finishing. It actually uses very little oil & you put the lid back on the tin after the grain filling.
http://www.organoil.com.au/woodcraft/printable.html
Too much oil will give a dark dull finish. Sand dry to 3000 grit if you can get it or an equivalent in Micromesh after grain filling & you get a finish that does this at the right angle but has no plastic looking coating. When viewed front on the timber looks just like ... timber
Last edited by onimaru55; 06-17-2011 at 01:00 AM.
The white gleam of swords, not the black ink of books, clears doubts and uncertainties and bleak outlooks.
-
The Following User Says Thank You to onimaru55 For This Useful Post:
Nphocus (06-17-2011)
-
06-17-2011, 01:04 AM #9Senior Member
- Join Date
- Mar 2011
- Location
- Richmond, Virginia
- Posts
- 104
Thanked: 11
Thank you for the VERY useful link. I'm going to whip out the dremel and try some high speed burnishing. Pics if it's not a disaster, later!
-
06-17-2011, 01:18 AM #10The Great & Powerful Oz
- Join Date
- May 2008
- Location
- Bodalla, NSW
- Posts
- 15,638
Thanked: 3751
Never tried the dremel. Hope to see pics
The white gleam of swords, not the black ink of books, clears doubts and uncertainties and bleak outlooks.


 Reply With Quote