
Results 1 to 10 of 11
 5Likes
 LinkBack URL
 About LinkBacks
-
06-29-2011, 11:03 PM #1Senior Member


- Join Date
- Jun 2007
- Location
- Belgium
- Posts
- 298
Thanked: 312 Producing Resin Impregnated Wooden Scales
I've just a posted a review of the new Thiers-Issard Limited Edition Oak Wing G straight razor.
In the Oak Wing G review I did make some slight mention of the resin impregnation process which was used to finish the special scales for that razor. In fact, there was so much to say about this process that it threatened to make the review overly long as well as somewhat 'top heavy' with technical information. Therefore, I have elected to provide this separate write-up for those of you who might be interested in a more complete explanation of the production of resin impregnated wooden scale material.
The scales on the new Oak Wing G are made of resin impregnated, chocolate colored, Figured Maple. They present a soft, lustrous surface finish, the appearance being something between buffed and varnished to the eye. Thiers-Issard obtained that special load of Figured Maple wood in the form of cutoffs from the production of electric guitar bodies in a musical instrument factory.
Unlike cheaper Stamina wood which is a composite made up of veneers which are sandwiched together in a body of phenolic resin under heat and pressure, the scales for the Oak Wing G are made from solid, Figured Maple which has been impregnated to its very core with a mixture of plastic resin and pigmented dye.
This special pressure treatment of plastic resin and pigmented dye augments the beauty of these scales by giving added strength, depth, color and luster to the wood.
Thiers-Issard elected to have this resin impregnation done at a small, nearby French factory. This decision was taken not only in order to support the local economy, but also because it offered much better oversight and control of the ongoing process. This French factory uses a proprietary impregnation process which produces results that are less garish than those produced by other factories, the end result more closely approaching the coloration of real wood which is what was desired for this series.
These kinds of resin impregnated solid wood scales are usually if not always the exclusive domain of custom razors. It must also be said that it is difficult to find resin impregnated material of suitable size for razor scales. Knife scale and block materials which are commonly to be found in lengths of 127mm (4-7/8”) fall short of the 155mm length (6”) required to produce razor scales.
The production process begins with the figured Maple being cut into blocks of sufficient size to provide six scales (enough for three complete razors). The wood cannot be worked any further at this point since the impregnation process causes the wood to swell and move.
These blocks are now sorted according to the best grain figuring. A white indelible line is marked at the end of each block to identify the future direction of cut in order that the best figuring of the wood will be brought out in the scales. The impregnation process covers up the figuring which will not become visible again until after the blocks have been cut. Without the white reference line, cutting mistakes would inevitably occur, leading to less attractive or downright unacceptable scales.
The sized blocks are then placed into a thick-walled pressure chamber, ready to undergo an impregnation cycle which lasts something between one and two days. Strong pumps slowly reduce the air pressure in the chamber until the wood is sitting in a near total vacuum. The wood blocks are allowed to ‘soak’ in this vacuum for sufficient time to allow all air and any remaining moisture to be sucked out from the wood cells. The second stage of the cycle sees the chamber flooded with the plastic resin/dye mix. The vacuum in the wood causes this mixture to be pulled right down into the cellular structure of the wood. At the same time, the pumps are reversed, forcing air into the sealed chamber, creating an extreme high pressure to more fully drive the plastic/dye combination down into the interior of the wood. This cycled vacuum/pressure procedure virtually guarantees 100% mixture penetration into the very center of these blocks of wood.
The down side to the process is that to attain this complete penetration the plastic mix must be both thin in consistency and slow setting... extremely slow setting. In point of fact, following the two-day impregnation cycle, the wood blocks then require another eight weeks of curing time to allow the plastic deep within the wood’s grain structure to harden to the point where the blocks are finally ready to be sliced up into the smaller slices from which the scales are cut.
When the curing time is finished, each block is first sanded flat and true on one side, with another side then being sanded true and square relative to the first, this to provide reference faces since the subsequent cutting operations will be tracked to these true faces. The blocks are now sawn into six smaller pieces, each one large enough to provide one scale. The process remains difficult as the wood still wants to move a bit after being cut.
Complicating the production is the fact that the fresh cut surfaces reveal plastic mix which isn’t yet as fully hardened as the plastic on the surfaces which constituted the outsides of the original block. In point of fact it is necessary to let the wood rest at each successive stage of being worked into the final form of the scales in order to give any non-hardened plastic mix time to cure.
Once the wood has been properly sliced it is first routed to form and then hand selected in matching pairs according to thickness, color and figure. This hand matching was done so as to provide the most interesting and visually satisfying result on both the front and back of the razor. Matched scale pairs then move along to the finish process where they are subjected to four or five successively finer sanding operations followed by a final buffing to bring out the luster.
Of course, finishing scale material in this fashion is certainly a lot of work , especially when compared to a simple surface finish like varnish or lacquer. But, unlike a brushed- or sprayed-on finish, this impregnated plastic/dye combination makes these scales not only extremely resistant to water damage, but also easy to rebuff should the surface lose its luster due to scratches or long use.Last edited by ignatz; 06-29-2011 at 11:06 PM.
-
The Following 5 Users Say Thank You to ignatz For This Useful Post:
dirtychrome (06-29-2011), easyace (06-30-2011), str8fencer (12-29-2011), tekbow (06-29-2011), Walt (06-29-2011)
-
06-29-2011, 11:13 PM #2Senior Member

- Join Date
- Mar 2011
- Location
- Leith, Edinburgh
- Posts
- 821
Thanked: 95
Great post, thoroughly interesting insight into how these were made.
-
06-29-2011, 11:35 PM #3I used Nakayamas for my house


- Join Date
- Aug 2009
- Location
- Des Moines
- Posts
- 8,664
- Blog Entries
- 1
Thanked: 2591
DIY way described here:
NorthCoast Knives Tutorials: Hints and Tips Page 3Stefan
-
06-29-2011, 11:37 PM #4At this point in time...


- Join Date
- Jun 2007
- Location
- North Idaho Redoubt
- Posts
- 27,037
- Blog Entries
- 1
Thanked: 13249
Stefan beat me to it...
I was going to say that is one sexy way of describing doing Wood Stabilization HNSB likes this.
-
06-30-2011, 05:02 AM #5Hones & Honing


- Join Date
- May 2005
- Location
- Saint Paul, Minnesota, United States
- Posts
- 8,023
- Blog Entries
- 1
Thanked: 2209
Once again, the little guys are the innovators.
Randolph Tuttle, a SRP Mentor for residents of Minnesota & western Wisconsin
-
06-30-2011, 05:39 AM #6Senior Member


- Join Date
- Jun 2011
- Location
- Doha
- Posts
- 794
Thanked: 128
Thank you for a very interesting review. It does put the price of this razor into context.
-
12-28-2011, 03:04 PM #7And now for the shave.
- Join Date
- Oct 2011
- Posts
- 14
Thanked: 1
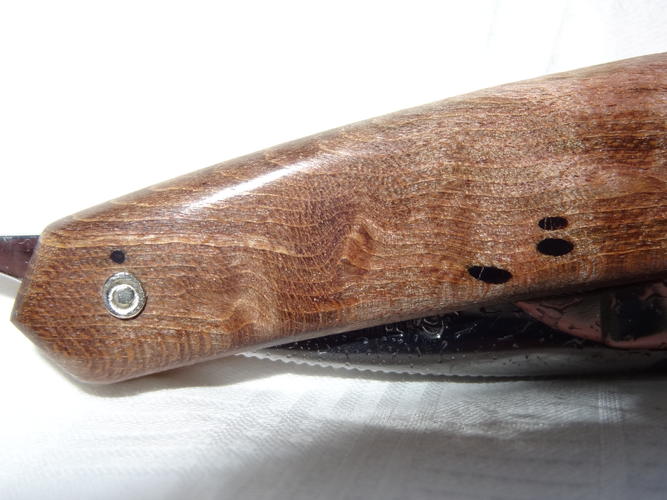
Great explanation of the process, sounds very complicated. I just received a TI Oak Wing for Christmas, it's a beautiful razor however I was disappointed to find 4 resin filled holes on one of the scales, is this common?
Your opinion will be appreciated, as I am considering returning it to the retailer to see if I can get one that does not have resin filled holes. The retailer said this is common.
-
12-28-2011, 05:23 PM #8At this point in time...
- Join Date
- Jun 2007
- Location
- North Idaho Redoubt
- Posts
- 27,037
- Blog Entries
- 1
Thanked: 13249
When the wood is stabilized (Resin Impregnated) it is designed to fill any voids in the wood with resin , that is actually the entire reason to do it.. This makes for a Homogenized working surface that is strong, and waterproof..
Basically you are turning wood to plastic but you have to keep in mind that I doubt that TI hand makes scales, and I doubt that they check the surface look of the scales, and we know they don't check the fit...
At the price you paid for the razor, if you haven't used it, and don't like it, then exchange it... -but- resin filled holes in stabilized wood is not actually a defect, it is what the process is designed to do they just cut yours at a spot where it is not visually appealing to you...
-
12-28-2011, 07:30 PM #9And now for the shave.
- Join Date
- Oct 2011
- Posts
- 14
Thanked: 1
Thanks for the explanation. Attached is a photo of what I am talking about. Does this look acceptable, not sure if I'm being to fussy?
-
12-28-2011, 08:03 PM #10At this point in time...
- Join Date
- Jun 2007
- Location
- North Idaho Redoubt
- Posts
- 27,037
- Blog Entries
- 1
Thanked: 13249
Ahhhh see it doesn't actually matter what I think,, It is your money and your razor and if you don't like it then simply ask for an exchange..
I think at the prices you should be happy with the product, what I was saying is that it isn't actually a defect, it is simply visually un-appealing to your eye...


 Reply With Quote