
Results 1 to 10 of 11
 14Likes
Thread: Warped Scale Press....
 LinkBack URL
 About LinkBacks
Hybrid View
-
09-03-2011, 02:43 AM #1At this point in time...


- Join Date
- Jun 2007
- Location
- North Idaho Redoubt
- Posts
- 27,161
- Blog Entries
- 1
Thanked: 13249 Warped Scale Press....
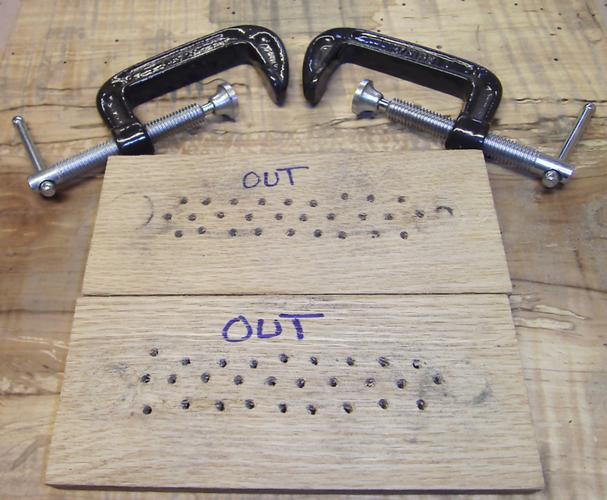
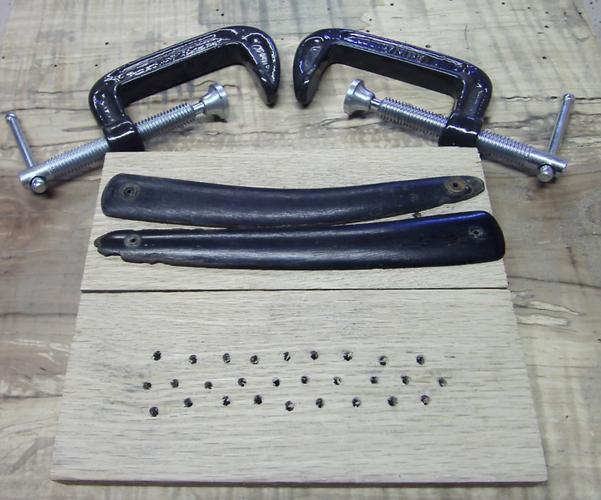
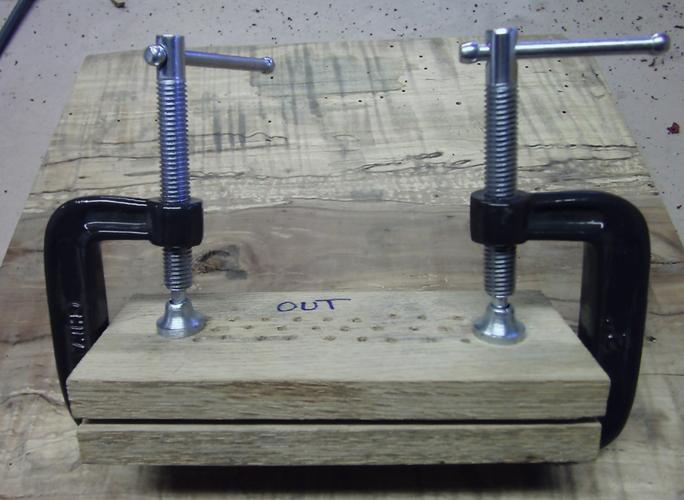
I was answering a question here in the Workshop about how to straighten warped horn scales...
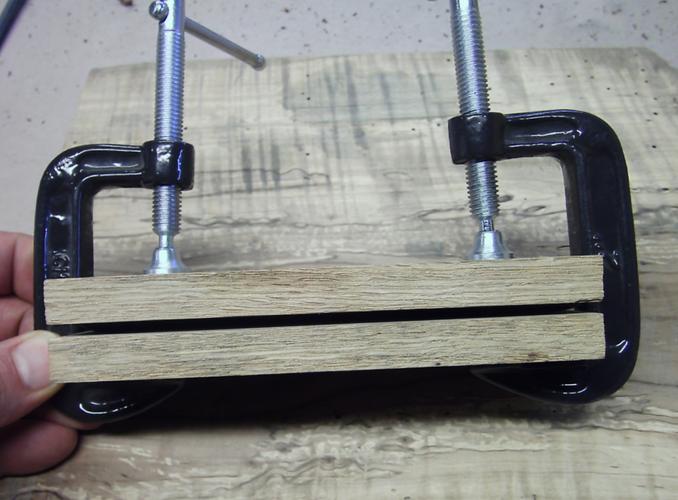
This little contraption is what I use for Natural scales, the dimensions on this one are 6 x 3 x 1/2 inches for each side.. but if I were to do it again I would do 7 x 3 x 1/2 inches...
The holes are 1/8 inch don't to too many as to weaken the wood...
The clamps are 2 inch
The only other thing you need is a Steam Iron, and don't worry you won't hurt it any, so the SWMBO will be OK with it
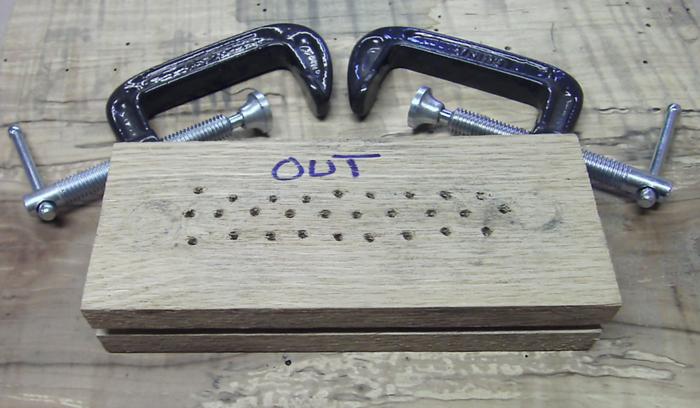
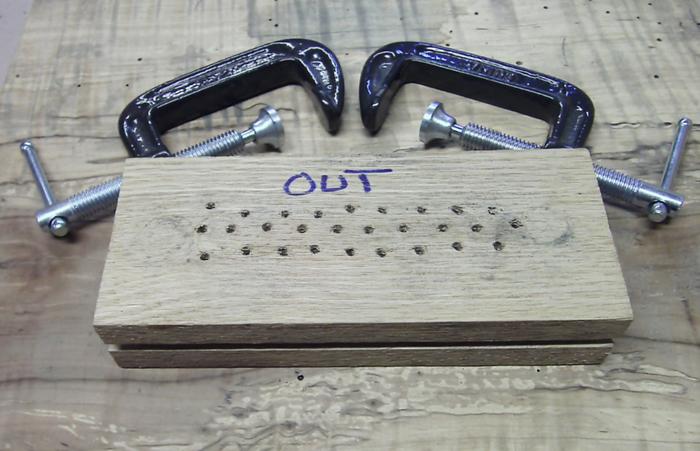
Set everything up as shown in the pics, and then hit both sides with steam, tighten the clamps gently, steam tighten, steam tighten, then steam a bit more... If you are using a Shot-o-Steam iron I do 3-4 blasts per... The 1/2 inch thickness of the wood and the limiting factor of the holes helps with control
Leave it alone for a FULL 24 hours and everything should be fine... Do not open it to check it, resist the urge
I have done Horn, Bone, and Ivory, in this contraption, there is a another thread for Celluloid in the Workshop Sticky... I have tried a heat gun but it doesn't work quite as well as the steam with the Naturals..
Take your time and everything should go wellLast edited by gssixgun; 09-03-2011 at 03:17 AM.
-
The Following 26 Users Say Thank You to gssixgun For This Useful Post:
Adam G. (09-05-2011), adbuett (09-06-2011), baldy (09-03-2011), Caledonian (09-08-2011), cpcohen1945 (09-10-2011), CTKnife (09-03-2011), dirtychrome (09-03-2011), Havachat45 (09-03-2011), JimBC (09-03-2011), JP5 (05-30-2015), lz6 (11-07-2011), Maxi (10-01-2011), Noswad (09-03-2011), onimaru55 (09-08-2011), pinklather (09-06-2011), randydance062449 (09-06-2011), ScottGoodman (10-06-2011), sharptonn (10-01-2011), Snake (09-03-2011), socalkid (09-03-2011), Str8Raz0r (09-08-2011), Str8Shooter (09-03-2011), Themagicturtle (09-03-2011), TroutWhisperer (09-12-2011), Walt (09-03-2011), WillN (09-06-2011)
-
09-03-2011, 02:52 AM #2Scales are not just for fish...

- Join Date
- Jun 2011
- Location
- Connecticut, USA
- Posts
- 184
Thanked: 51
Thank you sir, I've been waiting all day to see your version. I'll be darned if it almost looks like the one I had made some time back.
I've also used a set of iron plates to do this but they get to hot and are a pain to handle.
-
The Following User Says Thank You to CTKnife For This Useful Post:
gssixgun (09-03-2011)
-
09-03-2011, 02:59 AM #3Senior Member

- Join Date
- Mar 2010
- Location
- Arizona
- Posts
- 652
Thanked: 408
I do something similar, but over a big pot of boiling water for the steam instead of an iron. I'll place a lid over the boards to retain steam for how long I like. I also have my boards a little longer so they dont drop in the bucket of boiling water.
Being a widower, certain I have a steam iron someplace, just don't know where, lol.
If steamed too longer, the horn will get too soft, and imprint of wood grain or vent holes will also press into the horn, so use care. In a similar regards, if you want to press an inlay object into the horn, this works great.
That being said, figured I should edit with some old images with steps of my process Originally Posted by gssixgun


Last edited by dirtychrome; 09-03-2011 at 03:41 AM.
-
-
09-03-2011, 03:16 AM #4At this point in time...
- Join Date
- Jun 2007
- Location
- North Idaho Redoubt
- Posts
- 27,161
- Blog Entries
- 1
Thanked: 13249
Great additions gents keep them coming if ya got em.. I will put this in the Workshop sticky thread after a couple of days worth of ideas...

-
09-04-2011, 03:23 PM #5Senior Member


- Join Date
- Dec 2006
- Location
- Burkburnett TX
- Posts
- 3,100
Thanked: 2392
This is a great thread, thank you two for the great ideas and methods. I am gong to be changing my horn flattening method for the better because of you two sharing information. Every now and then a thread comes along with some prime nuggets of information. Thanks Glen and Dirtychrome.
Charlie
-
09-06-2011, 04:36 AM #6Hones & Honing

- Join Date
- May 2005
- Location
- Saint Paul, Minnesota, United States
- Posts
- 8,023
- Blog Entries
- 1
Thanked: 2209
Thanks guys!
 This is just in the nick of time. Today I was looking at an old razor with a cracked blade but perfect horn scales except they are warped a bit. I was wondering how I could best straighten them.
Has anyone tried putting the scales in a microwave for a bit to warm them up first?
Soaking in Neatsfoot oil first?
Thanks for sharing!
Last edited by randydance062449; 09-06-2011 at 04:40 AM.
Randolph Tuttle, a SRP Mentor for residents of Minnesota & western Wisconsin
-
09-08-2011, 09:44 AM #7Senior Member

- Join Date
- May 2011
- Location
- Saudi Arabia and Scotland
- Posts
- 314
Thanked: 60
I'm afraid you have brought logic to the issue. This may be one where you don't win the argument by winning the argument. Originally Posted by gssixgun
It's a valuable idea, and I can think of only one or two minor details which might be useful in certain situations. Some materials work best if a slight reverse curvature is applied, and this can be done by a single clamp in the centre, and two small blocks of wood spacing the ends from a more rigid piece.
Laboratory rubber tubing clamps can be useful. They probably allow you to do only one scale at a time, but they do offer advantages in some situations. For example, they reduce the size of the assembly, and allow you to obtain a higher temperature than boiling water at atmospheric pressure, by placing it above water in a pressure cooker. I think this would be worthwhile with bone, although you should try it on a pieced of scrap first.
When I was building ship models I had to bend 36in. strips of wood. I did it in a piece of steel pipe. with a pipe reducer threaded onto one end, and into that a gas-fitting for rubber tubing, which could be connected to the fitting on the pressure cooker from which the valve is removed. A heavy damp cloth over the other end will stop your steam leaking out too quickly. Of course I was single then.
LABORATORY TUBING CLAMP - HOFFMANN CLAMP STYLE - 30MM | eBay
-
09-30-2011, 10:31 PM #8Senior Member

- Join Date
- Jun 2011
- Location
- Red Hook
- Posts
- 188
Thanked: 11
Thank you so much, i finally found the time to make the press, the scales survived they are straight, and the crud super glue fill in's are still there. your the man thank you for sharing this.
-
10-01-2011, 01:18 AM #9Razor Vulture

- Join Date
- Oct 2010
- Location
- Lone Star State
- Posts
- 26,200
Thanked: 8624
Nice work, and Thanks for sharing it. I was thinking some grooves as in immersing them. You are steaming them! You really need to put some oysters in there!
"Don't be stubborn. You are missing out."
I rest my case.


 Reply With Quote