
Results 1 to 10 of 15
 10Likes
 LinkBack URL
 About LinkBacks
-
10-15-2011, 07:57 PM #1Senior Member

- Join Date
- Jul 2011
- Location
- Ponca City, Oklahoma
- Posts
- 605
Thanked: 66 Silhouette cutting machine to make blade etching?
http://www.silhouetteamerica.com
Tool Review: Silhouette Electronic Cutter @Craftzine.com blog
Basically it's a printer that has a metal cutter in it instead of ink, it will cut through paper and thin plastic and vinyl.
Today I just began reading up on how to etch blades, when a light bulb came on, and remembered that my mother who is into arts and crafts and owns one of these printers.
Her user manual says one of it's supported purposes is glass etching. but I am trying to figure out if it would be good for metal etching. I know it can create a silhouette in adhesive vinyl and other materials, I am thinking instead of using the supported glass etching solution, that I could use whatever is used for metal, I still need to do the research on that.
Does anyone have any experience with this type of device or metal etching in general? of course the easy thing to do is head over to moms and try to print a design and see what happens. but from you guys in the know and have done it before, what should I buy/learn before I start?
-
10-16-2011, 09:38 PM #2Member

- Join Date
- Apr 2011
- Location
- Brisbane, Australia
- Posts
- 1,434
Thanked: 642
I'm not certain what the etchant is for glass but ferric chloride works well for most steels. As long as the stencils will hold up to the ferric chloride that would probably work. Most polymers are non reactive with the ferric chloride.
Hope this is helpful.
Stu
-
10-16-2011, 11:16 PM #3Senior Member

- Join Date
- May 2011
- Location
- Orillia, Ontario, Canada
- Posts
- 741
Thanked: 164
I believe that hydrochloride etching is whats used on glass, I posted this in the "how do you make your mark" last week as an alternative to everyones branding and got no bites..... I am still curious to see how it will work.
One problem, I doubt that machine has the tollerance capability to create an intricate etch sized image...
I have problems making images that small with my industrial cutter...
It wouldnt hurt to give it a whirl, but the acid kit was 75$ ish and I already have my hands tied in 10 other projects LOL
-
10-16-2011, 11:44 PM #4Senior Member


- Join Date
- Mar 2011
- Location
- Ohio
- Posts
- 2,786
Thanked: 421
You could always etch the way I did as a kid, making little medals and coins. Completely cover the metal in candle wax and scratch out your design with a needle. Soak it in vinegar overnight. The next morning pull it out and soak it in warm salt water. After an hour or so, pull it out of the salt water and watch it rust. Occasionally spray it down with water to keep it rusting. After awhile, remove the wax and polish the rust off of the blade. Should leave a nice little etch in the metal. Not sure if i'd actually do this on a razor, but it does work and works cheaply.
-
10-17-2011, 09:55 AM #5Senior Member

- Join Date
- Jun 2011
- Location
- Northampton, England
- Posts
- 324
Thanked: 68
I use a method similar to Theseus, nail varnish(polish) an area bigger than what you want to etch. Get a big 9v lantern battery and some wire and alligater clips. Attatch the positive terminal to the steel and the negative to a piece of cotton wool(cotton balls) soaked in salt water(not dripping wet, give it a gentle squeeze first to get rid of excess water). Scratch your pattern in the varnish down to metal then gently dab the wet cotton wool on the scratched surface. Voila! Etched steel...
I just did this the other day as it has buffalo horn scales, hope this helps! Always good to have a play before you go to town on your actual piece.Last edited by Sasquatch; 10-17-2011 at 10:01 AM.
-
The Following 2 Users Say Thank You to Sasquatch For This Useful Post:
jeness (10-17-2011), regularjoe (10-21-2011)
-
10-19-2011, 02:06 AM #6Senior Member


- Join Date
- May 2011
- Location
- Ipswich, Australia
- Posts
- 481
Thanked: 64
A couple of thought come to mind when I read this thread
Firstly what a great idea
Next thought was what part of the razor you want to etch
Is it a Wedge or some other grind
I say this because I'm thinking you would need a flat surface
Hollow grind razors would certainly add to the difficulty of a great result
And of course the razor must remain totally still while you work
I wish you well in your venture
Just my 2 cents worth
I look forward to reading more on this thread
Rick
-
10-19-2011, 02:32 AM #7Senior Member
- Join Date
- Jul 2011
- Location
- Ponca City, Oklahoma
- Posts
- 605
Thanked: 66
I hope to get a chance to have my mother print out a Stencil soon, but I think it could be a little while. I have an extended work trip to China soon, and have barely had time to work on my current restores. Much less add a new layer of complexity. I will definitely report back how it works as soon as I test.
-
10-19-2011, 08:14 AM #8Senior Member
- Join Date
- Jun 2011
- Location
- Northampton, England
- Posts
- 324
Thanked: 68
Looking forward to seeing the results of a machine Sidmind, you could do a far more intricate etch with a machine than you could with my approach!
Rick- You're right about work surfaces and keeping the piece still, that was one of the reasons I posted the above method. It's a bit crude as you can see but it works on hollow grinds just as well. I suppose it all depends on what you want to etch and what your drawing skills are like. Mine are fairly limited so I tend to keep it simple!")
-
10-24-2011, 04:37 PM #9Junior Member
- Join Date
- Oct 2011
- Location
- Berkeley, Ca.
- Posts
- 1
Thanked: 0
Hi there all. I have a couple of suggestions.
I haven't yet done this on a blade, but I have done art etching on metal plates.
To do it freehand, you can get a paint-on liquid ground from art suppliers.
Scratch through the ground and apply a diluted acid solution, or any of the afore mentioned methods.
You should be able to use q-tips to apply the acid to the blade.
The time you leave it on before washing it off will control the depth of the bite.
There is also a photo process using "Liquid Light", another paint on solution.
When exposed to ultra violet light the material hardens.
Then wash off the remaining material leaving that surface available to the etching process.
The mask will have to be a "negative" as it is the unexposed area which will be exposed to the etch.
The mask can be made photographically, on the computer, or by hand.
Good Luck,
B.
-
10-29-2011, 10:09 PM #10Senior Member
- Join Date
- May 2011
- Location
- Orillia, Ontario, Canada
- Posts
- 741
Thanked: 164
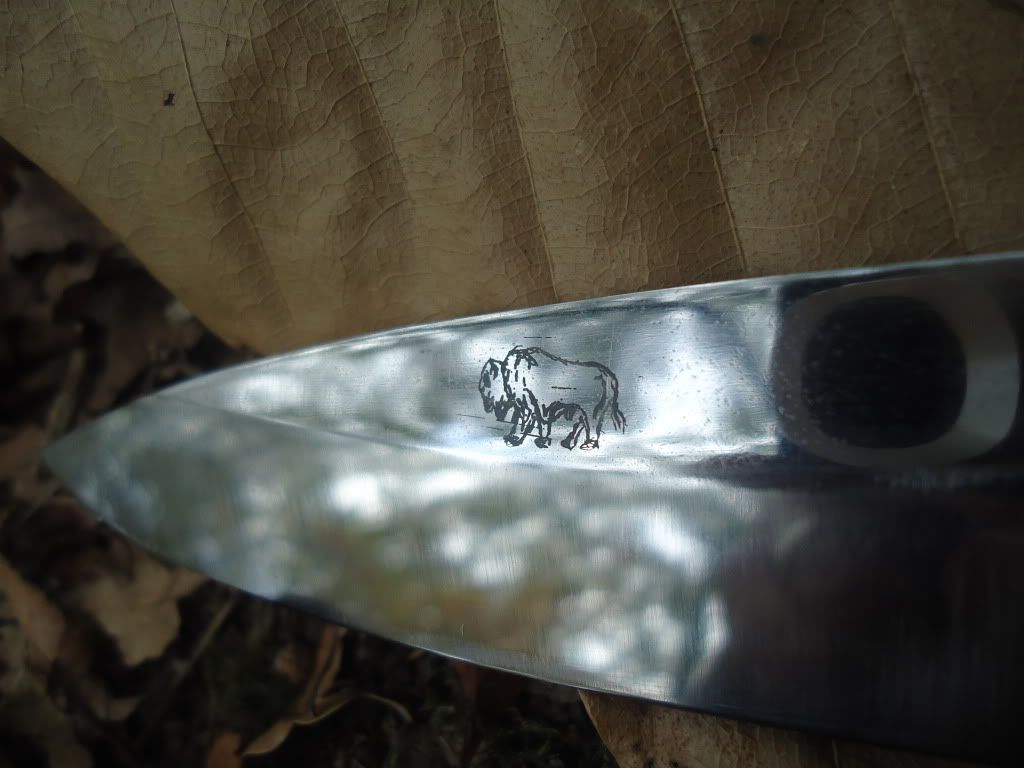
Hey guys, here is my first sucessful etch, its crooked and on a very crappy razor just incase, however im very pleased with the results.
1. cut out existing image with vinyl cutter
2. pre mask image, remove backing and apply to razor
3. remove pre mask, leaving vinyl image undistorted
4. apply etching compound, sit for 20 mins
5. rinse with water, remove vinyl
volia... etch
sorry for the crude pictures, I dont have much time to mess with this tonight but ill be back on it tomorrow.
applications:
If someone had a seven day set that needed a mixed matched razor etched to match, this would be the ideal method
Also if anyone has a big beautiful etched W&B, it could be copied and transfered to a razor that lost the etch during a resto
Looking foward to feedback from you guys as well as other possible applications.
Cheers,
Eric
PS, im going to try this on leather to create a custom design on the strop im working on. fingers crossed!


 Reply With Quote