
Results 1 to 5 of 5
 10Likes
Thread: How I etch steel
 LinkBack URL
 About LinkBacks
-
10-18-2011, 07:47 PM #1Senior Member


- Join Date
- Jun 2011
- Location
- Northampton, England
- Posts
- 324
Thanked: 68 How I etch steel
Old hat to some of you I'm sure but to anyone else tempted to try it here you go...
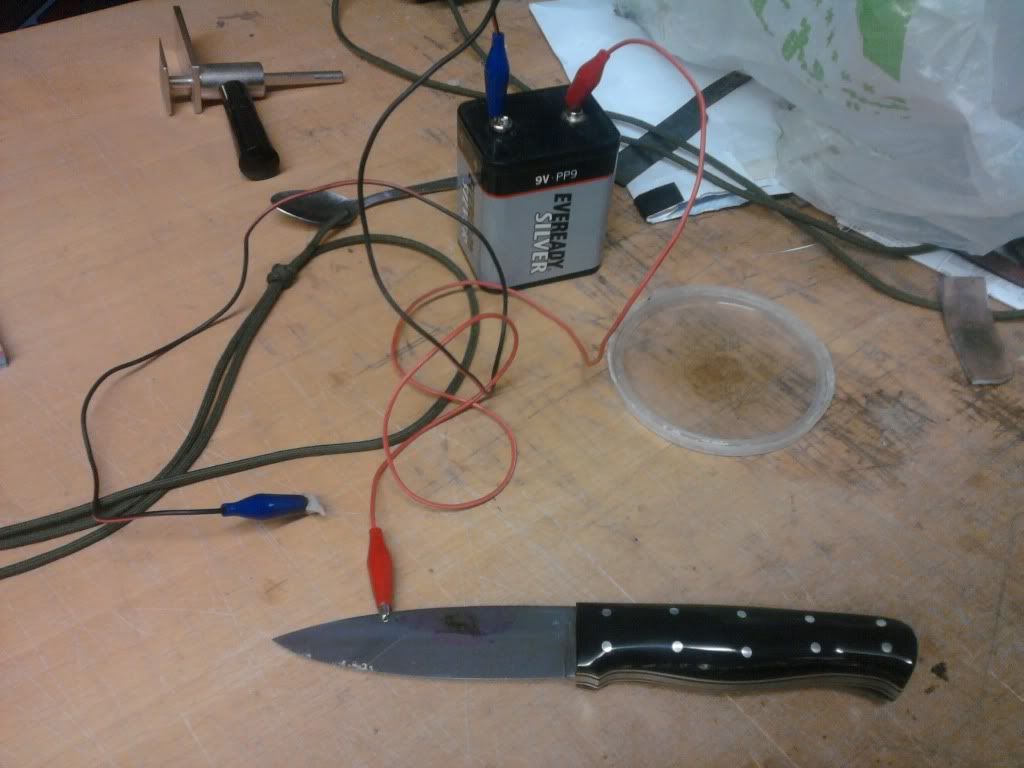
As you can see I put alligator clips on wire and run them off the battery. I put the positive on the bare steel of the blade. The little plastic lid has salt water in it, I dipped a little piece of cotton wool(ball) in the salt water and gave it a squeeze so it isn't running off onto the metal. Cotton wool goes onto the negative clip and dabs the etch.
For the etch you can just about make out some purple nail varnish(metallic! )on the steel. I put a thin coat on bigger than the etch to avoid corroding steel that shouldn't be etched. The wet cotton wool is then gently dabbed on the etched piece until it turns nice and dark. You can hear it sizzle and it won't take long. If you kept at it you achieve a deeper etch but it really doesn't take much. I used to go to town but realised some time ago there's no need to.
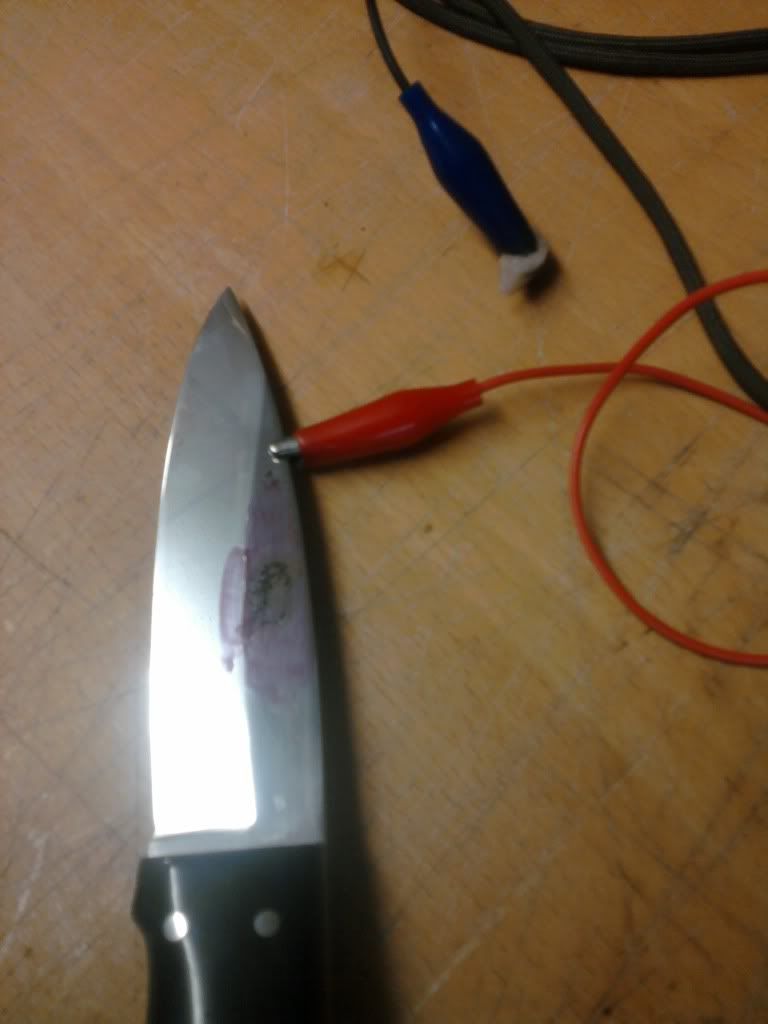
You can see here it's just a very speedy process to rust the steel. The cotton wool discolours and the etch itself turns a dark rusty colour. Once I clean it off with surgical spirit or nail varnish remover it just looks dark not rusty.
The buffalo was done with a sharp needle and a steady hand but was the first try and took about 30 seconds. Basically I just got lucky. If I didn't it would be back to bare steel and another layer of dried varnish and begin again. For my maker's mark which is just initials I tend to use a blunt needle or even a ballpoint pen for fatter lettering. You don't need to scratch the steel, just the layer of varnish protecting it.
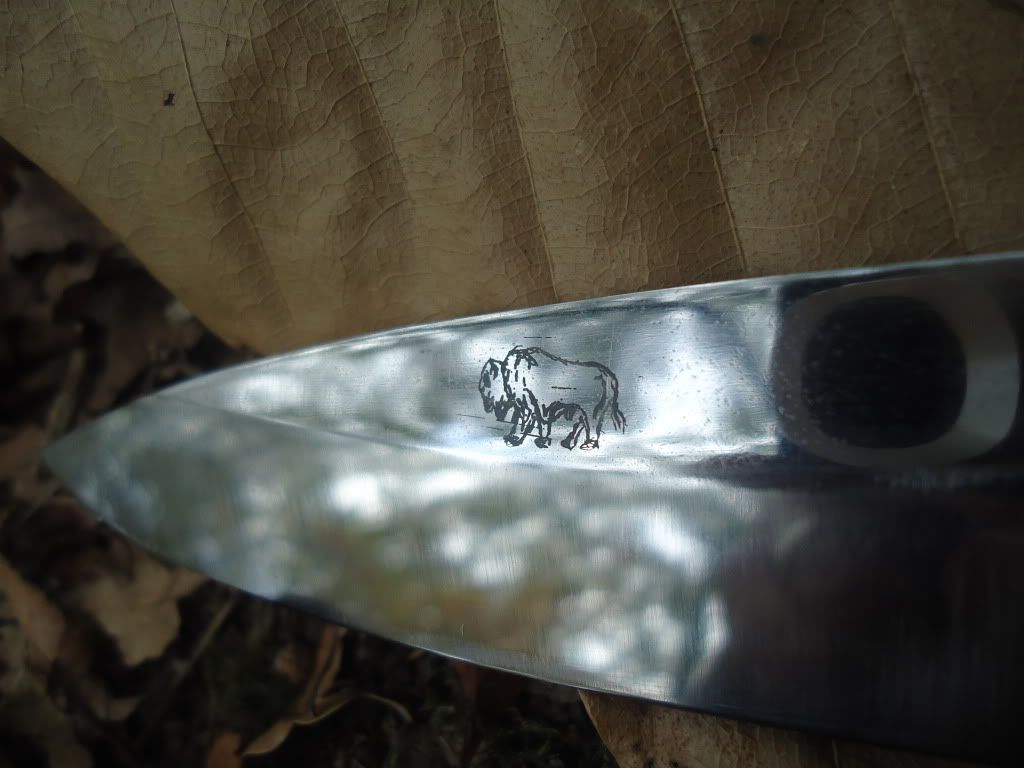
Post etching/pre polished here.
I hope this helps someone, it's easy to do and the battery and clips cost me about £5 in total. Nail varnish liberated from my wife as she didn't like that one and a bit of salt and cotton wool. I know this isn't a razor but it's easily applied to them. Happy days eh!
Chad
-
The Following 9 Users Say Thank You to Sasquatch For This Useful Post:
alb1981 (10-18-2011), baldy (10-18-2011), Birnando (10-18-2011), ChopperDave (09-04-2015), Geezer (10-19-2011), Malacoda (10-19-2011), regularjoe (10-21-2011), skipnord (10-19-2011), spazola (10-18-2011)
-
10-18-2011, 08:00 PM #2Senior Member
- Join Date
- Aug 2011
- Location
- Toronto, Canada
- Posts
- 233
Thanked: 22
Chad,
That's very cool. I never knew how etching was done..thank you.
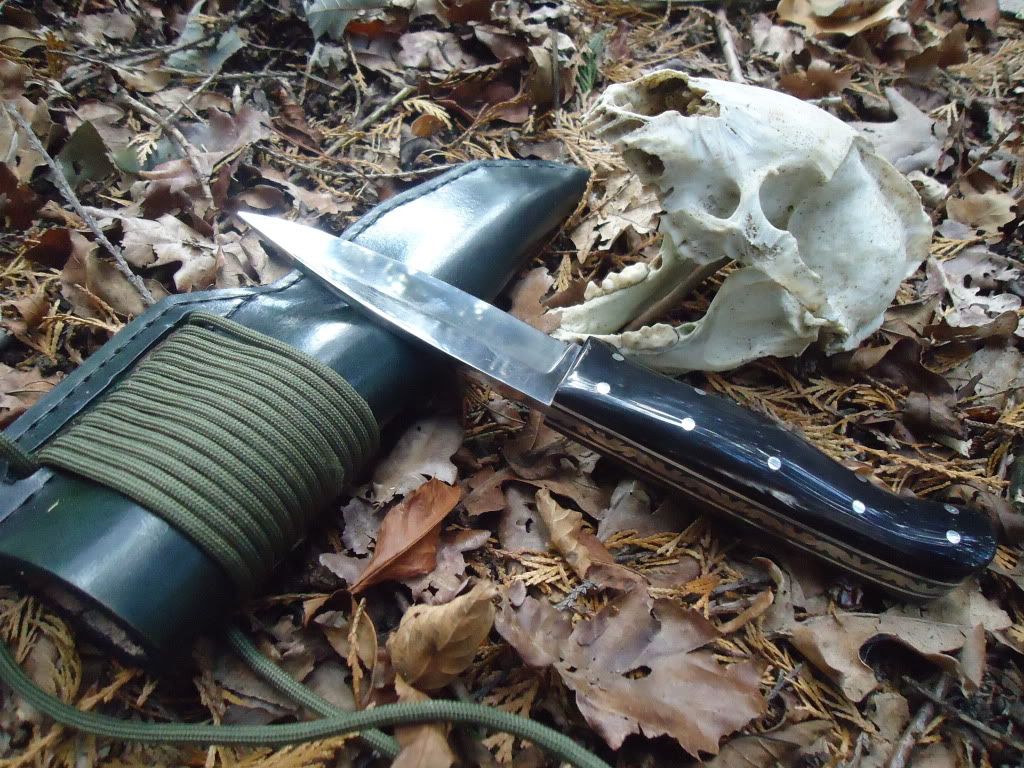
My real question though, is a bout the knife. It looks like a very nice bushcraft type knife with a scandi bevel. Did you make it?
-
The Following User Says Thank You to joebehar For This Useful Post:
Sasquatch (10-18-2011)
-
10-18-2011, 08:11 PM #3Senior Member
- Join Date
- Jun 2011
- Location
- Northampton, England
- Posts
- 324
Thanked: 68
Well spotted, it is a bushcraft knife I just did for myself. It's 4mm O1 carbon with a scandi grind and a micro bevel for added strength...
I don't think all etching is done this way, it's just the only way I know how to with next to nothing! Not the best way but it works for what I do. Thanks for looking!
-
The Following User Says Thank You to Sasquatch For This Useful Post:
RobertH (10-18-2011)
-
10-18-2011, 09:38 PM #4Senior Member
- Join Date
- Aug 2011
- Location
- Toronto, Canada
- Posts
- 233
Thanked: 22
You did a great job on it. I seem to also see see some filework on the tang.
I've wanted to try my hand at making a knife for quite some time now, but I don't have the grinding capabilities. Good bushcraft knives are darned expensive to buy.
-
10-18-2011, 10:26 PM #5Senior Member
- Join Date
- Jun 2011
- Location
- Northampton, England
- Posts
- 324
Thanked: 68
Thanks for that. I don't use a grinder for bevels. I roughed this one out of flat mill O1 carbon steel with a normal angle grinder then hand filed it to a clean blank. I made a very simple jig a couple years back to get a consistent angle with a hand file and put the bevels on that way. Drill press the holes for the pins and do the filework on the tang with little files and it's ready for heat treat. Heat it to non magnetic and quench in oil then throw it in the pre heated oven until it comes back to a straw colour to temper it. Then it's a case of putting scales on it and shaping with a rasp to rough shape and getting busy with sandpaper. After wet sanding to 1000 through the grades I give it a quick buff and then sharpen on waterstones. The only power tools used are the angle grinder, drill and buffer.
It's easier than most people think but patience is the key to this approach! If you want to have a go send me a message and I can go into detail to help you out if you want. Due to the amount of time I put into each one I don't sell many but I do tend to give them away when friends get married or for birthdays and things.
This one has buffalo horn scales on pewter liners on black fibre liners with filework as you pointed out. The pins are stainless and it weighs a lot which is why I knocked up a quick adjustable baldrick sheath to carry it in. Saves my trousers falling down in the woods from the weight of it as it's a bit of a beast! Plus the knife is always where I want it when I go to grab it.
They are expensive to buy which is exactly why I started making my own nearly 3 years ago now. Have a go, no matter how 'rustic' the first one looks you'll always love it and each one gets better after that!
*Sorry for waffling on and posting pics of a knife on here, this can all be roughly applied to making razors and I though someone might find the etching bit usefull!*Last edited by Sasquatch; 10-18-2011 at 10:30 PM.
-
The Following 2 Users Say Thank You to Sasquatch For This Useful Post:
midloth72 (11-19-2011), regularjoe (10-21-2011)


 Reply With Quote