Page 1 of 2 12 LastLast
Results 1 to 10 of 15
Like Tree1Likes

Thread: Advice on hand sanding...

  1. #1
    Member KillerDr3w's Avatar
    Join Date
    Jan 2012
    Location
    United Kingdom
    Posts
    48
    Thanked: 0

    Default Advice on hand sanding...

    Hi Folks,

    The only thing I've ever hand sanded with wet and dry is a aluminium points cover from a motorbike, and wet and dry made easy work on that - I could almost scoop metal out with the wet and dry in a few strokes! So I was quite surprised last night when I started hand sanding this blade to see how little impact I'm having on it.

    I'm using silicone carbide paper, and was working with between 80 and 400 grit last night - I only moved to 400 to see if it made a difference (despite what the wiki says!), using warm soapy water. I have't built a permament sanding rig yet, bit I was using a make-shift one made from two wooden blocks.

    I've read the wiki, and realise that I need to stay on low-grit, my post is more about how long I it should take.

    After about 2 hours, my blade looked like this:

    Name:  First Sanding Session 1.jpg
Views: 770
Size:  36.0 KBName:  First Sanding Session 2.jpg
Views: 775
Size:  33.1 KB

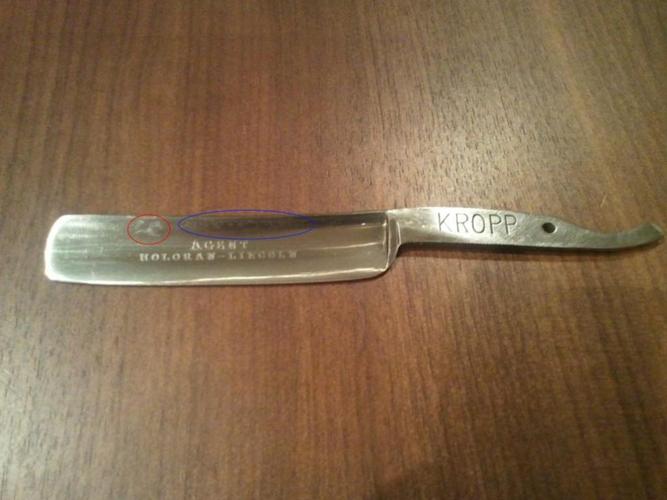
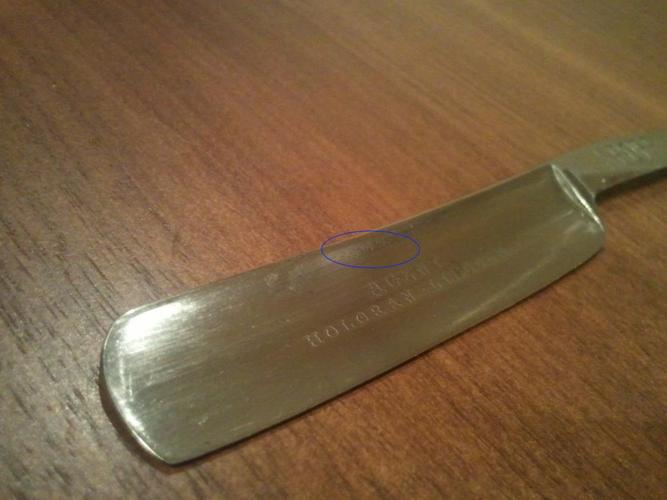
    You can see from the first picture, all the rust and dark stains have gone, but you can see where a dark stain was circled in red was and has left a pattern on the blade, and some pitting circled in blue - the second picture give a better idea of how deep this is. There is also a lot of patterened pitting on the tang, despite it looking not bad.

    How long does it take to get damage like this out? I was working for an hour and a half, I felt like I was hardly removing moving metal at all last night - the the point of me not being convinced I was! The metal is so hard compared to anything I've worked on before. I can still see a lot of areas I need to work on.

    Thanks,

    kD

  2. #2
    Senior Member osdset's Avatar
    Join Date
    Jun 2011
    Location
    London, United Kingdom.
    Posts
    227
    Thanked: 47

    Default

    Try hand sanding a LeGrelot, you will soon know what torture is all about.

  3. #3
    Senior Member cutalot's Avatar
    Join Date
    Mar 2009
    Location
    home for the last 28 years is switzerland
    Posts
    312
    Thanked: 48

    Default

    well if you realy want to get it out quite a long time.hard to tell how deep it is from the pics. are you just useing your fingers to back the sandpaper? if so try a stiff piece of leather treat your sandpaper like it was free and go light.let the sandpaper do the work. i cut a strip of paper as wide as my leather backing fold it over and just use the edge, moving the paper as it wears

  4. #4
    Lookin like a crim baldy's Avatar
    Join Date
    Apr 2009
    Location
    Coffs Harbour Australia, Home of the Big Banana
    Posts
    2,706
    Thanked: 1072

    Default

    If you really want to get rid of the pitting dont move up grits until its gone. maybe go back to 180-200 and get rid of the damage you want to get rid of.
    Then all the remaining sanding is just getting rid of the scratch marks from the previous grit.
    On another note, given the location if the pitting your talking about, just be careful you dont sand down the spine in that spot, that can cause honing problems.
    Grant
    Edit: Its not unusual to spend quite a few hours handsanding a blade, depending on the condition of course
    Last edited by baldy; 01-28-2012 at 10:58 AM.
    Maxi likes this.
    "I aint like that no more...my wife, she cured me of drinking and wickedness"
    Clint Eastwood as William Munny in Unforgiven

  5. #5
    Member KillerDr3w's Avatar
    Join Date
    Jan 2012
    Location
    United Kingdom
    Posts
    48
    Thanked: 0

    Default

    I noticed I'd dulled the edge on the spine on one spot, I managed to sand back the sharpness so its not really noticable, and I've changed the way I was sanding and am coming in at an angle to the spine now, so hopefully I won't do anything else.

    I'll go back to 200 and give it a few more hours. I think my problem is more the difference between my expectations based on aliminium and what I was getting on this steel I don't mind taking time, but at one point I was even looking to see if the wet and dry I had was ment for wood or something!

    I'll try a bit of leather or a sponge or something around the paper too. Thanks folks. I'll post an update when I manage to get this ready for putting scales on

  6. #6
    Heat it and beat it Bruno's Avatar
    Join Date
    Nov 2006
    Location
    Belgium
    Posts
    15,130
    Thanked: 5229
    Blog Entries
    10

    Default

    The wiki says what it says for a good reason
    If you jump to higher grits without having polished out pitting and the scratch marks of the previous grit, your work is just going to take much more time.
    Also, Aluminium and 60 HRc steel... not really a comparison. If you are handsanding a good razor, it can take as much as 10 hours or more.
    Til shade is gone, til water is gone, Into the shadow with teeth bared, screaming defiance with the last breath.
    To spit in Sightblinder’s eye on the Last Day

  7. #7
    Senior Member jeffegg2's Avatar
    Join Date
    Jul 2010
    Location
    Michigan
    Posts
    735
    Thanked: 104

    Cool

    Just finished the blade on my restore, first time hand sanding. Although I do have experience sanding, I used to make a living doing body work.
    I used a folded over kitchen sponge to sand mine. Be careful my blade did draw some blood from me!!
    You really don't see your results until you get to 1000 or so. 1st the big stuff and pits, then you are just removing the scratches from sanding....

    Lots of elbow grease, and why many turn to sanding/buffing wheels.

  8. #8
    Member KillerDr3w's Avatar
    Join Date
    Jan 2012
    Location
    United Kingdom
    Posts
    48
    Thanked: 0

    Default

    I've been hand sanding this razor for quite a while now, and I'm pleased to say - all the pitting has gone! The only problem I have now is - where the pitting was, it looks like I've focused sanding on that area, so there is a very slight groove in the two areas.

    Is it just a case of continuing to sand until the edges of the smooth area blend into the rest of the blade?

  9. #9
    Obsessive compulsive EisenFaust's Avatar
    Join Date
    Feb 2010
    Location
    New Zealand
    Posts
    1,315
    Thanked: 323

    Default

    When something like that happens it can be very hard to remove with straight hand sanding - fingers tend to dip into any shallows and accentuate them. To fix it you will have to span the shallow using a sanding block until its all leveled out.

  10. #10
    Member KillerDr3w's Avatar
    Join Date
    Jan 2012
    Location
    United Kingdom
    Posts
    48
    Thanked: 0

    Default

    Ah! I get you. A sponge would probably cause the same issues. I'll see if I can improvise a longish sanding block to remove the edge of the shallow.

Page 1 of 2 12 LastLast

Posting Permissions

  • You may not post new threads
  • You may not post replies
  • You may not post attachments
  • You may not edit your posts
  •