
Results 1 to 10 of 10
 1Likes
Thread: Bone inlay in wood scales
 LinkBack URL
 About LinkBacks
-
02-04-2012, 10:38 PM #1
 Bone inlay in wood scales
I wanted to make wooden scales with bone inlay.
I needed several tries, but eventually had something that looked more or less ok.
I decided to post about it here to let you learn from my mistakes
First I glued 2 thin pieces of bone together, and sanded them to shape on my belt sander.
Then I wanted to cut the shape out of wood.
For my first attempt, I used a pencil to draw the shape on a wooden scale, using the bone as a template. Then I used a stanley knife to try and cut the shape. Big mistake. The knife follows the grain of the wood, and you cut into the part of the wood that doesn't need cutting. Scrap the scales.
Then I tried again to draw the ourline, but using a dremel engraving needle to cut out the shape.
Well... Let's just not talk about it. Trying to follow a gently sloping line with a rotary tool in a material with grain structure...
Then I decided to try and use a sharp wood chisel to cut out the shape by 'stabbing' the wood along the line of the shape. That works fairly well. Only I found out that if you start pushing a chisel in wood, it's best not to do this close to the edge of the scale. Especially since the scale is fragile to begin with
So then I took a solid block of meranti, drew the shape, and used my chisel to carefully remove the part where the bone would come. At this point it was still a rectangular block. I chiseled deep enough that I could fit both pieces of bone in there, on top of each other, with room to spare. Then I cut the block lengthwise to end up with 2 thin planks with holes where the bone could fit.
I then glued those blanks to a thin piece of maple for backing, and clamped it for 2 days. Then I glued the bone into the slots, and again clamped it for 2 days. After that, I shaped the scales like I would make a normal pair of scales. I sanded them thin so that the wood and the bone would be the same height. I finished with enough layers of CA so that the surface of the scales would feel like 1 continuous surface.
What I didn't think of in advance was that I should make the slots a bit too small, and then sand them out with sandpaper until they fit perfectly. The slots were a tad too big. I tried filling the extra room with meranti sawdust mixed with wood glue. But that turned black. Still, on these scales, the black line does not look out of place so it is not a disaster, but you might want to try and prevent it.

 Til shade is gone, til water is gone, Into the shadow with teeth bared, screaming defiance with the last breath.
To spit in Sightblinders eye on the Last Day
-
The Following User Says Thank You to Bruno For This Useful Post:
regularjoe (02-05-2012)
-
02-04-2012, 10:45 PM #2This is not my actual head.


- Join Date
- Nov 2009
- Location
- Middle of nowhere, Minnesota
- Posts
- 4,624
- Blog Entries
- 2
Thanked: 1371
I like the black line.
I've never tried making any kind of inlay, I imagine getting the fit just right is a huge PITA...
I wonder about stealing a technique from house carpentry - covering the areas that are tough to fit with something that looks good. In other words... Your black line kind of does that, but I wonder about doing something like wire around the inlay to create a border that covers any gaps...
Kudos on taking on a courageous project - it turned out really well.
Strange women lying in ponds distributing swords is no basis for a system of government.
-
02-04-2012, 10:59 PM #3Senior Member

- Join Date
- Jan 2011
- Location
- Newfoundland, Canada
- Posts
- 266
Thanked: 23
Looks good! As always you giving the rest of us ideas...
I thought about soap stone inlay as i have a chunk and don't know what to do with it. But i think a wedge would look good as soap stone.
-
02-05-2012, 03:19 AM #4Senior Member

- Join Date
- Jan 2012
- Location
- St. John's, Newfoundland and Labrador, Canada
- Posts
- 164
Thanked: 11
Never done it myself but from looking at various luthier websites they usually use a jig/frame to guide a dremel with a router housing on it to cut out where the inlay goes.
-
02-05-2012, 03:48 AM #5Just a guy with free time.
- Join Date
- Oct 2011
- Location
- Mid state Illinois
- Posts
- 1,448
Thanked: 247
Looks like you tried something really hard and succeeded. I say that's awesome! Another option that might prove a bit easier is making the inlay a bit too large, then sanding it until it fits. Might be easier than spot sanding in tight spaces. Usually for my inlays, that have nothing to do with razors btw, I prefer making the piece fit the puzzle, as opposed to the other way around. There's also stainable, sandable wood putty available for filling gaps. Anyways, working with such small parts, I'm not ready to try. lol. Great job!!
-
02-05-2012, 04:41 AM #6Senior Member

- Join Date
- Jun 2011
- Location
- London, United Kingdom.
- Posts
- 227
Thanked: 47
Please allow me to chime in with some (hopefully) useful tips on inlaying, it's probably easier to show a photo first then explain how I went about doing it
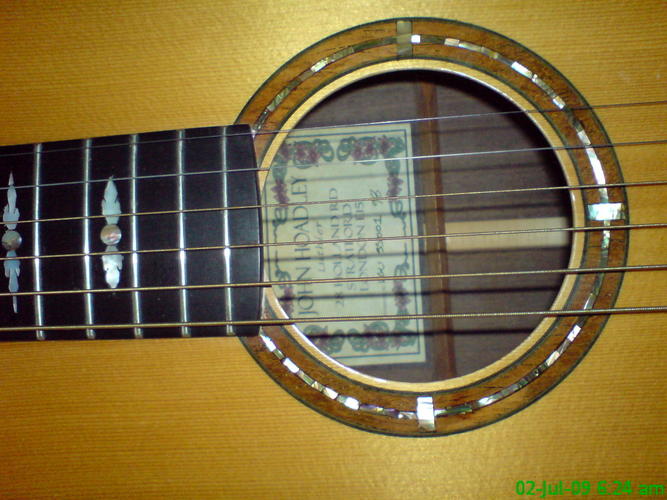
Acoustic guitar made by yours truly in 1998, inlays are Abalone, and Mother of Pearl, timbers are Ebony, Sitka spruce, Rio Rosewood, this was the first attempt I made at inlaying, my mistakes are apparent, and I have improved somewhat since then!
Looking at the shaped inlays on the left of the photo, the individual shapes were cut from Mother of Pearl first, I find it easier to print the shape onto label stock and stick the label onto the pearl, the shape is then cut using a jewelers saw. Any irregularity is cleaned up with small needle files.
Once I have all my shapes cut out I position them and glue them down with a small spot of superglue you don't want to go mad with glue here as the inlay piece needs to come off again, once I am happy with the layout I scribe around each piece with a fine scalpel blade, this transfers the outline to the work piece.
Carefully pop off the shape, I use a thin artists spatula, in this case the work piece is Ebony so to highlight the scribe marks I rub in some white chalk.
To remove the material and form the cavity for the inlay I use Dremel equipped with a flex drive and dental burrs, the flex drive is fitted into a mini home brew router base. Carefully rout along the inside of the scribed marks, the chalk will show you just how close to the line you are, once you are happy that you are as close as you dare go, the rest of the cavity can be hogged out, I use slightly larger burrs for this but a small chisel will do the job if you're careful, obviously the burrs will not get you into sharp corners of a cavity, and areas will need trimming where you have not quite hit the line so scalpels and a measure of patience are needed here, I have a selection of tiny chisels made from old three corner saw sharpening files that are ace for this type of work.
Now you can try the inlay for fit and adjust as required, I should of mentioned earlier that the depth of the cavity needs to be less than the thickness of the inlay, you want the inlay to stick out by about 0.5mm this will get levelled after any filling. if all is well, rub some candle wax around the outer perimeter of the cavity, you don't want any excess glue sticking where it its not supposed to, flood the cavity with superglue fit the inlay and clamp up.
Even the most experienced guy's make mistakes doing this kind of work and filling slight gaps is allowed, for the example above I would use vegetable black powder mixed with a two part epoxy as a filler, sand flush when dry, works a treat, any fine sawdust will work as well, when I say fine, I mean talcum powder fine!
Bigger inlays such as Bruno's example can be done the same way, or by using a jig, either way I would recommend doing any inlay work before the shape of the scales are cut out, you want as much area as possible for router bases to rest on.
I hope this helps,
John32t likes this.
-
The Following 4 Users Say Thank You to osdset For This Useful Post:
Adam G. (02-06-2012), johnny2274 (02-06-2012), randydance062449 (02-05-2012), Str8Raz0r (02-11-2012)
-
02-10-2012, 10:35 PM #7Senior Member

- Join Date
- Jan 2012
- Location
- Irving, TX
- Posts
- 811
Thanked: 84
I don't think this would work well in wood, but it does with something a bit harder.
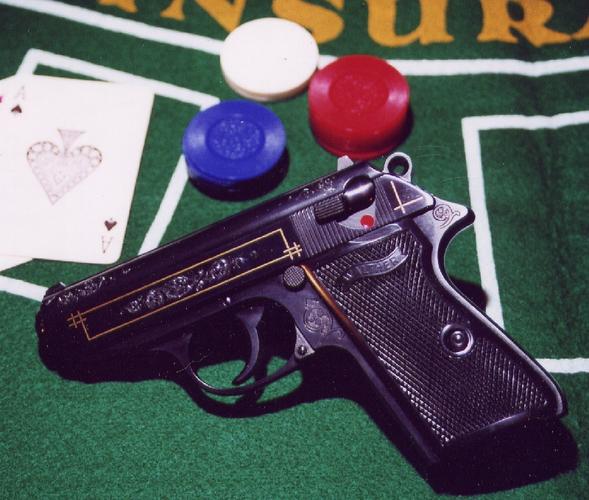
My wife does gold inlay by carving a groove and then using a point to make pits in the bottom edges of the inlay. The pits are to give the gold something to hold onto. Then she gets 22K gold wire. The groove must be only half the depth of the wire diameter or it takes more than one strand of gold wire. She runs the gold through a torch to make the wire soft as butter. Then she hammers it down into the groove. 600 grit sandpaper then removes the excess gold until it is flush. It looks beautiful. I can show you a pic of one of her guns if you like.
-
02-11-2012, 08:23 PM #8
Wouldn't you see the line where the wire touches the gold? Or does that become invisible?
Til shade is gone, til water is gone, Into the shadow with teeth bared, screaming defiance with the last breath.
To spit in Sightblinders eye on the Last Day
-
02-11-2012, 09:33 PM #9Senior Member
- Join Date
- Jan 2012
- Location
- Irving, TX
- Posts
- 811
Thanked: 84
I guess I didn't make myself clear. The wire IS gold.
-
02-12-2012, 03:02 AM #10Senior Member
- Join Date
- Jun 2011
- Location
- London, United Kingdom.
- Posts
- 227
Thanked: 47
I have seen a similar method used on Walnut shotgun stocks using silver wire, the method was explained to me by one of the restoration gunsmiths at the Tower of London. The design is incised into the wood, it's more like a cut than a groove, then square section silver wire was drawn through a plate with a 'V' shaped notch which profiled the wire into a wedge shape, the wire was then hammered into the cut lines on the stock. I saw some really impressive scroll work done this way, and you have to marvel at the skill of the craftsmen that did it, I would imagine that it took years of practice to be able to produce consistently even inlays. Originally Posted by Crotalus


 Reply With Quote