
Results 1 to 5 of 5
 2Likes
Thread: Sacrificial Razor
 LinkBack URL
 About LinkBacks
Threaded View
-
04-06-2012, 12:21 AM #1Senior Member

- Join Date
- Apr 2012
- Location
- Jersey City
- Posts
- 225
Thanked: 50 Sacrificial Razor
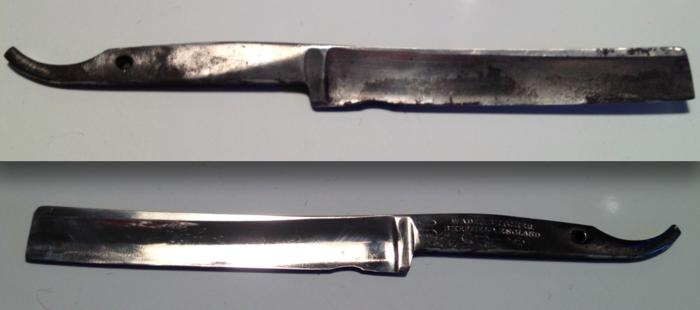
First off, new to the hobby, still learning to shave and learning how to maintain the razor. Stropping veerrry slowly. New Solingen "Best Quality" has a dark spot already that I'll buff out. Going to do the alcohol/mineral spirit mix to coat it. And, yes, ordered a lot off Ebay. I hope to get 2 or 3 everyday razors out of it and use the other two as teaching tools. I'll clean them up and ship the better ones off to a honemeister while I need to learn to hone. But I wanted to start the learning curve, so on the way by a pawn shop, I picked up a $5 Wade and Butcher "50", rusted, chipped, broken scales and all. The idea is not to do a restore but to start to work the basics, cleaning, polishing, safe handling, etc. This forum is a great place for that.
Discarding the broken scale, I'll keep the good one as a template. The edge is shot with deep honing on the shoulder, so I'm not even going to work on that. But I broke out the dremel with an idea of seeing what is involved in getting rid of rust, how deep you have to go to get rid of pitting and trying to restore the surface. First thing I did was to breadknife the edge for safe handling. Glasses of course. Then drilled out the pin and lost the broken horn scale. Clamped the blade to the edge table and started at it. I have Ryobi C, E and G compound sticks. The C is 1-3 microns and that took off the rust and patina. The E is stainless steel, 4-7 microns and the G is jewelers rouge, 6-10 microns. Worked the C mostly until I found that I was going to have to grind the pitting out. Got the finest grit wheel I had and worked it down until all I saw was grind scratches. Then went back to the C and worked the scratches out which took some time. Found that I lost most of the makers mark but wasn't really to concerned about that at this point. Started with the G and got the finish you see here. The other half of the pic is the opposite uncleaned side.
Not unhappy about the results. Nobody went to the hospital, nobody went to jail. Now I'm off to clean up the kitchen, get a bit to eat and go back to trying to get the Norton 8000 down to flat. Good times.


 Reply With Quote