
Results 1 to 7 of 7
 1Likes
Thread: Easy Peasy Pin Removal
 LinkBack URL
 About LinkBacks
-
08-23-2012, 01:41 AM #1Senior Master Tinker


- Join Date
- Jul 2012
- Location
- Deland, Florida
- Posts
- 233
Thanked: 81 Easy Peasy Pin Removal
Okay guys, I know this subject comes up often and has an entry in the Wiki and even in this forum under the sticky "How do I / Where do I / What do I / answers are here". But I have never seen the method I use in any tutorial. This is not a new idea; it has been mentioned on this forum by others. But somehow, it has gone unnoticed and not implemented or mentioned as an option for pin removal. But with three successful razor pin removals with all scales in tact, by a complete and utter novice, I thought I'd post my method for your consideration. Without further ado here is my method:
These are the first two attempts using my Redneck Dremel Speed Control (http://straightrazorpalace.com/works...trol-rdsc.html) and a vintage one speed Dremel tool. Even with such crude equipment, I was able to get the speed down to around 15,000 RPM and complete the task. Slow speed is your friend here, allowing you to control the bit.
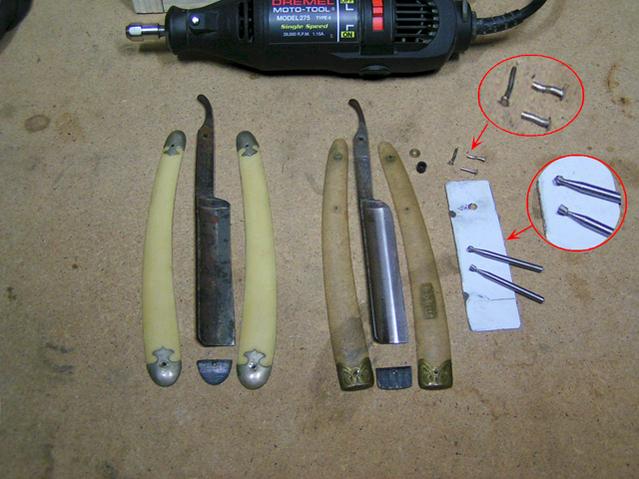
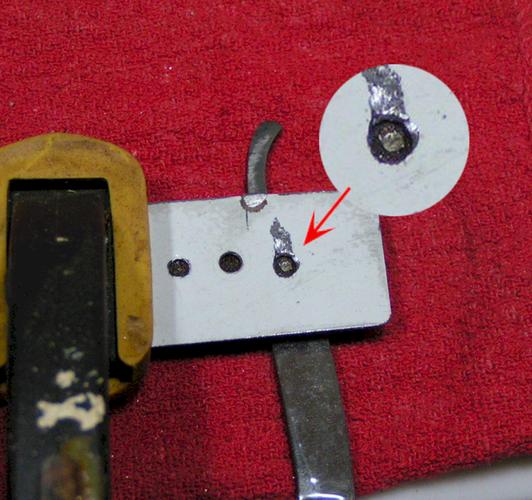
Notice the top inset. I did not have a cake walk removing these pins. Three of the four pins were seriously bent. The bottom inset shows the HSS Burrs I used. One is round like a ball and the other is kind of like an inverted pyramid. With the unwieldy nature of the Dremel I found it difficult to start with the round bit as it wanted to race off the pin head. So I used the inverted pyramid bit to create a concave and then switched to the round bit to finish.
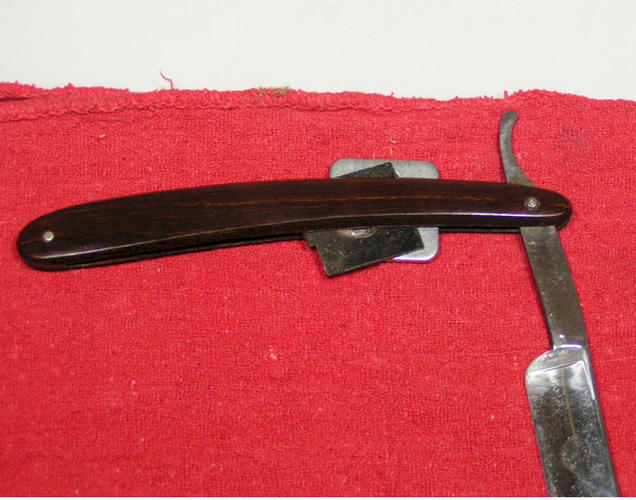
Here is the next sucker, I mean patient, to go under the scalpel for a pin discectomy. Notice the pieces of material between the scales. They are just something I had at hand. The intent is to remove the blade from any possible damage and keep the scales from bending when clamped with the jig. The material is just snug enough so that when I place the clamp on, there is very little or no flexing of the scales one way or the other.
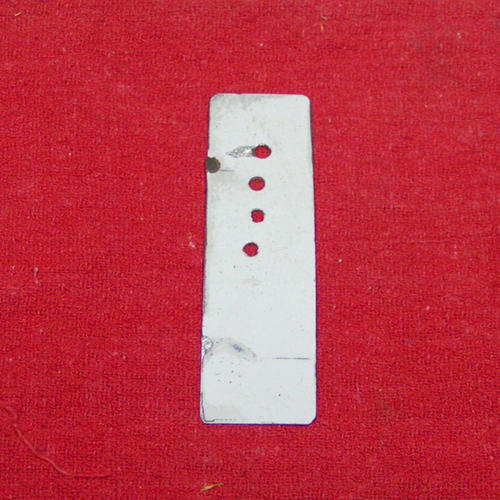
The next picture shows the magic of this method. It is a 1/32 piece of sheet metal I cut from a range hood that after salvaging as much as I could from it, I threw away the bones. I drilled 1/8 holes in the sheet metal to fit over the pin washer. The extra holes are so I can move the jig once one hole gets too gnarly to use.
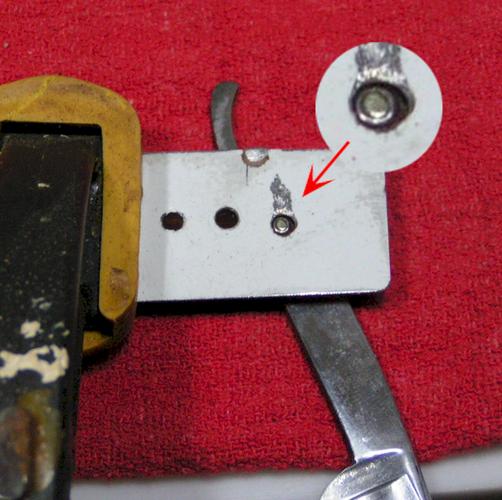
The next two pictures show the sheet metal clamped down. The first photo clearly shows the washer before beginning the onset of using the rotary tool. The second photo shows that the washer has gone. You can see the washer fly off as you are using the rotary tool.
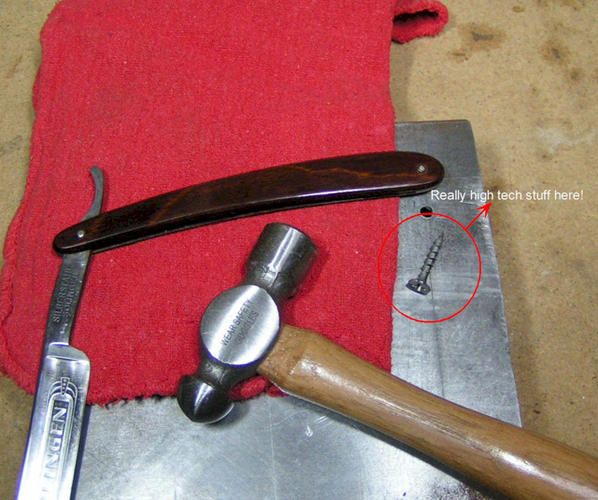
And finally, we are reaching the conclusion of this verbose explanation. The next three pictures show the result of the washer and pin removal process. For all three pin removals, I simply used a case hardened dry wall screw. But I have now made myself a proper pin removal tool so I will not need the screw again!

What a winded explanation of something that takes less than a minute from beginning to end. Since I have purchased a flex cable for my RotoZip tool, I can now just use the round HSS bit and the job is done in 30 seconds with the scales intact! Can you match that with filing, the drill press or even the Dremel cut of wheel?
Give it a try. I would love your feedback, positive or negative,
Randy
[WhiteLion - formerly known as BRGriff]Last edited by WhiteLion; 08-23-2012 at 01:45 AM. Reason: grammar correction
Geezer likes this.Tell me and I forget. Teach me and I remember. Involve me and I learn. Ben Franklin
-
-
08-23-2012, 02:08 AM #2Senior Member

- Join Date
- Jan 2011
- Location
- Roseville,Kali
- Posts
- 10,432
Thanked: 2027
Seems to work,great job,on a salvage I just like some masking tape with a hole punched in it,A fine file,and always just try to press them out.For me hammers and punches are a bad mix with old scales.Whatever works tho.
-
08-23-2012, 02:19 AM #3Just a guy with free time.
- Join Date
- Oct 2011
- Location
- Mid state Illinois
- Posts
- 1,448
Thanked: 247
That metal jig is genius! I love it when I see something on here, and think "ohhh yeahh...I should have thought of that."..lol! That's great stuff! Thanks for sharing! Ofc, now I've been doing it often enough that I don't worry about a runaway bit very often. OTOH, with YOUR idea, I NEVER have to worry about it again! Excellent!
-
08-23-2012, 02:27 AM #4Junior Member

- Join Date
- Aug 2012
- Location
- Medicine Park, Oklahoma
- Posts
- 8
Thanked: 1
Thanks for the detailed description along with the pictures, it's always nice to see a different way to approach a problem.
-
08-26-2012, 02:30 AM #5
Randy, you are the man! I just did a long wordy of the same process on another thread. I am going back and post this as a link!
thank you!
~Richard
-
08-26-2012, 03:46 AM #6Senior Master Tinker
- Join Date
- Jul 2012
- Location
- Deland, Florida
- Posts
- 233
Thanked: 81
Thank you Richard. I knew when I posted this thread that I was not unique. Just seemed that no one was paying any attention to this method so I thought I'd share my experience with the members. Originally Posted by Geezer

For those still using the Dremel cut off wheel, tape and file, or a drill press, they would be amazed by this method. To me, using a Dremel cut off wheel is like trying to get rid of ants in your back yard with a nuclear bomb. Way overkill! Tape and a file? It works and in some situations like trying to save the collar for historical preservation, it is by far better than this method. But why put in 15 minutes to remove just any old pin when it can be done in 30 seconds? And the drill press? For me, trying to center a 1/16th inch bit on a pin head with no flex in the bit, let alone breaking the bit, is virtually impossible. If I try to "ding" the center of the pin with a hammer and punch I am more likely to bend the pin and increase my work in removing it.
I am a Master Tinker and tried all of the methods with utter frustration until I read something on one thread about an European seller of fancy pins who include in his offering a jig for removing pins. Viola, the Easy Peasy Pin Removal thread was born.
RandyLast edited by WhiteLion; 08-26-2012 at 06:09 PM.
Tell me and I forget. Teach me and I remember. Involve me and I learn. Ben Franklin
-
The Following User Says Thank You to WhiteLion For This Useful Post:
UKRob (08-28-2012)
-
08-30-2012, 02:25 AM #7Hones & Honing


- Join Date
- May 2005
- Location
- Saint Paul, Minnesota, United States
- Posts
- 8,023
- Blog Entries
- 1
Thanked: 2209
I have to save this thread!

Thanks a bunch!Randolph Tuttle, a SRP Mentor for residents of Minnesota & western Wisconsin


 Reply With Quote
