Page 2 of 3 FirstFirst 123 LastLast
Results 11 to 20 of 21
Like Tree5Likes

Thread: Some tips on my storage case pls.

  1. #11
    Stropping Addict Scookum's Avatar
    Join Date
    Aug 2012
    Location
    Ottawa
    Posts
    347
    Thanked: 39

    Default Re: Some tips on my storage case pls.

    Quote Originally Posted by Euclid440 View Post
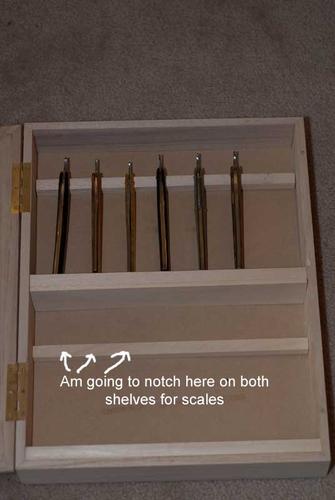
    Is this a hanging case? How about a 45 degree dado to reveal a ¼ profile? Drill a dimple in the bottom bar to keep in place. Thinner dividers will allow more space for the razors that are coming…because they are coming. Build in something for moisture control.
    Yes it's going to be mounted on a wall, I have a rechargeable demoisturizor thingamabob that will go into the cabinet.
    I dream of a world where a chicken can cross a road without having it's motives questioned.

  2. #12
    Incidere in dimidium Cangooner's Avatar
    Join Date
    Mar 2012
    Location
    Val des Monts, Quebec
    Posts
    4,065
    Thanked: 1439

    Default

    Quote Originally Posted by Scookum View Post
    Yes those are what I was looking for. I was just at Lee Valley the other day asking about hooks they told me they didn't have any...
    Try home hardware. For some reason I seem to remember buying some there several years ago.

    It was in original condition, faded red, well-worn, but nice.
    This was and still is my favorite combination; beautiful, original, and worn.
    -Neil Young

  3. #13
    Stropping Addict Scookum's Avatar
    Join Date
    Aug 2012
    Location
    Ottawa
    Posts
    347
    Thanked: 39

    Default

    Grabbed a packet of 100 from Lee Valley for 2.50 bucks. And then I just had to "browse" final bill 69 dollars... It looks like I can put 8 razors in there in two rows offset from one another.
    Euclid440 likes this.

  4. #14
    Incidere in dimidium Cangooner's Avatar
    Join Date
    Mar 2012
    Location
    Val des Monts, Quebec
    Posts
    4,065
    Thanked: 1439

    Default

    Quote Originally Posted by Scookum View Post
    Grabbed a packet of 100 from Lee Valley for 2.50 bucks. And then I just had to "browse" final bill 69 dollars... It looks like I can put 8 razors in there in two rows offset from one another.
    Ha ha - you got off light! It's amazing how quickly a browse of that store can head north of $100 in a hurry.

    And better yet, if I do something similar, I'll know who to bug for some hooks.

    It was in original condition, faded red, well-worn, but nice.
    This was and still is my favorite combination; beautiful, original, and worn.
    -Neil Young

  5. #15
    Stropping Addict Scookum's Avatar
    Join Date
    Aug 2012
    Location
    Ottawa
    Posts
    347
    Thanked: 39

    Default

    Quote Originally Posted by Cangooner View Post
    Ha ha - you got off light! It's amazing how quickly a browse of that store can head north of $100 in a hurry.

    And better yet, if I do something similar, I'll know who to bug for some hooks.
    I should have a few left over They are the small ones and are just L shaped, to be honest I would prefer a J style hook, but they didn't have that kind. I've searched all the hardware and building stores in town for these little buggers lol.

    That little lathe is still there too...I swear its watching me...
    Cangooner likes this.

  6. #16
    Senior Member blabbermouth
    Join Date
    Apr 2012
    Location
    Diamond Bar, CA
    Posts
    6,553
    Thanked: 3215

    Default

    In my longun safe I used woooden dowel pins so I can stack shoulder to shoulder, to take up the least amount of space. Perhaps a contrasting wood. A small strong magnet at the tang would keep them from jumping out.

  7. #17
    Senior Member blabbermouth Geezer's Avatar
    Join Date
    Jul 2010
    Location
    EauClaire,WI
    Posts
    7,685
    Thanked: 3825
    Blog Entries
    1

    Default

    I used a few small rare earth magnets from HF for my over sink rotation set. They will hold a razor well and allow the razors to dry with the pivot upward. I also used them in a wall hanging shadow box such as yours. I epoxied the magnets into holes drilled in a thin board and then glued the board to the top of the shadow box. Your box should easily hold two rows! Install all the magnets with the same pole upward, that will keep them apart at the wedge end, otherwise the razors will swing together. You can stagger two rows on each board if you wish.

    Whatever you do, It is always nice to have the razors in view when not in use.
    ~Richard

  8. #18
    Senior Member Tylerman's Avatar
    Join Date
    Sep 2012
    Location
    Syracuse NY
    Posts
    116
    Thanked: 12

    Default

    Quote Originally Posted by Geezer View Post
    I used a few small rare earth magnets from HF for my over sink rotation set. They will hold a razor well and allow the razors to dry with the pivot upward. I also used them in a wall hanging shadow box such as yours. I epoxied the magnets into holes drilled in a thin board and then glued the board to the top of the shadow box. Your box should easily hold two rows! Install all the magnets with the same pole upward, that will keep them apart at the wedge end, otherwise the razors will swing together. You can stagger two rows on each board if you wish.

    Whatever you do, It is always nice to have the razors in view when not in use.
    ~Richard
    Very cool setup. Ill definitely have to use magnets if/whenever i build a case

  9. #19
    Stropping Addict Scookum's Avatar
    Join Date
    Aug 2012
    Location
    Ottawa
    Posts
    347
    Thanked: 39

    Default Re: Some tips on my storage case pls.

    Quote Originally Posted by Geezer View Post
    I used a few small rare earth magnets from HF for my over sink rotation set. They will hold a razor well and allow the razors to dry with the pivot upward. I also used them in a wall hanging shadow box such as yours. I epoxied the magnets into holes drilled in a thin board and then glued the board to the top of the shadow box. Your box should easily hold two rows! Install all the magnets with the same pole upward, that will keep them apart at the wedge end, otherwise the razors will swing together. You can stagger two rows on each board if you wish.

    Whatever you do, It is always nice to have the razors in view when not in use.
    ~Richard
    That is a good idea. Now I have to go back and rethink my design.
    I dream of a world where a chicken can cross a road without having it's motives questioned.

  10. #20
    Senior Member blabbermouth
    Join Date
    Apr 2012
    Location
    Diamond Bar, CA
    Posts
    6,553
    Thanked: 3215

    Default

    Recently my father in law gave me his mechanic hand tools and now I have several sets of wrenches. I was looking for a way to organize my roll away tool boxes and I found this video on cutting foam drawer liner. The liner is available from Sears but also from a few other places as well. This guy has a good, simple video on how to cut the foam to French Fit your tools.

    When I saw this vid, I though of your thread. This is a simple way to hold you display razors with a Foam French Fit. If you get more razors and need more space, just re cut foam for a Spine up, shoulder to shoulder fit.

    The foam sells at Sears for $19 a sheet and is on sale for $16.
    Here’s the link. How I organized my tool box. - YouTube

Page 2 of 3 FirstFirst 123 LastLast

Posting Permissions

  • You may not post new threads
  • You may not post replies
  • You may not post attachments
  • You may not edit your posts
  •