
Results 1 to 2 of 2
 3Likes
 LinkBack URL
 About LinkBacks
-
10-08-2012, 01:20 AM #1Senior Master Tinker


- Join Date
- Jul 2012
- Location
- Deland, Florida
- Posts
- 233
Thanked: 81 Scales thickness sanding on Drill Press
When last I left on this subject, we were discussing a method of resawing scale blanks or cutting blanks off of a slab of wood (http://straightrazorpalace.com/works...anks-rrsb.html.) I promised in that post I would share with you my method for getting the blanks you cut to a uniform and predefined thickness. I do not have a drum thickness sander which can run into the multi-hundreds or even thousands of dollars. I simply use my drill press.
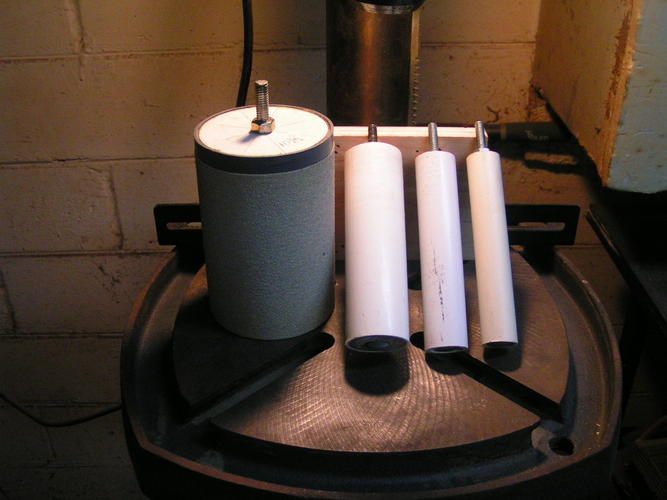
The primary thing you need is a sanding drum. You can make these out of any hollow tube strong enough to handle the job (i.e.: not a cardboard tube). I use PVC or similar pipe. My primary sanding drum is made of a 3" PVC thin wall. Next time I will use thick wall. Here are pictures of the pieces. The carriage bolt needs to be long enough to span the entire length of the PVC cylinder and leave enough left over to chuck into the drill press.
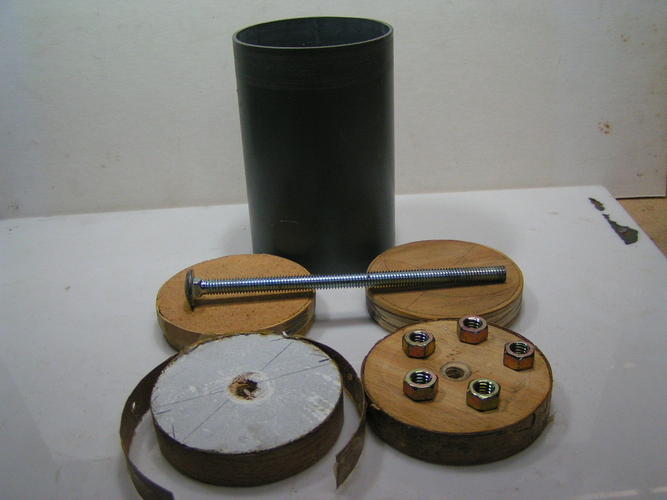
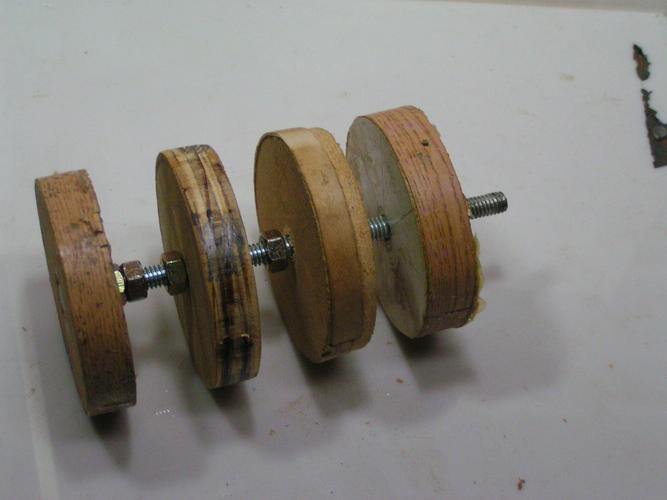
This is way overkill. My first prototype was only two discs. I got over exuberant one day and was sanding a lot of items in the same spot. The heat caused the PVC to melt and cause a concavity. Like I said, I will use thick wall PVC in the future. But as a stop gap (since I have no 3" thick wall on hand) I doubled up on the discs. Notice the wrappings around the discs. I did not factor in the saw kerf. The difference between a professional and a craftsman? The professional would get it right the first time or if he erred, he would start over again. A craftsman knows how to fix his mistakes or at the very least, to hide them. So I used some cabinet maker's edge banding and thin pieces of wood to make the circles fit. Here is the mock up of the assembled parts before inserting them into the PVC. Two nuts lock together to fix the bottom so it does not rotate. The carriage bolt has been drawn into the wood by tightening the nuts. The interim nuts are simply to stop the disc at the proper level when gluing up. The top nut is to keep the whole unit from spinning when the disc is in use. All discs are glued into place. Here is the assembly before inserting into the cylinder:
While you are at it, you may as well make up a number of drums. The smaller drums are much easier to make with a circle cutter. The drill cutters that are completely round, Not the cutter that has only one blade. If the cutter blank is too large, simply use a short carriage bolt and nut to fasten them together and chuck into your drill press and sand to the correct diameter.
Here is the set up for using the sanding disc.
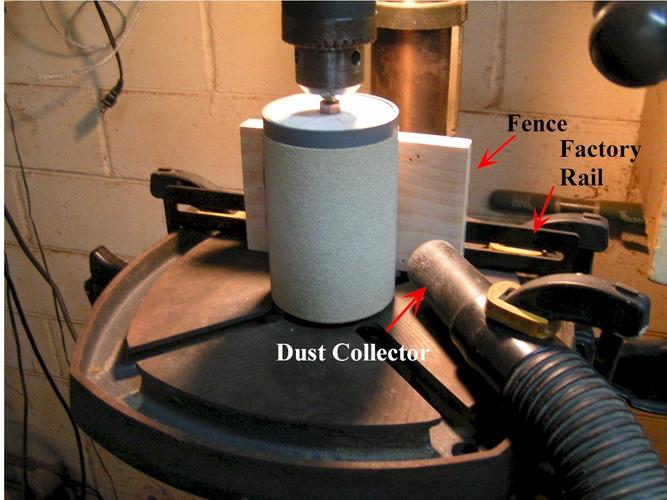
The fence MUST be as square to the sanding disc as possible. Do not be a dunce like me and think that screwing a piece of wood to the the factory rail will suffice. The rail is NOT square to the table!!. I learned the hard way. Take the time to make a fence that is square to the table! I put each piece through twice, turning it end for end to minimize any variation of the fence. No matter how square your fence is, putting the pieces through twice in the manner specified will diminish any fence variation.
As far as the vac dust collector, it is a MUST unless you want to be cleaning your shop for a week of all the saw dust this procedure can produce. Place the vac hose as close to the in feed side as possible without interfering with the sanding process. The in feed side is ALWAYS from the right as you are facing the drill press. The drum is turning clockwise and you want to feed into it. This will give you resistance. If you feed the other way, there is no resistance and in fact the drum tries to grab the piece and fling it at the earliest opportunity.
So how good is this process? How accurate can you be? How about thinning a piece of wood to 1/32"?
I am in the process of finishing a set of scales that have a 1/32" liner and 3/32" of wood. Not bad for a Redneck set up!
WARNING WILL ROBINSON! DANGER! There are some things to be mindful of. First and foremost is that you can damage your drill press if you are too aggressive You should only remove approximately 1/32" per pass. Any more and you can possibly damage your drill press. The press is designed for vertical pressures, not horizontal. Trying to remove too much material in one pass WILL affect your press bearings. Be patient! I set up the fence initially so that the piece of wood is just kissing the sander disc. I run the piece through. Then I use my 4 oz. ball peen hammer to tap on the out feed side of the fence to move the fence closer to the sander. One or two taps is all that is necessary. If you start feeding the material in and get too much resistance, tap the out feed side to open up the space. Second, the sanding drum will throw a piece of wood 15 feet if you do not have a firm grasp on it on the out feed side!
The process really is not dangerous or harmful to your drill press if you only use a little caution, sense and take your time. If you do, you will save a whole lot of hand sanding and get uniform results for your scales and liners.
Randyrandydance062449 and Geezer like this.Tell me and I forget. Teach me and I remember. Involve me and I learn. Ben Franklin
-
The Following 3 Users Say Thank You to WhiteLion For This Useful Post:
Geezer (10-08-2012), Havachat45 (10-10-2012), skipnord (10-08-2012)
-
10-08-2012, 03:33 PM #2
You have covered the subject well and let us know the problems/goof-ups to be found. You gave a very nice explanation and presentation of the information.
 Originally Posted by WhiteLion

Thank you
~RichardWhiteLion likes this.


 Reply With Quote


