Results 1 to 10 of 10
Like Tree16Likes
  • 1 Post By bongo
  • 3 Post By tiddle
  • 2 Post By Voidmonster
  • 1 Post By Voidmonster
  • 2 Post By Martin103
  • 7 Post By Jingles8D

Thread: Wade & Butcher Diamond Edge - First Restore Effort

  1. #1
    Junior Member
    Join Date
    Nov 2012
    Location
    Victoria, BC, Canada
    Posts
    10
    Thanked: 0

    Default Wade & Butcher Diamond Edge - First Restore Effort

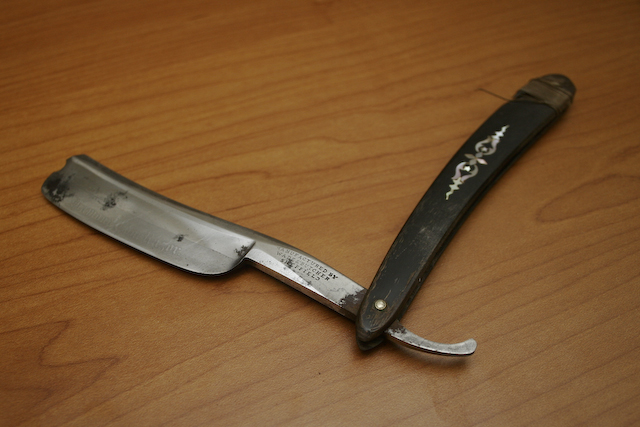
    Well, here I go with my first restoration attempt. I picked this Wade & Butcher Diamond Edge up off the bay inside an old paddle strop with a storage drawer.
    Name:  Ebay_Razors-15.jpg
Views: 1094
Size:  214.9 KB

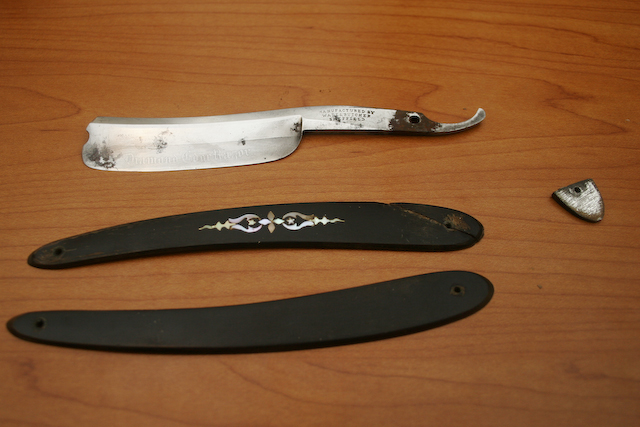
    It's got some pitting, but is in generally good condition. The biggest troubles faced in this restoration appear to be trying to keep the etching, and whether or not I can save the scales. If I can't save the scales, I'd at least like to save the inlay. It's a black horn handle, looks like a steel wedge, and the last 3/8 of an inch are VERY light almost satin finish with "Diamond Edge Razor" clear inside the satin.

    The Parts Disassembled:
    Name:  WBDE_Restore-1.jpg
Views: 876
Size:  223.6 KB

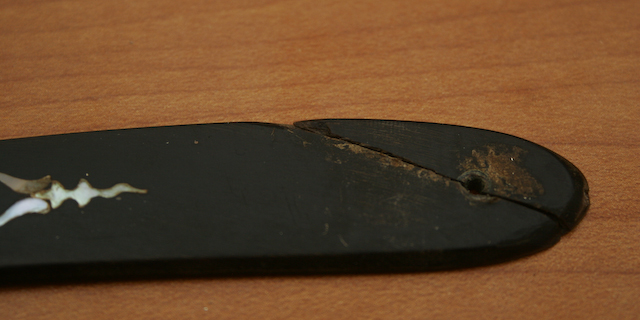
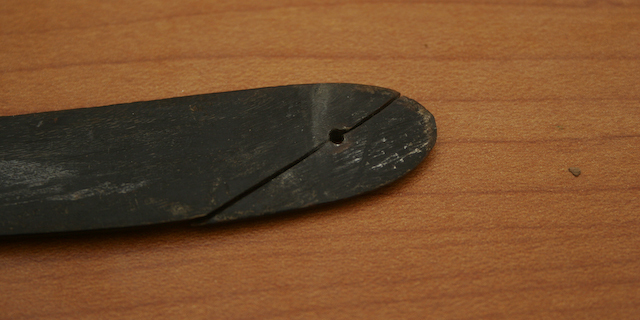
    Scale Damage:

    The scales appear that they may have been overtightened at one time, as the split is right through the pin hole. Hard to say what caused it, but now there are small fragments missing. I'm not sure how I would fill the gap, if I were to stick the parts back together. I'm going for a "as near to new" appearance as I can get.
    Name:  WBDE_Restore-2.jpg
Views: 687
Size:  160.1 KBName:  WBDE_Restore-3.jpg
Views: 671
Size:  183.6 KB

    Blade Before:
    With the blade fresh out of the scales, I found, significant rust around the pivot, and a lot of black marks. The black marks protruding into the etching on the front side of the blade are going to be a problem. I'm thinking that I'll mask off the writing when it comes to cleaning that up, and try to preserve it that way... I have a few other ideas, but we'll see as I progress.

    Well, my impatience got the best of me, and I attacked the blade with my dremel and polishing compound since I couldn't wait for the shop to open in the morning and pick up some sandpaper. I went at it for about an hour for my first effort, being careful not to overheat the blade. Overall, I'm happy with the start this gave me, but upset at myself 'cause I was free-handing it and slipped taking a nick out of the edge near the toe. That'll teach me! Fortunately a honing stone is on my Christmas list, and it wasn't a gigantic nick, though it is larger than I would have liked... For that matter, any nick is larger than I'd like.

    Before/After Attacking with a Dremel:
    Name:  WBDE_Restore-4.jpg
Views: 635
Size:  101.2 KB
    Name:  WBDE_Restore-7.jpg
Views: 620
Size:  87.9 KB

    Name:  WBDE_Restore-5.jpg
Views: 623
Size:  94.9 KB
    Name:  WBDE_Restore-6.jpg
Views: 627
Size:  94.1 KB

    I'll update after I continue hand-sanding and see where I get!

  2. #2
    Senior Member bongo's Avatar
    Join Date
    Dec 2012
    Location
    Perth, West Australia
    Posts
    1,431
    Thanked: 497

    Default

    That's going to look lovely !!
    Have you considered 'soaking' it overnight in something ?
    The humble WD40 should loosen some of the rust without hurting it.
    I'm looking forward to seeing the finished razor.
    Bazz likes this.

  3. #3
    Senior Member tiddle's Avatar
    Join Date
    May 2012
    Location
    Oxford, Al
    Posts
    1,605
    Thanked: 407

    Default

    Its coming along nicely. Epoxy could be used to help piece it back. Best advice, when it comes to hand sanding...DO NOT GET LAZY! When i had sand up to 220 after the dry sanding at each grit after I go back and wet sand at that grit level. If you half ass your lower grits it will leave what looks like deep gouges in the blade after your final polishing. Just want to save you the same headache I had on my first restore ya know.
    Mastering implies there is nothing more for you to learn of something... I prefer proficient enough to not totally screw it up.

  4. The Following User Says Thank You to tiddle For This Useful Post:

    Geezer (11-08-2015)

  5. #4
    Captain ARAD. Voidmonster's Avatar
    Join Date
    May 2011
    Location
    Pacifica, CA
    Posts
    2,474
    Thanked: 2226

    Default Re: Wade & Butcher Diamond Edge - First Restore Effort

    Here's how you fix horn that's broken like that.

    You're going to need some stuff. Cyanoacrylate glue (superglue) -- preferably the thinnest you can find, sandpaper (check auto part stores for this, you want a good progression from 150 to 2000 grit), a piece of donor horn -- you're going to make a bunch of horn powder with this so use something you don't mind killing, and finally a bottle of India black ink.

    First you've got to figure out if it's warped. Things get more complicated if it is, because then you're going to have to learn how to heat and form it and that's beyond the scope of a simple repair how-to.

    If it's just snapped superglue is how you're going to fix it, but you have to prepare.

    First, wash it with an old toothbrush and dishwashing soap. Clean it very, very thoroughly. (At this point, I use an ultrasonic jewellery cleaner -- if you're going to do much restoration, I really highly recommend one).

    Let it dry. Use patience, not heat, or you'll warp the scales.

    Put a tiny amount of glue along the crack and very carefully put the pieces together. Cyanoacrylate bonds more enthusiastically to horn than it does to you. The instant the pieces touch, they'll bond.

    Use a low grit grinding head on the dremel to make a bunch of horn dust from your donor horn (either from a broken razor or a cow horn) the coarser the pieces you use, the stronger the bond will be. Fill thew gaps with the horn dust then carefully drip CA glue onto it. It'll wick down in. Drip it until it stays wet on the top.

    Let that dry.

    Sand it down to be even with the surrounding scales, put India ink on it, then fill the gaps again. You might do this a few times before the cavities are gone.

    For the final round, rough up the whole area around the repair, paint it with the ink then put a thin coat of glue on.

    Finally, sand it all to a nice polish. There are good threads here on sanding.

    You will probably need to re-drill the pin hole, and your fingers will be covered with glue. You can safely sand it off. Really!
    Last edited by Voidmonster; 12-22-2012 at 04:31 PM.
    Jingles8D and Chevhead like this.
    -Zak Jarvis. Writer. Artist. Bon vivant.

  6. The Following 2 Users Say Thank You to Voidmonster For This Useful Post:

    Baxxer (12-22-2012), skipnord (12-22-2012)

  7. #5
    Captain ARAD. Voidmonster's Avatar
    Join Date
    May 2011
    Location
    Pacifica, CA
    Posts
    2,474
    Thanked: 2226

    Default Re: Wade & Butcher Diamond Edge - First Restore Effort

    Also, if you can't find any donor horn, you can use your own (or someone else's as long as you ask very nicely indeed) hair. Just be sure it's cut into very short pieces and is very clean -- no conditioner or shaving cream. Natural body oil is good, that helps the glue, but soap and hair product does the opposite.
    Chevhead likes this.
    -Zak Jarvis. Writer. Artist. Bon vivant.

  8. #6
    Historically Inquisitive Martin103's Avatar
    Join Date
    Aug 2011
    Location
    Upstate New York
    Posts
    5,780
    Thanked: 4249
    Blog Entries
    1

    Default

    Thats very good advise there from Zak, also it is the main reason why you never throw away any pieces of scales wedges etc for repairs.
    Another thing is you going to sand the scales anyway so you could use the dust from it to fix the broken piece or fill any worm holes. That way you hace a perfect color match!
    Good luck!
    Geezer and Chevhead like this.

  9. #7
    Senior Member Havachat45's Avatar
    Join Date
    May 2011
    Location
    Redbank, Queensland, Australia
    Posts
    1,639
    Thanked: 291

    Default

    I was watching this one too - I'm glad someone here got it.
    Hang on and enjoy the ride...

  10. #8
    Junior Member
    Join Date
    Nov 2012
    Location
    Victoria, BC, Canada
    Posts
    10
    Thanked: 0

    Default

    Thanks both for the advice... I have a "lot" of straights coming that I bought cheap on the bay... I may have some donor horn in there. In the meanwhile, I'll be concentrating on refreshing the blade. The more I look at it, the more I think that I'll lose the original etching. However, I'll be documenting it well enough that I may be able to recreate it sometime down the line.

  11. #9
    Junior Member
    Join Date
    Nov 2012
    Location
    Victoria, BC, Canada
    Posts
    10
    Thanked: 0

    Default

    Well, 3 years have gone by while this project got benched. I'm back at it now. Here's a few photos of the sanding progress. I started with 220, but had to move down to 150 because of some of the deep pitting. I unfortunately lost the etching, but plan to re-etch after I'm done. I have some good photos to work with, and a good hand at calligraphy, so should have no problem duplicating the writing. Some minor pits left, and I'm not sure if I should keep going to sand them out, or just live with them on the finished product.

    Name:  IMG_2282.jpg
Views: 232
Size:  53.2 KB
    Name:  IMG_2283.jpg
Views: 251
Size:  61.5 KB
    Last edited by Jingles8D; 11-07-2015 at 11:31 PM.

  12. #10
    FAL
    FAL is offline
    < Banned User >
    Join Date
    Jul 2015
    Location
    Central Oregon
    Posts
    789
    Thanked: 98

    Default

    Looking Good Jingles, ya have a great start on it.

Posting Permissions

  • You may not post new threads
  • You may not post replies
  • You may not post attachments
  • You may not edit your posts
  •