Results 1 to 10 of 32
-
01-07-2013, 03:54 AM #1
 W&B- My first Regrind- Work in progress
About 3 months back i took a risk on the bay and got burned on a w&b suprise package. This pics where terrible and nobody was bidding so for 20$ and free shipping i picked it up hoping for gold. What i got was doo doo. Huge frown, honed to the bone. Scales as crooked as a questtion mark. I took it and tossed in in my tool bin as i did not have the heart to chuck it.
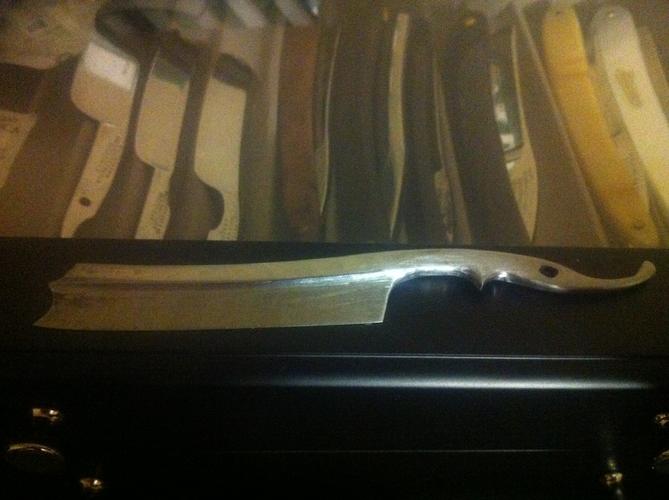
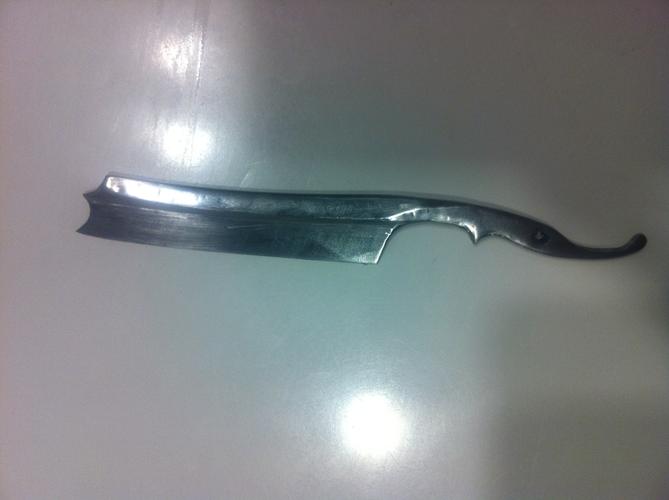
Then i thought, hey maybe this could be something... so i pulled out my sharpie, a dremel and an hour and a half later now i have this. I am actual pretty impressed with the result so far and the pic dont really do it justice but heres what i got so far. unfortunatly i do not have a before pic as i sort of planned for failure. please leave me some tips / feed back! i love regrinding... think im gonna take it up and buy some more junkers to save!!

-
The Following User Says Thank You to JoeLowett For This Useful Post:
Geezer (01-08-2013)
-
01-07-2013, 04:34 AM #2

That is one funky looking blade. Do you have a before pic? It would be cool to see what this evolved from.
How did you cool the blade while grinding? I thought about taking a dremel to one of my beat up ebay specials that came in a lot just to see what I could do with it, but never did as I was worried about wrecking the temper with heat.
And be careful with that point around your ears!
It was in original condition, faded red, well-worn, but nice.
This was and still is my favorite combination; beautiful, original, and worn.
-Neil Young
-
01-07-2013, 04:38 AM #3Senior Member


- Join Date
- Jan 2011
- Location
- Roseville,Kali
- Posts
- 10,432
Thanked: 2027
Funky looking my arse,looks like a thing of beauty (in the rough)
-
The Following User Says Thank You to pixelfixed For This Useful Post:
JoeLowett (01-07-2013)
-
01-07-2013, 04:40 AM #4
-
The Following User Says Thank You to Cangooner For This Useful Post:
JoeLowett (01-07-2013)
-
01-07-2013, 04:41 AM #5

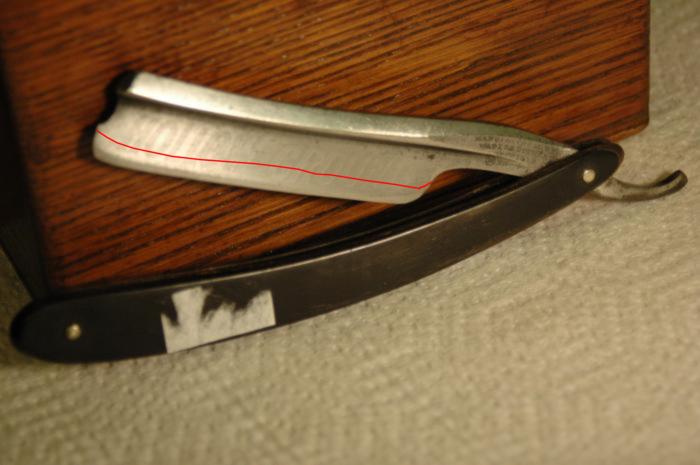
I used a cup of water to coor the blade. Any time i felt it getting warm i dipped it. Yeah that point is mean, but i couldnt resist going a little sharp there. As for a before i forgot to take a before because working on this project just sort of happend randomly, i wasnt planning on doing this so i didnt think to take a before pic. however here is a pictur of the blade in much better, and larger shape. This one was hone half wat through the letting/etching on the face of the blade about 1/8 or less away from the barbers notch. i drew a red line to show you the frown as it was an how much of the blade was missing.Below that i posted a second angle of the blade. Still rough, needs to be refined.


Last edited by JoeLowett; 01-07-2013 at 04:58 AM.
-
The Following User Says Thank You to JoeLowett For This Useful Post:
Geezer (01-08-2013)
-
01-07-2013, 05:19 AM #6Historically Inquisitive


- Join Date
- Aug 2011
- Location
- Upstate New York
- Posts
- 5,782
- Blog Entries
- 1
Thanked: 4249
Really impressive! blade looks great, very unusual, i surely hope it will take an edge, and post your progress!
-
01-07-2013, 05:25 AM #7

Thanks, will do. I hope it will take an edge too, i dont think i messed up the blades temper, i made sure to keep it cool to the touch. The blade edge itself i had to bread knife to fix the horrible frown, and at the depth the blade is currantly at it is still suprisingly thin. The faux frame back is def thinner then it was from the facroty, prob reduced by half but it still should give enough angle on a hone to take a new bevel easy enough and as we all know taking and holding an edge on an old sheffield blade of that era should not be a problem, provided i did not burn the blade on the wheel.
-
01-07-2013, 05:48 AM #8

Good luck finishing that thing up-- that thing is very cool by the way (medieval/futuristic?). That is certainly one way to do a custom!
Kudos on the guts to try something. I am sure a lot of people would just be disheartened and that blade would have sat in the drawer untouched.
-
01-07-2013, 06:05 AM #9

Thank you. What your saying is true. I had no intentions to touch this blade, i figured its shot thats it and nearly forgot about it. Then once i starting futzing around with the dremel 4000 i got a little confident and next thing i knew i was grinding hald the blade away. This razor did have an inspiration, no quite medval and the oposite of futuristic. I took inspiration from a w&b ottoman egyptian and royal windsor razor which was prob made some where in the 1850 range. The addition of the deep curved thumb notch with the 'point' or thorn between the tang and pivot as well as the sharp point and redesigned tail mimiced the appearance of that razor. In the end the two razor look nothing alike! hahha
-
01-07-2013, 07:05 AM #10Senior Member


- Join Date
- Nov 2012
- Location
- Across the street from Mickey Mouse in Calif.
- Posts
- 5,320
Thanked: 1185
Looks cool. A JL custom by the time your done with it. Your going to have to learn to etch your name in it. Well, after you get some new scales on it.
Good judgment comes from experience, and experience....well that comes from poor judgment.


 20Likes
 LinkBack URL
 About LinkBacks


 Reply With Quote


