
Results 11 to 16 of 16
 2Likes
 LinkBack URL
 About LinkBacks
-
02-05-2013, 01:17 AM #11Senior Member


- Join Date
- Sep 2012
- Location
- Washington DC Metro
- Posts
- 165
Thanked: 18
Soaking them in water may prove to only be a temporary fix. They may start cracking again once they start drying out again. I agree with an earlier poster that some neatsfoot oil would be a worthwhile effort. I would like to compare that with getting a good moisturizer for your dry hands as opposed to just soaking them in water hoping that cracks and dry skin will go away because they get hydrated.
And whatever you do, let them dry very slowly. Maybe put them in the fridge or something.
-
The Following User Says Thank You to Storsven For This Useful Post:
10Pups (02-05-2013)
-
02-05-2013, 06:24 AM #12Senior Member


- Join Date
- Nov 2012
- Location
- Across the street from Mickey Mouse in Calif.
- Posts
- 5,320
Thanked: 1185
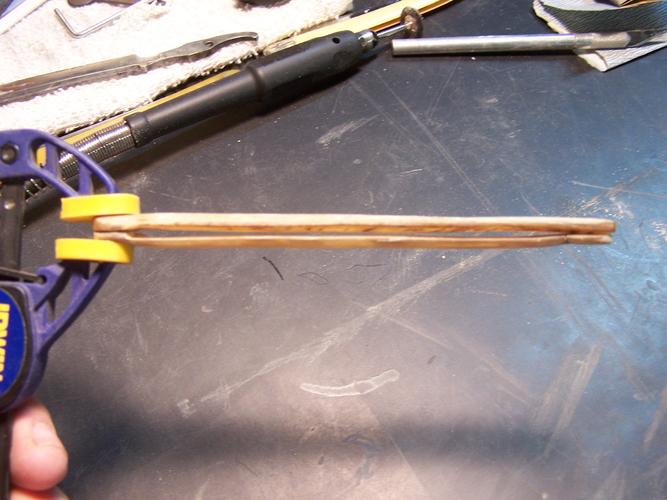
Point taken on the neatsfoot oil. I started with water in hopes of using an adhesive on some of the cracks first. Then I was thinking of using the neatsfoot oil after the scales dried and the glue set. I was also thinking put the oil on and put them back in the press for a week or so. I wonder if I should sand the scales smooth before putting the oil on. Then there is the matter of finish/sealing.
Good judgment comes from experience, and experience....well that comes from poor judgment.
-
02-05-2013, 12:24 PM #13Senior Member
- Join Date
- Sep 2012
- Location
- Washington DC Metro
- Posts
- 165
Thanked: 18
I found a link to working with horn that could be useful. Using and working with Horn - Making a Drinking Horn
-
The Following User Says Thank You to Storsven For This Useful Post:
10Pups (02-06-2013)
-
02-05-2013, 06:40 PM #14Senior Member

- Join Date
- Apr 2012
- Location
- Diamond Bar, CA
- Posts
- 6,553
Thanked: 3215
If you really want to save the originals, I like Charlie’s idea scarfing a piece on the pivot end and using a liner, Aluminum, Brass or Carbon fiber. I would use some Buffalo for contrast or color, kind of like a 55 -56 Belair.
-
The Following User Says Thank You to Euclid440 For This Useful Post:
10Pups (02-06-2013)
-
02-06-2013, 01:21 AM #15Senior Member
- Join Date
- Nov 2012
- Location
- Across the street from Mickey Mouse in Calif.
- Posts
- 5,320
Thanked: 1185
That is a cool article thanks. Originally Posted by Storsven

" If you really want to save the originals, I like Charlie’s idea scarfing a piece on the pivot end "
I kinda get the idea of scarfing but not exactly sure how to go about that. What do I carve out a layer and cut a piece to fit in on both sides? The liner idea is formulating in my head and I thought about some bolsters over the ends also. Most of my metal work experience has been with BIG iron. Truck beds, tractors, 1/2" 3/4 " plate etc. This working under a magnifying glass is all new but very interesting :<0)Last edited by 10Pups; 02-06-2013 at 01:25 AM.
Good judgment comes from experience, and experience....well that comes from poor judgment.
-
02-11-2013, 05:04 AM #16Senior Member
- Join Date
- Nov 2012
- Location
- Across the street from Mickey Mouse in Calif.
- Posts
- 5,320
Thanked: 1185
This has never happened to me before ,that I can remember ,but the more I work on these the less I like them. It's like they don't match at all. I got them mostly straight and the cracks even closed up. But the 1 side has spots and the other looked more grainy. The side with spots looked as if 1 layer had flaked off and was a lot thinner than the other. I started to sand and the spots got lighter and almost went away but then the other side still had that top layer and underneath that it is a lot darker.
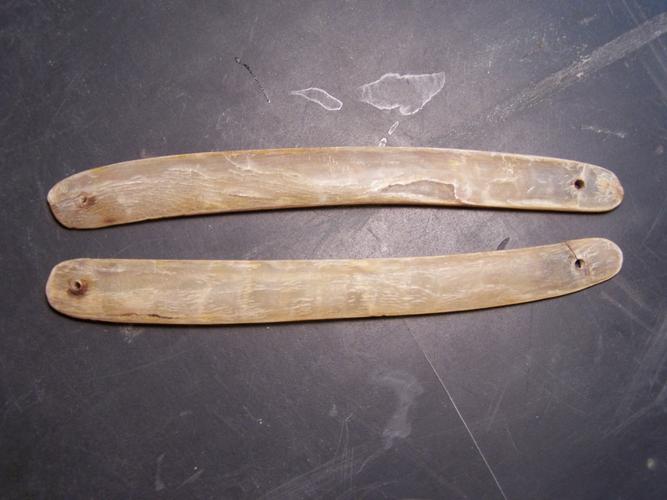
I am not going to stop playing with them but if they don't start looking better color and pattern wise they will just be a learning experience in horn. I did purchase some Gorilla epoxy. It was clear so I think I will give it a try after some more sanding to see what it does. There is also 2 more places on the cracked side that need to be straightened if I am going to use them. I am going to have to find some close ups of horn to see what they are supposed to look like :<0).
 Good judgment comes from experience, and experience....well that comes from poor judgment.


 Reply With Quote