
Results 11 to 20 of 32
 3Likes
Thread: wet dry sandpaper for a restore
 LinkBack URL
 About LinkBacks
-
03-16-2013, 10:55 PM #11Senior Member


- Join Date
- Nov 2012
- Location
- London, UK
- Posts
- 810
Thanked: 70
May I borrow this thread a moment? You're asking pretty much the same question as I want to.
I've just picked this up off eBay with the intention of trying my hand at some light restoration:
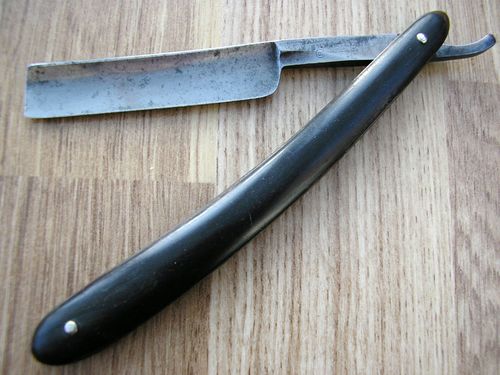
I have two questions:
1. What grit sandpaper do you reckon I want to start at? On one of the how-to threads, a really coarse grit was mentioned but here the consensus seems to be that you don't want to start too low.
2. This might be a funny question but will it be absolutely necessary to take the scales off? I wasn't really planning to and I don't want to crack them by accident, either...but it would be a shame to do a half-arsed job by sanding around them, too.
-
03-16-2013, 10:58 PM #12Senior Member

- Join Date
- Jun 2012
- Location
- Long Island/Queens N.Y.
- Posts
- 1,035
Thanked: 74
Before u start sanding, try maas. My razor was alot worse i started at 220..
-
03-17-2013, 01:52 AM #13Senior Member


- Join Date
- Jul 2012
- Location
- Chicagoland - SW suburbs
- Posts
- 3,810
- Blog Entries
- 1
Thanked: 734
Check out Amazon. I picked up a package of various grit papers from 1000 to 2500. I cleaned up one wit some minor rust on the spine. If youre having a hard time finding it, try Amazon.
-
03-18-2013, 11:34 AM #14Senior Member
- Join Date
- Nov 2012
- Location
- London, UK
- Posts
- 810
Thanked: 70
I've found an assorted pack of the following grits:
120, 240, 400, 800, 1200, 1500, 2000, 2500
Does that sound like a suitable progression? Maybe start sanding from 240 upwards?
Also, what do you guys think about the scales? I didn't want to have to go to the trouble of repinning the scales but my head is telling me to do it for the sake of a job well done...
-
03-18-2013, 11:53 AM #15RazorBase DB application developer
- Join Date
- Jan 2012
- Location
- West Midlands, UK
- Posts
- 299
Thanked: 67
That set of grits should be enough, unless you want a mirror finish, in which case micromesh is your best bet. 2500 should leave a nice shiny satin finish, you'll only be able to see the scratches in very strong light/under magnification.
I'd try starting at 400, and only go to 240 if there is pitting/scratching which is obviously too deep to remove with 400.
If you don't unpin, you won't be able to get right up to the scales with the sandpaper. But it's not hard to crack the scales trying to unpin a razor, so there's a risk involved. Have you considered putting tape round the tang and just polishing the blade itself, leaving a sort of 2-tone razor?
-
03-18-2013, 12:10 PM #16Senior Member
- Join Date
- Nov 2012
- Location
- London, UK
- Posts
- 810
Thanked: 70
Ok, thanks. I'll start from 400.
Polishing the blade only is a cool idea, it not really thought of it. Maybe I'll wait until the razor arrives and make a decision from there, once I've seen it myself.
-
03-18-2013, 01:33 PM #17Senior Member
- Join Date
- Jun 2012
- Location
- Long Island/Queens N.Y.
- Posts
- 1,035
Thanked: 74
Mayb im.wrong but dont u.work.up.from.the 240 to.the finer grits to.remove scratches..
-
03-18-2013, 02:16 PM #18Senior Member
- Join Date
- Mar 2012
- Posts
- 273
Thanked: 43
Because you don't have experience to look back on, try something like 400 on the back of the spine and then remove the 400 grit scratches with 600.
The spine area is way easier to sand and a flat blocking to accomodate the sandpaper is easy to come up with.
I have used the hard erasers that school kids use for backing the sandpaper. It is cheap and easy to grind to the proper shape to accomodate the curveature with coarse sandpaper.
After you sand a small area with 400, remove those scratches with the 600, and you will find the degree of hardness and toughness that the blade offers.
With that lesson learned you might decide that you don't want to go any coarser then 400.
If you start with 220 you will be stuck with removing those relatively deep scratches or accept them residing on your blade.
If your blade is very thin at the edge 220 won't work there but can be used where the metal is thicker.
For me if I need coarser than 600 at the bevel area I tend to want to pass on restoring that blade unless it is a half hollow or a wedge, and then it can be harder to decide.
Good luck to you and be ready for some really sore fingers.
-
03-18-2013, 02:45 PM #19Senior Member
- Join Date
- Nov 2012
- Location
- London, UK
- Posts
- 810
Thanked: 70
Nice post. Thanks!
-
03-18-2013, 02:53 PM #20
Doesn't have to be wet dry.
I find normal 'dry' on linen to be the fastest in metal removal. You can use WD40 to prevent it from loading up with swarf.Til shade is gone, til water is gone, Into the shadow with teeth bared, screaming defiance with the last breath.
To spit in Sightblinders eye on the Last Day


 Reply With Quote

