
Results 1 to 8 of 8
 1Likes
 LinkBack URL
 About LinkBacks
-
05-05-2013, 10:02 PM #1Senior Member


- Join Date
- May 2010
- Location
- Upstate South Carolina
- Posts
- 3,308
Thanked: 987 Joseph Elliot: Rough Blade-How to Proceed?
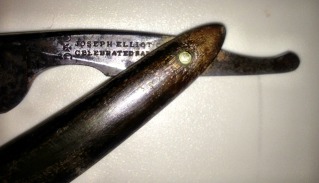
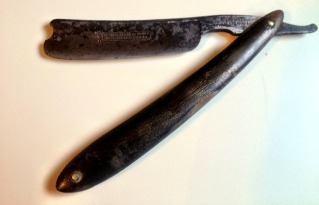
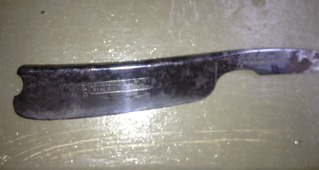
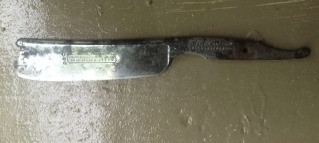
Hi All-Since I'm already building a complete knife-making workshop for my son's budding hobby (hopefully a business!), I'm also looking to get into razor restorations. With that in mind, I just acquired this "
somewhat rough" Joseph Elliott Celebrated pictured below:
.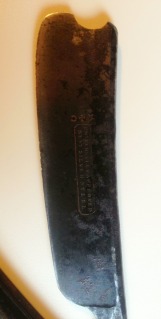
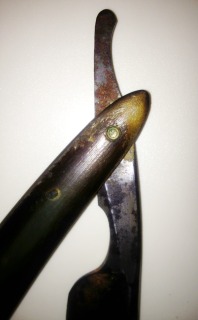
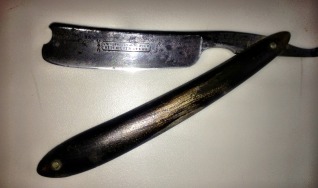
These are the Before pics. It says Universally Approved Best Silver Steel on the blade face. Hone wear is light/moderate, though the edge has a fair amount of chipping (though I don't see the rust/pitting into the edge). There is some red rust, as well as a good amount of black tarnish, "devil's spit," and pitting here and there. The horn scales have some bug bites and seem to be delaminating. After unpinning and working on it with Mother's to see what lay underneath, here is what it looks like:

I have a few questions about it: Any information on this particular blade would be appreciated-dates, history, etc. But also:
1. Should I try to preserve the scales? I just got a whole box-full of cutoffs from a custom woodworker friend (various burls, rosewood, walnut, cherry, etc.). I may try my hand at scale-making, and will gladly get some of it stabilized if I think I can use some of this free treasure trove!
2. I'm watching the Brad Maggard/Undream restoration videos, and may just try to take this thing through the grits on the buffers. Is it too far gone, or can I get a lot of that out? I don't mind preserving some "character" if it will help me preserve the stamping.
3. The pin-hole on the tang is kinda worn. Will a 1/16" pin work? Inside washers? I am slowly practicing my peening on other razors.
My goal is to sort of learn the whole process as I go on razors like this. I never was smart enough to do one step at a time, and as I'll have my summer off (one benefit of teaching!), a workshop with all the tools, and hopefully the patience and wisdom to learn from my mistakes, any advice?
TIA for any thoughts! Aaron
-
05-06-2013, 02:07 AM #2Sinner Saved by Grace

- Join Date
- Jul 2012
- Location
- Corning, CA
- Posts
- 598
Thanked: 133
Lots of potential and work there. I would try very hard to save the etch/stamps and original scales.
Jonathanonimaru55 likes this.
-
The Following User Says Thank You to Datsots For This Useful Post:
ScoutHikerDad (05-06-2013)
-
05-06-2013, 04:00 AM #3The Great & Powerful Oz


- Join Date
- May 2008
- Location
- Bodalla, NSW
- Posts
- 15,636
Thanked: 3751
Just one thing re Devil's spit . It aways runs deep & rarely will the black tarnish disappear. If it does, you can guarantee any blade etch will go with it. If you want to keep the etch your restoration centres around how much loss can accept. Hopefully you don't similar rust near the edge for obvious reasons.
Delaminating horn scales can be repaired. Epoxy & then neatsfoot has always been my choice but I can't help wondering if heat can rejoin the laminations. Never tried it so YOYO unless someone chimes in with experience.The white gleam of swords, not the black ink of books, clears doubts and uncertainties and bleak outlooks.
-
The Following User Says Thank You to onimaru55 For This Useful Post:
ScoutHikerDad (05-06-2013)
-
05-06-2013, 04:47 AM #4Senior Member


- Join Date
- May 2011
- Location
- Redbank, Queensland, Australia
- Posts
- 1,639
Thanked: 291
Aaron,
I'm afraid that this one is too far gone - please send it to me and I'll get rid of it for you....
Seriously though, looking at the photos, I've bought worse ones than this back to life - I'd go the hand sanding route.
Good luck with it and let us see the final resultHang on and enjoy the ride...
-
The Following User Says Thank You to Havachat45 For This Useful Post:
ScoutHikerDad (05-06-2013)
-
05-06-2013, 10:46 AM #5Senior Member
- Join Date
- May 2010
- Location
- Upstate South Carolina
- Posts
- 3,308
Thanked: 987
Thanks for the thoughts, Gents!
-
05-07-2013, 12:11 AM #6The Great & Powerful Oz
- Join Date
- May 2008
- Location
- Bodalla, NSW
- Posts
- 15,636
Thanked: 3751
Here's a couple of links may be of help.
http://straightrazorpalace.com/works...le-repair.html
http://straightrazorpalace.com/works...-repair-2.htmlThe white gleam of swords, not the black ink of books, clears doubts and uncertainties and bleak outlooks.
-
05-09-2013, 03:19 AM #7Senior Member

- Join Date
- Nov 2012
- Location
- Utah
- Posts
- 128
Thanked: 18
The stamping on that Joseph Elliot blade looks faily deep. This is a good thing if you are going to attempt to remove the "bad" on the blade. If it were me I would start with about a 400grt compound and see where that gets you. I always start light and see just how deep some of that pitting really is. If you have removed the shell of the devils spit you can tell how deep you will need to go to make it look new. I personally do not think that blade is gone for good. It could be saved. Go slow and see what you want to do. I would try and save the stamp on the face if it were me. A little staining and pitting will not hurt that blade as long as it is not at the bevel.
These older razors do not have a perfect 1/16 hole on them. The older they are the more "wollering" there will be. Put a thrust washer on both side of the 1/16 pin you will use or go with a bigger size. Its up to you and how big the hole is. 1/16 should be fine as long as it is pinned tight.
I look forward to seeing your progress.
Stoney
-
05-09-2013, 06:44 AM #8aka shooter74743


- Join Date
- Sep 2009
- Location
- SE Oklahoma/NE Texas
- Posts
- 7,285
- Blog Entries
- 4
Thanked: 1936
Nice blade to give some new life, but it may not ever look like a new blade. Tumbler method is the easiest on the steel.
Looks like you are going to be making some new scales.Southeastern Oklahoma/Northeastern Texas helper. Please don't hesitate to contact me.
Thank you and God Bless, Scott


 Reply With Quote