
Results 1 to 9 of 9
 23Likes
Thread: Red Mallee burl with TGN 24mm finest 2 band
 LinkBack URL
 About LinkBacks
Hybrid View
-
11-16-2013, 04:01 PM #1I love Burls....... and Acrylic


- Join Date
- Mar 2012
- Location
- Baden, Ontario
- Posts
- 5,475
Thanked: 2284 Red Mallee burl with TGN 24mm finest 2 band
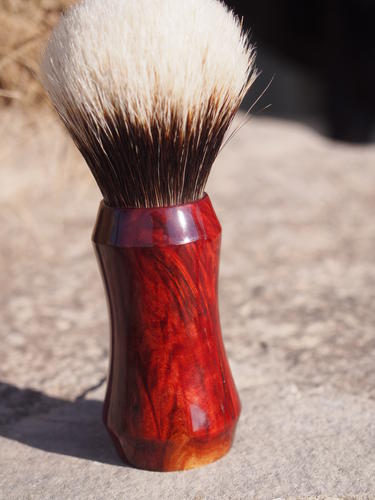
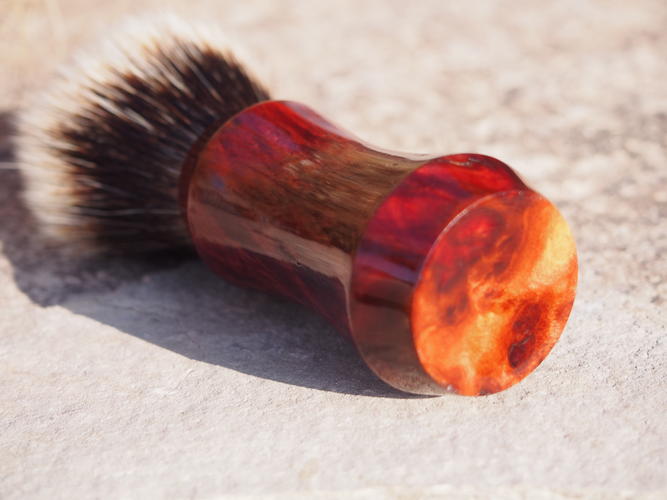
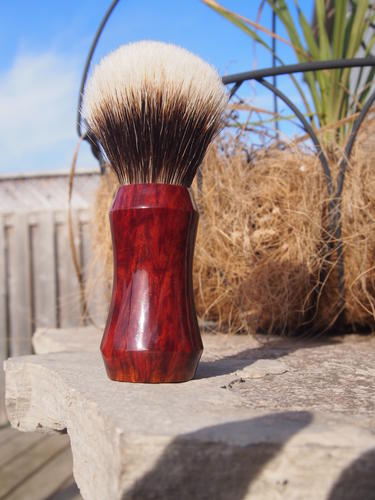
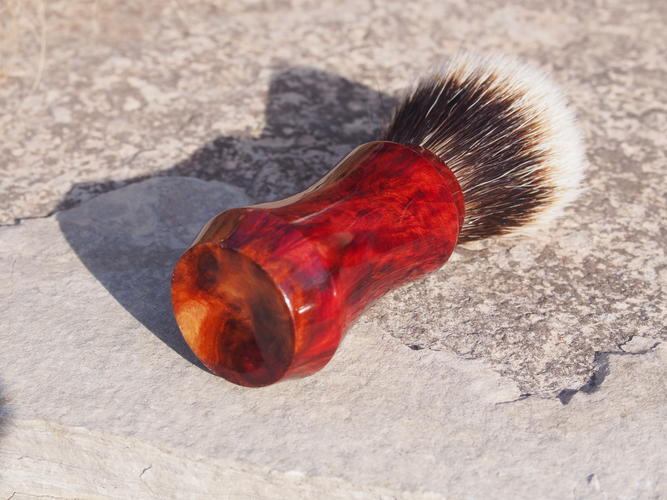
The handle is a nice piece of Australian Red Mallee burl, with a high gloss poly finish. The knot is a 24mm TGN finest 2 band set at 51/52mm loft. The heart wood on this Mallee burl is a super bright red. There's a bit of the sap wood on the bottom that contrasts the red very nicely. Again, I tried to keep the lines of the handle simple, and try not to take away too much from this beautiful wood. I also tried something a bit different and turned a bit of a concave on the bottom.
Hope you guys like it!
 Burls, Girls, and all things that Swirl....
-
The Following User Says Thank You to HARRYWALLY For This Useful Post:
MrMagnus (11-16-2013)
-
11-16-2013, 04:07 PM #2Senior Member

- Join Date
- Aug 2012
- Location
- STHLM
- Posts
- 822
Thanked: 179
Very elegant looking. love the wood and the design. is the wood stabilized or have you coated it with something?
HARRYWALLY likes this.//Magnus
-
The Following User Says Thank You to MrMagnus For This Useful Post:
HARRYWALLY (11-16-2013)
-
11-16-2013, 04:42 PM #3I love Burls....... and Acrylic
- Join Date
- Mar 2012
- Location
- Baden, Ontario
- Posts
- 5,475
Thanked: 2284
All my pieces are soaked over night in wood hardener ( not true stabilizing, but works well.) I fill all cracks or pits with CA while it's on the lathe, before finish sanding. This also works well to fill any gaps that occur in these burls. My final sanding is to 600 grit, then I did 6 coats of sprayed polyurethane sanding with 600 grit in between coats.
I should mention that this piece was fully dry before I used it.MrMagnus likes this.Burls, Girls, and all things that Swirl....
-
The Following User Says Thank You to HARRYWALLY For This Useful Post:
MrMagnus (11-16-2013)
-
11-16-2013, 06:11 PM #4Senior Member

- Join Date
- Jun 2013
- Posts
- 157
Thanked: 19
Awesome, I love the simple lines and the color!
-
The Following User Says Thank You to MandoRob For This Useful Post:
HARRYWALLY (11-16-2013)
-
11-16-2013, 07:20 PM #5Razor Vulture

- Join Date
- Oct 2010
- Location
- Lone Star State
- Posts
- 26,166
Thanked: 8617
Nice and long, this brush must be great in-hand! Good work!
"Don't be stubborn. You are missing out."
I rest my case.
-
The Following User Says Thank You to sharptonn For This Useful Post:
HARRYWALLY (11-16-2013)
-
11-16-2013, 09:32 PM #6Poor Fit
- Join Date
- May 2010
- Posts
- 4,562
Thanked: 1263
That's a great looking brush that looks like it would be very comfortable in hand. The wood has a very unique look to it as well. Nicely done
-
The Following User Says Thank You to Catrentshaving For This Useful Post:
HARRYWALLY (11-18-2013)
-
11-17-2013, 01:11 AM #7Senior Member

- Join Date
- Sep 2013
- Location
- SoCal
- Posts
- 248
Thanked: 48
Would you share your process and products for the wood hardener? Originally Posted by HARRYWALLY

-
11-17-2013, 04:02 AM #8I love Burls....... and Acrylic
- Join Date
- Mar 2012
- Location
- Baden, Ontario
- Posts
- 5,475
Thanked: 2284
Take your wife's Dyson, fill up the canister with minwax wood hardener, plus your hunk of wood. Turn on the Dyson and start feeding your old socks in the nozzle until it clogs up. This will create the vacuum needed to draw that hardener into the pores of the wood.

Here's the real method
I use the canning method just like grandma use to do with her peaches, pears and beets. Simple and works well.
I read this method online a while back on a pen turners forum. Sounded simple so I gave it a go. I've only done 6 or 7 blocks this way, but it seems to work well. SWMBO is not a fan of this method and keeps asking me if there's a better way of doing it. I'm surely not a pro at this, but I think I may be investing in a vacuum chamber. Looks like a lot of fun.
Anyways, heres the method.
I do this outside in the garage on a heat pad I bought from Valuevillage. (thrift store)
Take a mason jar big enough to hold your block of wood, and enough hardener to cover the entire block. I use Minwax wood hardener. You take that and put it in pot of water and start to heat it up, making sure the lid is off. Now this is the part where it can go bad. As soon as you start seeing any bubbles starting to emerge from the hardener, and I mean any sign of a boil starting to happen, remove it from the heat. The boiling point temp of the hardener is a lot lower than water, so boiling happens a lot faster. Tighten the lid up and wait. As it cools it starts to create a vacuum. Next thing you know you'll hear that lid pop, just like when you use to do canning with granny back in the day. The vacuum has been created and the block should start to suck up the hardener.
Some species of wood will obviously take a lot more product in than others, but let it sit overnight or a few days. Pull it out and let it dry afterwards.
I did a lot of reading about this method before I tried it, and it can definitely get real messy in an awful hurry. So caution needs to be had when doing this.
Lets be honest, the easiest way to get stabilized wood is to just buy it that way. I buy most of my wood from an exotic wood store, and most their wood is already stabilized.Last edited by HARRYWALLY; 11-17-2013 at 04:13 AM.
Burls, Girls, and all things that Swirl....
-
The Following 3 Users Say Thank You to HARRYWALLY For This Useful Post:
Adam G. (11-18-2013), irish19 (11-18-2013), walleyeman (11-22-2013)
-
11-22-2013, 12:34 PM #9Always Thinkun

- Join Date
- Nov 2012
- Location
- Grain Valley, Missouri
- Posts
- 818
Thanked: 348
Very nice and thanks for the post. Especially your process. It has renewed my interest in wood handles again!!
RayHARRYWALLY likes this.
-
The Following User Says Thank You to walleyeman For This Useful Post:
HARRYWALLY (11-22-2013)


 Reply With Quote