
Results 1 to 10 of 26
 5Likes
 LinkBack URL
 About LinkBacks
-
12-13-2013, 04:07 AM #1Senior Member


- Join Date
- Apr 2013
- Location
- Houston, TX
- Posts
- 199
Thanked: 28 Looking for advice on brush restoration
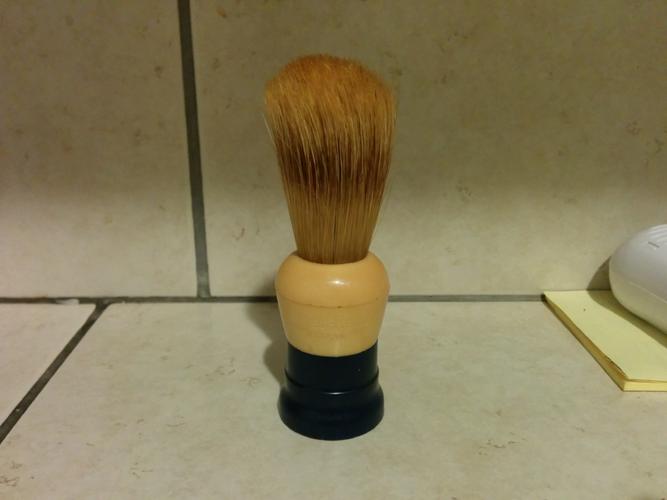
I got my grandfather's Ever-Ready shaving brush. It probably lost 30 hairs when I used it and didn't exactly compare to my synthetic. So, I think I'm going to read through some tutorials and replace the knot.
Anyone have recommendations for particular tutorial type threads that you enjoyed or where to buy the knot? I've only owned boar and synthetic brushes, so will probably make this one a silvertip.
-
12-13-2013, 04:19 AM #2Senior Member


- Join Date
- Nov 2012
- Location
- Across the street from Mickey Mouse in Calif.
- Posts
- 5,320
Thanked: 1185
Reliable knots bought here ---> https://thegoldennib.com/index.php?m...3a2298fc926de3
I pinch the knot in a vise untill it cracks, turn and repeat. turn and repeat until it falls out. Learned it from Glen. :<0)Chevhead likes this.Good judgment comes from experience, and experience....well that comes from poor judgment.
-
The Following User Says Thank You to 10Pups For This Useful Post:
RADisorder (12-14-2013)
-
12-14-2013, 12:25 AM #3Senior Member
- Join Date
- Apr 2013
- Location
- Houston, TX
- Posts
- 199
Thanked: 28
Sounds like a great tip. No vise here but have vise-grips that should do the same sort of thing. Originally Posted by 10Pups

-
12-14-2013, 01:52 AM #4At this point in time...


- Join Date
- Jun 2007
- Location
- North Idaho Redoubt
- Posts
- 27,068
- Blog Entries
- 1
Thanked: 13249
Moved this over into the Brushmakers Alcove so you get even more advice have fun on the restore
-
The Following User Says Thank You to gssixgun For This Useful Post:
RADisorder (12-14-2013)
-
12-14-2013, 01:54 AM #5At this point in time...
- Join Date
- Jun 2007
- Location
- North Idaho Redoubt
- Posts
- 27,068
- Blog Entries
- 1
Thanked: 13249
And I learned it from a Total Newb on here a few years back, funny as heck he had no idea what he was doing, but it worked and he took pics because he thought he broke it Originally Posted by 10Pups

Sure works easy when it works,,, No bristles all over the shop from cutting them down and drilling it out Chevhead likes this.
-
12-14-2013, 03:01 AM #6Senior Member
- Join Date
- Apr 2013
- Location
- Houston, TX
- Posts
- 199
Thanked: 28
Thanks for showing me the brush subforum. I really enjoyed looking through the razor forging/restore subforums in the past and this looks like the equivalent. And, glad you are still keeping busy here as well, doing your good work. Originally Posted by gssixgun
Can't find my vise grips atm and the channel locks aren't quite cutting it (although I am getting some of the cracking sound from the glue breaking). Will resume my brush quest in the near future.
After I get the knot out, my next step will be to buy the right sized knot. I do have some calipers to help with the measurement.gssixgun likes this.
-
12-14-2013, 09:10 PM #7Senior Member
- Join Date
- Apr 2013
- Location
- Houston, TX
- Posts
- 199
Thanked: 28
I tried twisting the knot loose, but it turns out the cracking I heard was the hairs and not glue. This is where I'm at and will now have to drill out somehow:
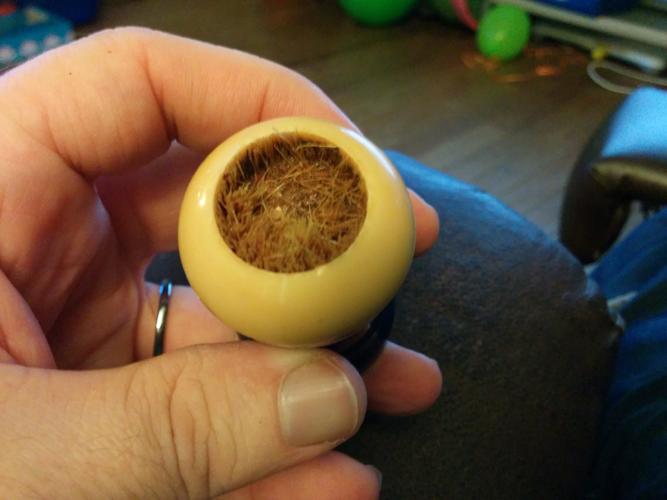
edit: Now, I've cleaned out the inside with a dremel and measured. It's about 7mm deep and 20mm diameter. I understand the insides of these are hollow? That's what it feels like. I'll probably drill out the top part and fill with epoxy.
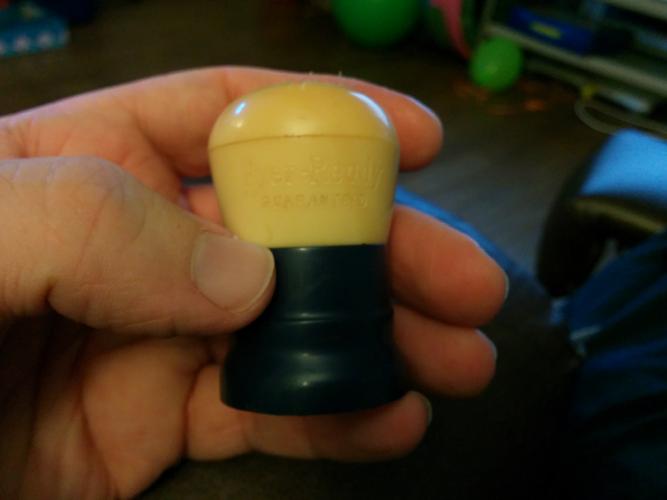
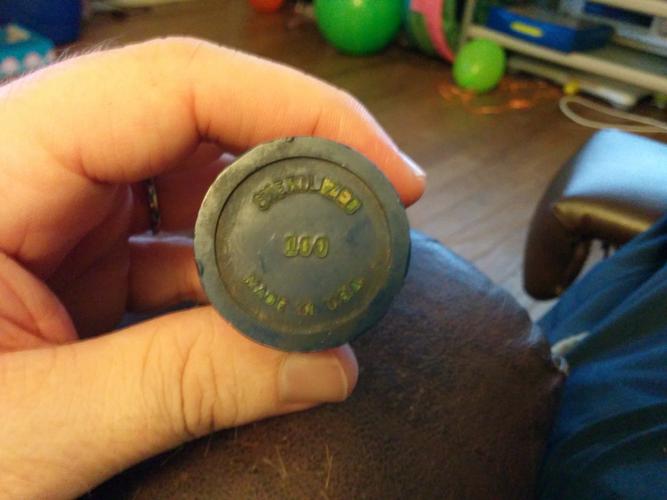
Polished it up with some blue magic and it looks cleaner - but can't get the dirt out of the lettering on the bottom yet. Any tricks to getting in those tiny grooves? Just using a microfiber cloth atm.Last edited by RADisorder; 12-15-2013 at 01:20 AM.
-
12-15-2013, 01:33 AM #8Senior Member
- Join Date
- Apr 2013
- Location
- Houston, TX
- Posts
- 199
Thanked: 28
Now that I've got it cleaned out and know it's about 7mm deep and 20mm diameter, I found this knot: 20mm Silvertip Grade A [20-STA] - $27.95 : Fountain Pen parts - NIBS, - Wholesale Fountain Pen Ink - Golden Nib AZ Originally Posted by 10Pups
Do you know how thick that glue part of the knot it? I've only owned a few brushes, so don't know much about how deep I should set the knot.
-
12-15-2013, 02:22 AM #9At this point in time...
- Join Date
- Jun 2007
- Location
- North Idaho Redoubt
- Posts
- 27,068
- Blog Entries
- 1
Thanked: 13249
Originally Posted by RADisorder
Oy Vey here it comes now LOL
This is one of those things that has many opinions,, You adjust the depth by drilling deeper or not, you have to drill deep enough to at least bury the plug. after that you have to adjust for effect..
The deeper you set the plug the lower you set the loft the lower the loft the stiffer then feel of the bristles... and that is where it switches to YMMV
Sorry
-
12-15-2013, 02:43 AM #10Senior Member
- Join Date
- Apr 2013
- Location
- Houston, TX
- Posts
- 199
Thanked: 28
Originally Posted by gssixgun
Yes, I've heard it before and seen the particular camps opine when it comes to preferences of face/bowl lathering and the backbone of the brush, softness, etc. I'm not sure I'm as picky as some yet - so was thinking I might get away without breaking that shelf on top and needing to fill the whole hollow inside with epoxy. Probably will have to, since that glue part of the knot is probably bigger than 7mm, but I'll just order it and figure out the next step when it gets here.
This is fun though. Bought my first "dremel" type tool today. It's a Chicago Electric I got at harbor freight for 16 bucks with a coupon. Speeds are fully adjustable and it made easy work of cleaning out the inside so far.


 Reply With Quote