
Results 61 to 70 of 189
 399Likes
Thread: Troll brush
 LinkBack URL
 About LinkBacks
-
10-07-2014, 12:12 PM #61Senior Member


- Join Date
- Jan 2014
- Location
- Brisbane, Australia
- Posts
- 673
Thanked: 79
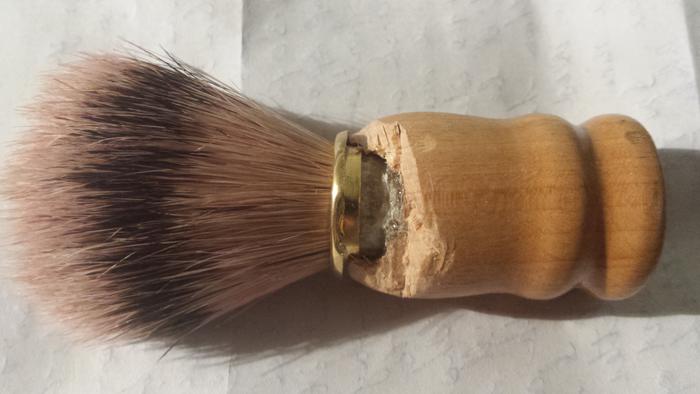
How are you going to mount the knot with the non-circular opening in the head when the hair is removed? are you going to squish/reshape the base of the knot to fit the head hole, or fill the head hole and leave a circular knot base?
If it were me, I'd wait until Pixelfixed posts his next comment, and do exactly that... I find it quite surreal that whenever he posts a comment or opinion re brush making, it exactly echoes what I would have done, he just beats me to posting every time It's nice to be important, but more important to be nice
-
10-07-2014, 12:14 PM #62Senior Member
- Join Date
- Jan 2014
- Location
- Brisbane, Australia
- Posts
- 673
Thanked: 79
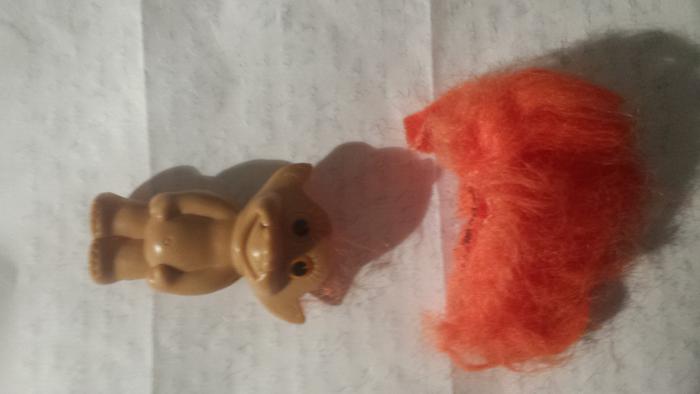
Now take that hair, glue it to a short piece of dowel and list on ebay so we can add it to the wall of shame Originally Posted by edhewitt

 It's nice to be important, but more important to be nice
-
10-07-2014, 12:22 PM #63
The knot will leave a gap around the two oval edges, i was just going to fill them with epoxy, i may even glue in a bit of troll hair
This is the knot removal so far - using a Stanley knife.
 HARRYWALLY likes this.Bread and water can so easily become tea and toast
-
10-07-2014, 03:18 PM #64
 right I can go no further until I get a hacksaw blade tomorrow. I think the knot will sit well in trollio's head, i just need some advice about filling the gap, i should have plenty of epoxy (2 of the syringes I showed earlier) if they will work. Is it best to glue the knot in and fill around it, or put loads of epoxy in and jam the knot in?
Geezer likes this.Bread and water can so easily become tea and toast
right I can go no further until I get a hacksaw blade tomorrow. I think the knot will sit well in trollio's head, i just need some advice about filling the gap, i should have plenty of epoxy (2 of the syringes I showed earlier) if they will work. Is it best to glue the knot in and fill around it, or put loads of epoxy in and jam the knot in?
Geezer likes this.Bread and water can so easily become tea and toast
-
10-07-2014, 03:25 PM #65
Thanks Ed! I like the weirdness of your project and posts!
Please keep them coming!
~RichardBe yourself; everyone else is already taken.
- Oscar Wilde
-
10-07-2014, 06:22 PM #66Razor Vulture


- Join Date
- Oct 2010
- Location
- Lone Star State
- Posts
- 26,121
Thanked: 8612
Have you considered leaving the brass ring, filling the troll with sand or something up till close to the top and adding epoxy, stick the knot in? What does the top of the bald troll look like?
"Don't be stubborn. You are missing out."
I rest my case.
-
10-07-2014, 06:27 PM #67Senior Member

- Join Date
- Jan 2011
- Location
- Roseville,Kali
- Posts
- 10,432
Thanked: 2027
If you need to fill it, use plaster of paris,Is Cheap, sets up like concreat in an hr and will be a perfect base for the knot I think
sharptonn and HARRYWALLY like this.CAUTION
Dangerous within 1 Mile
-
10-07-2014, 09:32 PM #68
First up, thanks Richard (I think
).
Sorry, I didn't get around to taking a photo but the head is effectively a cup, the neck is sealed, then the rest of the body cavity is accessed through the feet.
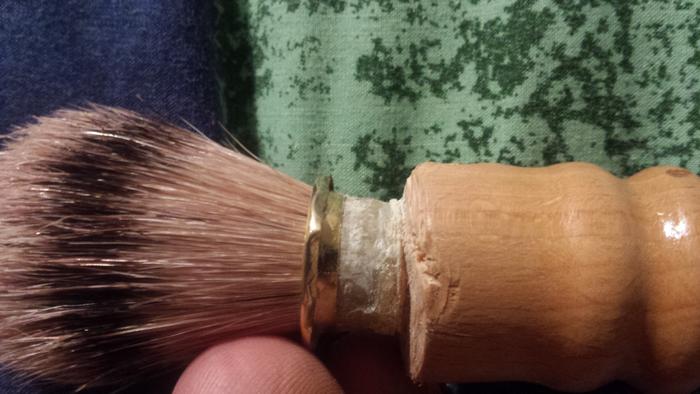
The brass ring looks a bit sorry for itself, it is quite thin and has suffered somewhat from where I used it as a stop for the Stanley knife. I think i can probably straighten it out though. It isn't nicked, just dented.
The head looks about the right depth for setting the knot, so i just need to put some epoxy in to fix it then fill around the knot until the head is level ( I think). As for filling the rest of the body I will have to see what I can find laying around at work.
Thanks for all of the input so far guys, I look forward to presenting the finished product in a day or so.Bread and water can so easily become tea and toast
-
10-07-2014, 09:42 PM #69Senior Member

- Join Date
- Oct 2010
- Location
- 50 miles west of randydance
- Posts
- 9,675
Thanked: 1354
The hole in the top of the head doesn't appear to be round. How about taking a piece of plexiglass or something similar 1/8 inch thick or so and shaping it in the shape of the hole in the head. Then drilling a hole the size of the knot in it. Maybe drill it before shaping... Insert and glue the knot into that. Leave the brass ring if salvageable??? Fill the hole with your best guess of the proper amount of epoxy and glue the whole assembly in. Just typing the thoughts as they pass through my mind. You are welcome to borrow all or none!

P.S. I would use a little less epoxy than I thought would be needed as it would be easier to trim the rubber of the doll that stuck up than to fix an overflow of the glueedhewitt likes this.
-
The Following User Says Thank You to 32t For This Useful Post:
edhewitt (10-07-2014)
-
10-07-2014, 10:18 PM #70I love Burls....... and Acrylic

- Join Date
- Mar 2012
- Location
- Baden, Ontario
- Posts
- 5,475
Thanked: 2284
Another idea would be to fill the hole with the epoxy first, let that cure, then drill the appropriate size hole.
 UKRob likes this.Burls, Girls, and all things that Swirl....


 Reply With Quote


