Results 11 to 20 of 26
Thread: Transplant in Progress
-
01-19-2015, 01:22 PM #11

Will you sand out the exterior and refinish or leave as is?
Is the handle wood or something else?If you don't care where you are, you are not lost.
-
01-19-2015, 07:37 PM #12
-
The Following User Says Thank You to SRNewb For This Useful Post:
rolodave (01-20-2015)
-
01-19-2015, 09:37 PM #13

Speaking of the handle, I sanded it a bit today. About an hour's work.
I started with 800 grit, since the handle was in good shape, and there were no deep scratches to deal with. That took care of the little marks made by the forstner bit. I followed that with 2000, which was the next grit up that I had available. By hand, basically just wrapped the sandpaper around the handle and turned it with my other hand.I think it looks good, and is ready for polishing out. I suspect that the opening will need to be adjusted a bit to fit the knot I choose for it. They should be here tomorrow or the next day. According to USPS tracking my knots have made it to Dulles, which is the local hub for us. Usually when it reaches there, I will see the package the following day. So I am expecting it tomorrow, but it could take another day in transit. I will not do a final buff and polish until after the handle is fitted properly to the knot.Mike
-
01-19-2015, 10:04 PM #14

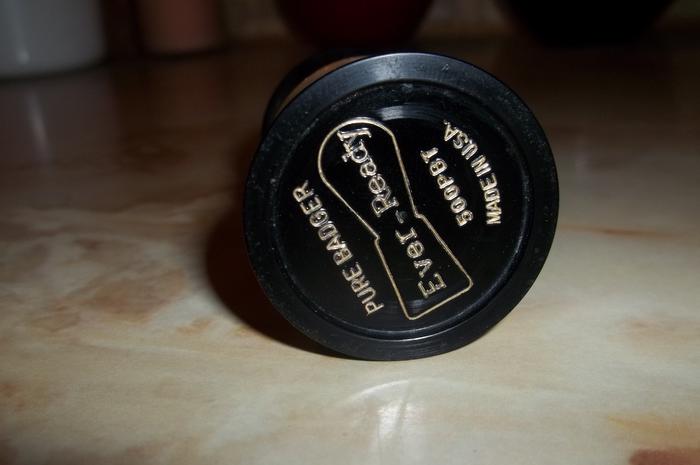
Handle was in such good shape that the raised lettering on the bottom still have the original gold paint intact. Glad I don't have to figure out how to repaint them. I see a lot of posts on how to repaint engraved lettering, but not one I can find about raised letters.
 Mike
Mike
-
01-20-2015, 03:27 AM #15

Put your paint on a wooden dowel & roll it across ,,,

-
01-20-2015, 03:35 AM #16
-
01-20-2015, 07:23 PM #17

Package arrived.
18mm Finest F2 on the left, 20mm Finest on the right. These knots were listed as 18mmx60mm and 20mmx60mm, respectively. They are actually 65mm loft. Guess they are what was in stock. I'm actually pleased with this, as it gives me a bit more play concerning loft. As a bowl latherer, I think I will prefer a higher loft.
The 18mm fits the handle nicely, giving a loft of 55mm if I just set it in the hole and let it settle where it wants to.
I know this is not a perfect test, but if I hold the brush in my hand and press the knot to my face, it feels like even at 55mm loft there is a bit more backbone than I might want. So I think I will set this knot at 55mm, thinking that as the knot blooms and splays a bit, it will relax a bit more, and I will be close to what I think I want for this brush.
I have a modern acrylic handle with a 20mm opening, and t he 20mm Finest sits in that opening perfectly, giving a loft of 57mm, which feels like that is going to be just about right as well. Still contemplating whether to set that knot, or save the 20mm and go looking for another vintage handle. Will probably go ahead and set it. If I find another vintage handle, well, you know.
Mike
-
01-20-2015, 08:46 PM #18

Slight change. I enlarged the hole so that I can get it to a 52mm loft. I know, just 3mm probably won't matter, but I want a bit lower loft, just don't want to go too low. Used a rotary rasp. Also polished the handle out. Came out great, I think.
The piece of 1/2" dowel you see to the right will be used for filler. By my measurements, if I create a shelf that ends up being just at the bottom of where the shelf used to be, I will be set for a 52mm loft.Mike
-
01-20-2015, 10:10 PM #19

I used masking tape around the opening, and filled the handle about a third full of epoxy, and mixed that in the handle for about one minute. Then I chucked a couple of dimes in, and followed that with the piece of dowel for filler.
I then mixed a good bit of epoxy up, and drizzled it in around the filler piece until I had the level I wanted. Then it was a simple matter to put a bit of epoxy on the knot, and set it.
Transplant successful. Patient is now in recovery.
Final loft is exactly 52mm. Once again, 18mm Finest F2.
I used Devcon 5 minute epoxy. The handle is no longer hot, but 5 minutes or not, that is a truckload of epoxy in the handle, even with filler. So I will wait until the evening shave before I use this brush. Will put up a post bloom photo, and post my thoughts, following that shave. Thanks for looking.Mike
-
01-21-2015, 04:57 AM #20


 32Likes
 LinkBack URL
 About LinkBacks


 Reply With Quote


