
Results 11 to 20 of 35
 85Likes
 LinkBack URL
 About LinkBacks
-
04-03-2017, 12:38 AM #11Senior Member


- Join Date
- Jun 2016
- Location
- NH
- Posts
- 1,924
Thanked: 1363
Sometimes stuff from China comes pretty quickly and sometimes not so much. I think it depends on when your item goes into the big shipping container. If it's one of the first items in, you'll have to wait until they (and whoever else is using that container) get enough orders to fill it before it ships. If your item is one of the last ones into the container then you don't have to wait as long. ... I think.
"Go easy"
-
The Following User Says Thank You to xiaotuzi For This Useful Post:
Demetrius (04-03-2017)
-
04-03-2017, 10:07 AM #12I love Burls....... and Acrylic


- Join Date
- Mar 2012
- Location
- Baden, Ontario
- Posts
- 5,475
Thanked: 2284
Looks like you did well with the wet sanding. I'm thinking your going to have a great brush in the end!
ejmolitor37 and Demetrius like this.Burls, Girls, and all things that Swirl....
-
The Following User Says Thank You to HARRYWALLY For This Useful Post:
Demetrius (04-04-2017)
-
04-03-2017, 10:13 AM #13I love Burls....... and Acrylic
- Join Date
- Mar 2012
- Location
- Baden, Ontario
- Posts
- 5,475
Thanked: 2284
Sounds like a good plan. I did couple restores not too long ago, and the one handle was hollow. It was a tiny handle, I believe I put a 16mm knot in that one. The handle was very light. I used plain old auto fiberglass resin to fill the handle up to where I needed the knot to sit at. Let it cure a couple days and then epoxied in the knot. Gave the handle some nice weight and worked well. Originally Posted by Demetrius
 ejmolitor37 and xiaotuzi like this.Burls, Girls, and all things that Swirl....
-
The Following 3 Users Say Thank You to HARRYWALLY For This Useful Post:
Demetrius (04-03-2017), ejmolitor37 (04-04-2017), xiaotuzi (04-04-2017)
-
04-04-2017, 05:34 PM #14Senior Member


- Join Date
- Oct 2015
- Location
- Knoxville,IA
- Posts
- 2,368
Thanked: 762
Great job and I will be following this, I have an ever ready that I need to re knot, I have the wet sanding done so maybe I can learn along with you
 You did a fine job on the sanding and polishing so far
Nothing is fool proof, to a sufficiently talented fool...
You did a fine job on the sanding and polishing so far
Nothing is fool proof, to a sufficiently talented fool...
-
The Following User Says Thank You to ejmolitor37 For This Useful Post:
Demetrius (04-04-2017)
-
04-04-2017, 11:17 PM #15Senior Member

- Join Date
- Mar 2016
- Location
- Denver, CO
- Posts
- 1,031
Thanked: 105
As of last night, the knot was in Yiwu, China. I think that's outside of Shanghai, but my Chinese geography is not too good.

 When the knot arrives, I'll be back.
-
04-08-2017, 03:43 PM #16Senior Member
- Join Date
- Sep 2010
- Posts
- 2,169
Thanked: 220
Nice work! Please post pictures of the finished brush, I'm sure it will be great.
-
04-20-2017, 12:35 AM #17Senior Member
- Join Date
- Mar 2016
- Location
- Denver, CO
- Posts
- 1,031
Thanked: 105
The knot arrived from VS in China yesterday. It seems to fit perfectly so I plan to set it with epoxy this weekend. Any suggestions on a particular epoxy to use? Also, how long should I let it set before using?
-Doug
-
04-20-2017, 12:37 AM #18I love Burls....... and Acrylic
- Join Date
- Mar 2012
- Location
- Baden, Ontario
- Posts
- 5,475
Thanked: 2284
Naaah. Just use a good 2 part epoxy, and once you set it, leave it and don't touch.
Sent from my LG-K121 using TapatalkBurls, Girls, and all things that Swirl....
-
The Following User Says Thank You to HARRYWALLY For This Useful Post:
Demetrius (04-20-2017)
-
04-20-2017, 12:56 AM #19Senior Member
- Join Date
- Jun 2016
- Location
- NH
- Posts
- 1,924
Thanked: 1363
Cool that the knot came! You'll be able to use that brush before you know it.
"Go easy"
-
04-21-2017, 08:49 PM #20Senior Member
- Join Date
- Mar 2016
- Location
- Denver, CO
- Posts
- 1,031
Thanked: 105
It's been a busy couple of days at work so I haven't been able to get out and buy some epoxy. The stuff I had is pretty old, so I plan to go to Lowe's in the morning and pick up some fresh stuff. In the meantime, here's a pic of the knot and handle, pre-glue:
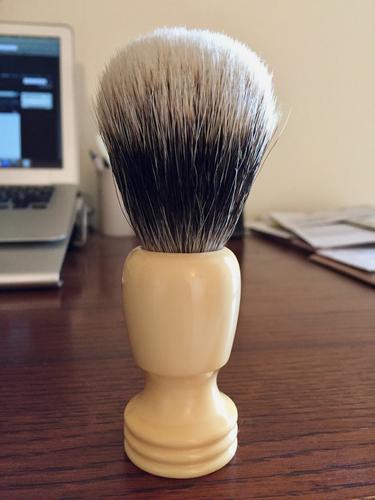
I'm a face latherer and I think this will work really nicely!-Doug


 Reply With Quote