
Results 1 to 10 of 18
 51Likes
Thread: Stocking Up on Wood Blanks
 LinkBack URL
 About LinkBacks
Hybrid View
-
07-15-2020, 08:56 PM #1Senior Member


- Join Date
- May 2010
- Location
- Upstate South Carolina
- Posts
- 3,308
Thanked: 987 Stocking Up on Wood Blanks
So Cook Woods had a sale (famous last words). I couldn't resist stocking up on some tropical hardwoods. My rough plan is to make razor scale blanks off of one half of the 2x2x12 blanks, and turn brushes off the other half, and hopefully end up with some matched sets.
From left to right: Black and White Ebony, Bhilwara, Bocote and Bolivian Rosewood.
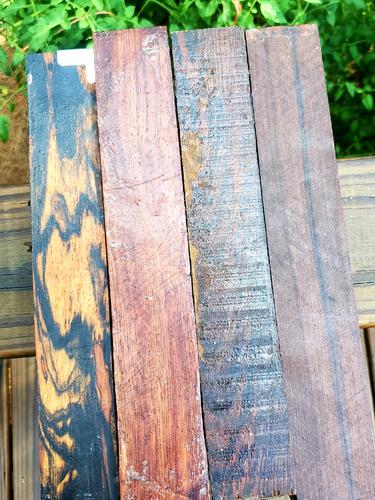
I've been drooling over their B/W Ebony especially for a long time. I may try to see what I can spin from it this evening. Once I have some scraps for stacking, I have seen some brushes with contrasting rosewood/cocobolo/bocote with various ebonies that are just stunning-I look forward to trying that too.
Speaking of stacking, do you turners just cut and square up your pieces, and then epoxy them together?Last edited by ScoutHikerDad; 07-15-2020 at 09:01 PM.
There are many roads to sharp.
-
07-16-2020, 12:18 AM #2Senior Member
- Join Date
- May 2010
- Location
- Upstate South Carolina
- Posts
- 3,308
Thanked: 987
One of my guiding philosophies in life is, if I fear something, I do it so that I have one less thing to fear. With that in mind, I threw caution to the wind and centered/chucked up a chunk of that ebony with a rough design in mind (knowing that the sensible thing to do would have been to practice on a few more pieces of poplar, but where's the fun in that?). Funny how that redheart was soft as butter, whereas this ebony is much harder and higher on the Janka scale (especially the black parts are much harder, which makes it kind of tricky). Nevertheless, I got it round pretty easily.Drilling out the recess took a minute-I kept having to stop and let things cool. I'll probably have to sharpen that bit tomorrow.
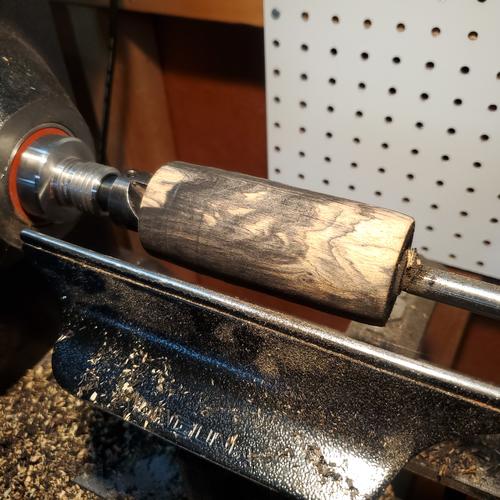
Taking a break while I re-sharpen my tools and stew on it a bit. I'm quickly finding that the Holy Grail of turning skills for me right now is chasing those blasted lines out of my coves especially. I'm hoping that my all-day class in a couple of weeks will help with that. I may go back to it tonight, or maybe sleep on it.
As you can see, it's wanting to chip where the black runs out. That white part under it is soft as particle boards, I swear. Maybe I should have tried pure black ebony instead. Oh, well, I'll fix it in the morning (I hope).
I'll post the finished piece if I don't screw it up.Last edited by ScoutHikerDad; 07-16-2020 at 01:00 AM.
There are many roads to sharp.
-
07-16-2020, 12:50 AM #3Skeptical Member


- Join Date
- Nov 2016
- Location
- Colorado Springs
- Posts
- 10,554
Thanked: 2195
Your pics didnt post up Aaron.
It's just Sharpening, right?
Jerry...
-
07-16-2020, 12:59 AM #4Senior Member
- Join Date
- May 2010
- Location
- Upstate South Carolina
- Posts
- 3,308
Thanked: 987
I fixed it-at least they show up on my end.
Gasman likes this.There are many roads to sharp.
-
07-16-2020, 01:48 AM #5Senior Member

- Join Date
- Dec 2018
- Location
- Gainesville, FL
- Posts
- 6,688
Thanked: 675
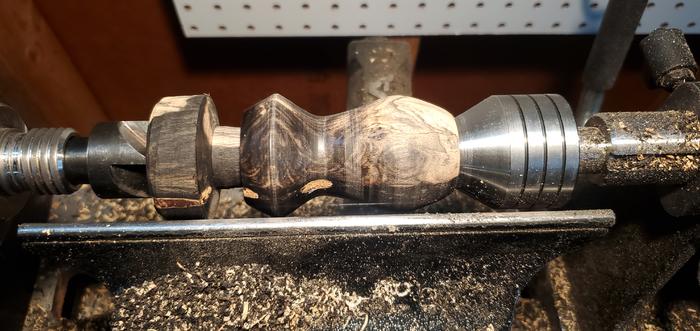
Yep, they're showing now. Beautiful angles to that piece
Iron by iron is sharpened, And a man sharpens the face of his friend. PR 27:17
-
07-16-2020, 08:13 AM #6www.edge-dynamics.com

- Join Date
- Feb 2013
- Location
- London
- Posts
- 3,066
Thanked: 512
Looks good..Maybe you can fill the chipped parts when finished ?
-
09-25-2020, 05:46 PM #7Member
- Join Date
- May 2010
- Location
- New York
- Posts
- 94
Thanked: 9
I love how this one came out, that's a gorgeous piece of wood!
Have what might be a stupid question, but, here goes...
Is that a pic of you drilling with a forstner bit while the other end is only on a live center?
I'm not sure I've ever seen that done. I get things round between centers, but then put the base in a chuck before i bore anything out. Originally Posted by ScoutHikerDad

Regarding the stabilizing, i have only a little experience with that myself, but I would think perhaps in a word like this the resin would mostly soak into the light wood, and kind of balance out the two densities... Maybe?
-
09-27-2020, 06:29 PM #8Senior Member
- Join Date
- May 2010
- Location
- Upstate South Carolina
- Posts
- 3,308
Thanked: 987
Kavik-You are partly correct. The left side is on a spur-drive center, not a live center (though I had a hard time getting the spurs to drive deep enough to drive reliably in such hard wood). Though I haven't done enough shaving brushes yet to have firm procedures that I always do (I'm still learning, in other words), for my first few I did that way: the left side on a spur drive, and the right being drilled with a forstner bit on a chuck after rounding on the live center. Originally Posted by Kavik79
Now that I have a couple of different size jaw sets for my Nova G3 chuck (20mm and 50mm), I have been chucking them into the jaws to drive and hold the piece, especially on that super-hard desert ironwood brush I recently turned-there's a reason they call it ironwood lol!. No way was I going to get a spur drive to dig into that. I then used a parting tool to square and clean up most of the bottom before sawing off the last little nub, then finishing the bottom by hand.

I'm sure there's a better way; I just haven't figured it out yet. In other news, I am now turning pens from both DI and the other tool-killer, Lignum Vitae. Both finish beautifully, but take about twice as long to process a piece as softer woods.There are many roads to sharp.
-
09-27-2020, 06:49 PM #9'with that said'

- Join Date
- Aug 2010
- Location
- Walla Walla in WA State USA
- Posts
- 11,254
Thanked: 4238
Things are looking good A. Aron.
I would presume that the drill press is working well especially for the pens ScoutHikerDad likes this.Our house is as Neil left it- an Aladdins cave of 'stuff'.
Kim X
-
The Following User Says Thank You to cudarunner For This Useful Post:
ScoutHikerDad (10-04-2020)
-
09-28-2020, 12:52 AM #10Member
- Join Date
- May 2010
- Location
- New York
- Posts
- 94
Thanked: 9
I'm certainly far from an expert myself, but i like the idea of chucking before boring MUCH better. In my mind it seems way more secure, safer, and better guaranteed to be centered.
You sure do make some bold choices in materials for someone still figuring things out... I like it lol
 ScoutHikerDad likes this.
-
The Following User Says Thank You to Kavik79 For This Useful Post:
ScoutHikerDad (10-04-2020)


 Reply With Quote