
Results 1 to 10 of 12
 11Likes
 LinkBack URL
 About LinkBacks
-
08-13-2013, 06:46 PM #1Junior Member


- Join Date
- Feb 2013
- Location
- Charleston, SC
- Posts
- 26
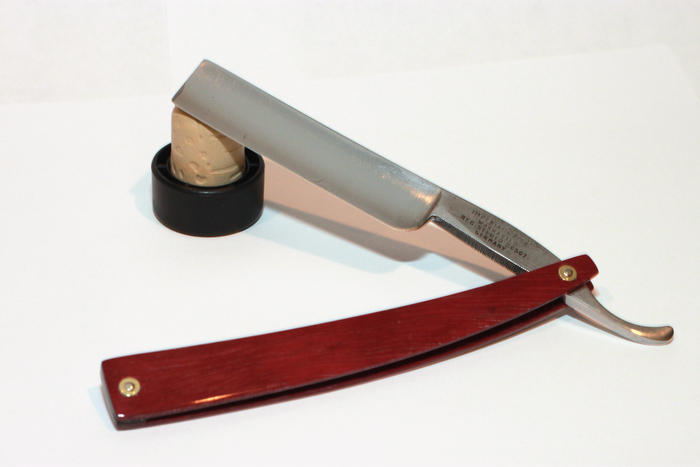
Thanked: 5 5/8 Imperial Razor in Purple Heart
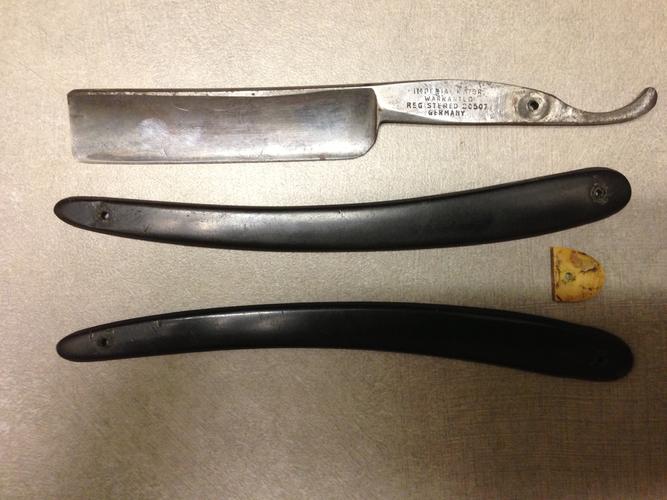
So, this was one of three blades that I purchased on Ebay, each for under 12 dollars (this was my goal). It is an Imperial Razor, a definite 5/8 to the top of the hollow, hollow ground, with "Registered 20507" on the tang. The blade had been finished once before, I found out as I was sanding it down: close to the bevel, I could see what appeared to be the bottom two bicycle wheels. After further research, I have discovered that those are actually the wheels of a 1900's Model Ford, and the engraving had been long gone before I started working. What little I can find on this blade indicates that it dates between 1900 and 1938; however, most of the "car" Imperials are New York-Germany marked whereas this is simply marked with Germany.
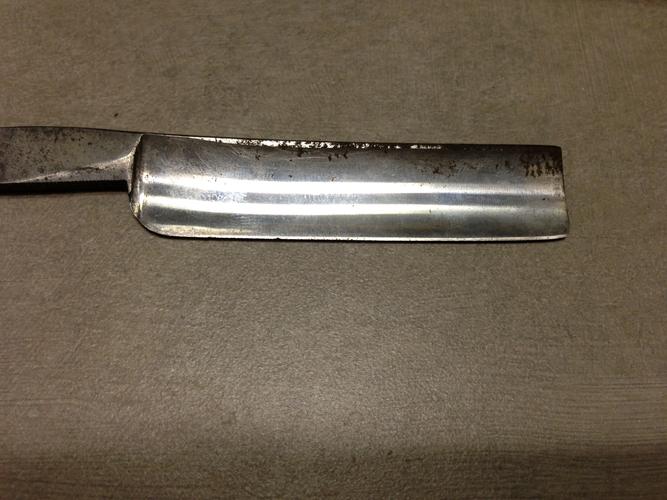
I didn't take it to a mirror finish, so you can still see some of the work marks on the blade. (To be honest, looking at it, and the pictures, the pictures catch the light and make them look far worse than they are...meh). The scales are purple heart with a CA finish and the wedge is black horn. The pins are Ni-Ag with brass washers from microfasteners, and the "bearing" washers on the hinge pin are flattened and polished brass washers of the same type. On a side note, I think Dante forgot to mention the special level of hell reserved for trying to polish those damn little washers. I will address that later. This razor was only my third de-pinning and after my attempts broke the scales of the first two, I bought some flush cutters and de-pinned this one successfully. The vulcanized rubber/bakelite scales are still serviceable, if needing a little love, but I have re-scaled the blade anyway (the bakelite scales will be restored and then stored away for later projects). I thought that a more square-themed scale pattern would better balance the profile of the blade; and some colorful wooden scales would class-up the entire assembly.
Before:
After:
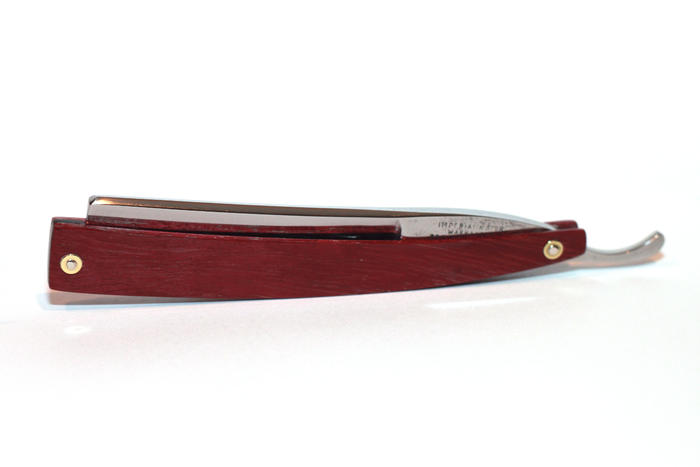
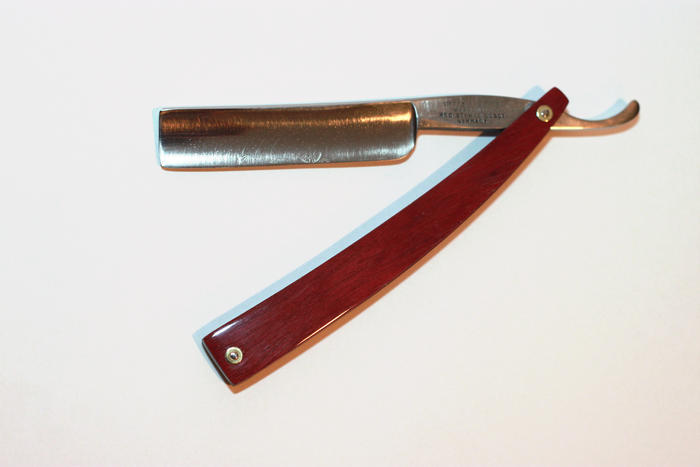
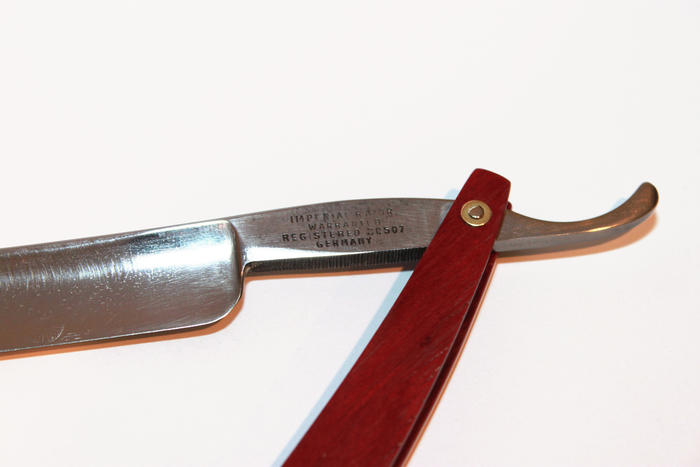
As with any project, there was much learning with this one, most notably with the scales. I learned that CA can be rather finicky, and if you are not careful, it is very easy to sand through the finish or get drips, or runs, or these wierd ribbon-stalagtite-formations. After much trial and error, though, I got a pristine glass-like finish on the scales. I was proud. Then I tried to shape the wedge. So two things here: 1) the thickness of the CA did create slightly rounded edges, which meant the wedge did not fit flush, and despite my efforts to sand down the area in which the wedge would be affixed, the un-flush-ness remained 2) sanding down the wedge to shape blemished the CA finish. On the razor, you can see that the wedge end lost some of its CA luster. The latter can be solved by shaping/fitting the wedge BEFORE applying the CA, but any tips on the first conundrum?
My next question(s?) for the more experienced types. Pins and washers. First of all, I cannot figure out how you get the nice, perfectly round peans on the pin. I'm still new at this, and I am sure I will gain finesse with experience, but my pin heads always end up just slightly lopsided. Functional, but lopsided. Second, how do ya'll polish the washers and pins. This time, I polished the washers before I pinned up the razor. This was an exercise in extreme patience that rivalled dealing with my 2 year old. However, it worked, and once I pinned up the razor, all I had to worry about was sanding/polishing the pins. This presented its own difficulty, as placing the sand paper on a flat surface rendered flat, not domed, pins; and holding the sandpaper and working on the pins/washers inevitably marred the surface of the CA finish...which I then had to go back and re-polish, hoping that I didn't mar the finish as bad as I did with the wedge, and lose the luster. Anyway, looking for advice on any of those steps! Thanks in advance!"2 from Lead, I can't hear you...you're coming in broken and stupid...."
-
08-13-2013, 07:21 PM #2Senior Member

- Join Date
- Jan 2011
- Location
- Roseville,Kali
- Posts
- 10,432
Thanked: 2027
Punch a hole approx the size of the peened pin in masking tape.cover,than sand.
-
08-13-2013, 10:57 PM #3Senior Member

- Join Date
- May 2012
- Location
- Oxford, Al
- Posts
- 1,605
Thanked: 407
Nice job, love the purpleheart. Getting the perfect peen, I use a small highly polished anvil, and once the peen is "set", I peen some on one side flip it over and peen the other. I keep doing this til I get the approximate shape I like, then keep peening using less and less pressure so you are not tightening the peen, but merely gently hammering the dimples out of the dome shape. It takes a WHILE to do it that way, but I would rather do that than put tape over a fresh finish, or try and sand them smooth while trying not to destroy my finish at the same time.
Mastering implies there is nothing more for you to learn of something... I prefer proficient enough to not totally screw it up.
-
The Following User Says Thank You to tiddle For This Useful Post:
Kalloran (08-20-2013)
-
08-14-2013, 02:34 AM #4
Shaved with my Imperial today. You will certainly enjoy using your beauty. Well done.
If you don't care where you are, you are not lost.
-
08-14-2013, 04:21 AM #5The Great & Powerful Oz


- Join Date
- May 2008
- Location
- Bodalla, NSW
- Posts
- 15,634
Thanked: 3751
 Originally Posted by Kalloran

It's really just a matter of hitting the pins lightly & evenly. All peens are multifaceted not round but if you start with a fairly square cut pin & peen evenly you will get the basic shape you want. The facets can be removed by buffing with a dremel or 2" buff. Personally I like the jewelled look the facets give.
Nice shavers those Imperials. I did one a while back but forced a patina on it to blend some pits & staining. It had the New York stamp.
http://straightrazorpalace.com/custo...8-w-kauri.htmlThe white gleam of swords, not the black ink of books, clears doubts and uncertainties and bleak outlooks.
-
The Following User Says Thank You to onimaru55 For This Useful Post:
Kalloran (08-20-2013)
-
08-14-2013, 04:35 AM #6Senior Member
- Join Date
- Jan 2011
- Location
- Roseville,Kali
- Posts
- 10,432
Thanked: 2027
If you use one or two layers of tape,than use foam padded Micromesh starting at about 600 grit,you will get on nickel pins the perfect finish.
No dings at all.
-
-
08-15-2013, 09:05 AM #7Member

- Join Date
- Apr 2011
- Location
- Brisbane, Australia
- Posts
- 1,434
Thanked: 642
Nicely done. Looks great.
My first rescale was in Purple Heart and I still use it a lot, one of my faves.
As these guys have said, slow and steady with a small polished ball peen. I use a 2oz cross peen and a 4oz ball peen, both polished.
If you get your pens light enough you don't need heaps of polishing.
Stu
-
The Following User Says Thank You to Str8Raz0r For This Useful Post:
Kalloran (08-20-2013)
-
08-15-2013, 03:45 PM #8Senior Member

- Join Date
- Apr 2012
- Location
- Diamond Bar, CA
- Posts
- 6,553
Thanked: 3215
I polish and de-burring my washer prior to pinning by gluing to a coffee stir stick with CA, then cut 4-5 inches off a round bamboo chopstick. Chuck into a drill press and put a dab of metal polish on the tip of the chopstick and buff at a slow speed and light pressure.
To polish the pins first dress the cut with a fine file and polish before pinning by running the end on a buffing wheel. After pinning tape as Pix recommended and polish with another chopstick with a dab of diamond paste or chrome ox and metal polish. Drill a small hole in the end of the chopstick for domed pins.
A piece of wood with 1/8 in hole in it or a ¼ in piece of craft foam will keep the finished razor from dancing on the table & marring your scales.
You can get your pins and washers smooth and gleaming in a few minutes.
Nice work.
-
08-16-2013, 01:20 AM #9The Great & Powerful Oz
- Join Date
- May 2008
- Location
- Bodalla, NSW
- Posts
- 15,634
Thanked: 3751
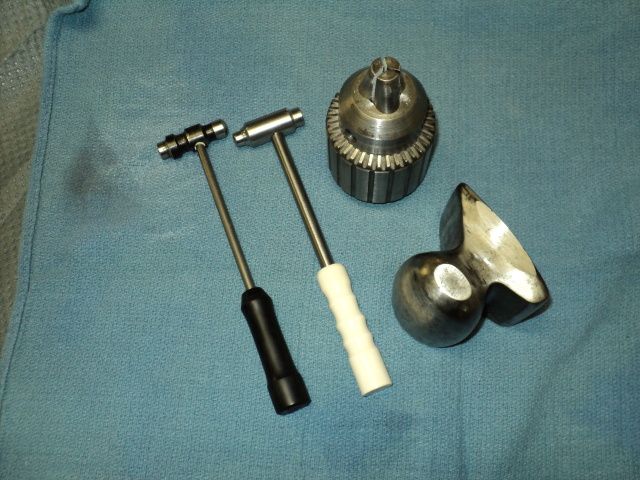
I like Pixel's hammer.
 Euclid440 likes this.The white gleam of swords, not the black ink of books, clears doubts and uncertainties and bleak outlooks.
-
08-16-2013, 01:28 AM #10Senior Member
- Join Date
- Jan 2011
- Location
- Roseville,Kali
- Posts
- 10,432
Thanked: 2027
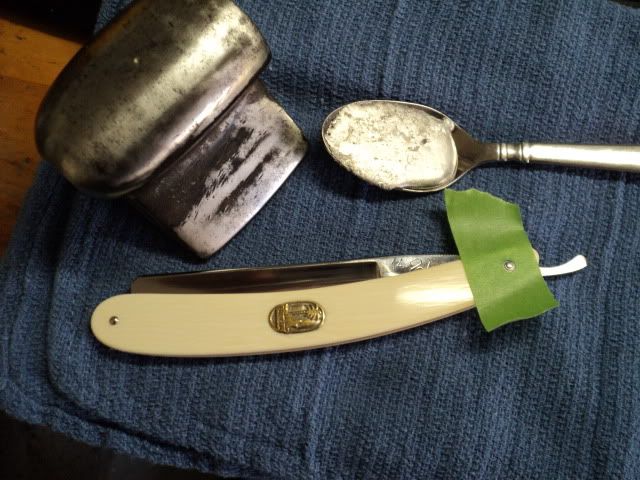
I do have purpose built hammers,But a lead filled spoon works pretty well Originally Posted by onimaru55
 onimaru55 likes this.


 Reply With Quote


